Framework - Bossthemes Framework Opencart
Compatible with: Opencart 1.5.5.X
Framework theme made with www.bossthemes.com.
Theme have many features that Opencart default does not support (session theme features).
Please contact us with email address support@bossthemes.com to be the best support.
Requirements
Framework support for opencart version 1.5.5.1
Get Started
OpenCart is an ecommerce solution based on MVC structure. OpenCart's structure is easier to follow and understand compared to other ecommerce solutions. Opencart is designed feature rich and user friendly. It is great solution if you want to have an online store. This chapter will help us to start customizing OpenCart's theme properly.
We will use Opencart_OpenSource theme - a great free responsive Opencart theme provided by www.bossthemes.com
1. Set up your development workspace step by step.
Install the theme to your existing Opencart project
» Step 1 : Download and upload
Download opensource-theme-package.zip and Extract then copy all the files and folders merge the original files on your project(opencart v_1.5.X.X) from the upload folder.
- Note: Package version must same your project opencart version.
» Step 2 : Settings for opensource theme
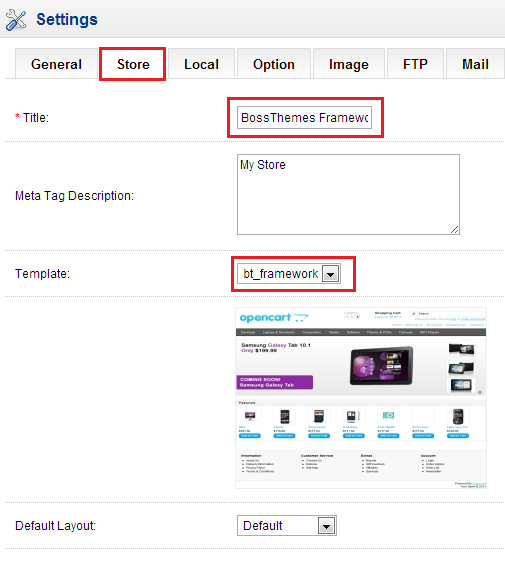
In back end, Go to System > Settings, select Store Name and Edit.
- For more settings, you can read here.
» Step 3 : Install vQmod
Theme is using some modules that need to install the vqmod run correctly. if you use the module that you please take a look at this step, if not you go to the next step
Modules used Vqmod
- Boss - Products by Alphabet
- Boss - Label Products
Install vQmod(if you have not installed vQmod in the your project)
» Step 4 : Install modules
In back end, Go to Extension > Modules, click on the install link the following modules and then edit them.
Modules used in themes
- Boss - Blog Category
- Boss - Blog Recent Comment
- Boss - Blog Recent Post
- Boss - Blog Tag Cloud
- Boss - Products by Alphabet
- Boss - Boss - Category
- Boss - Theme Editor
- Boss - Home Filter Products
- Boss - Label Products
- Boss - Boss Manufacturer
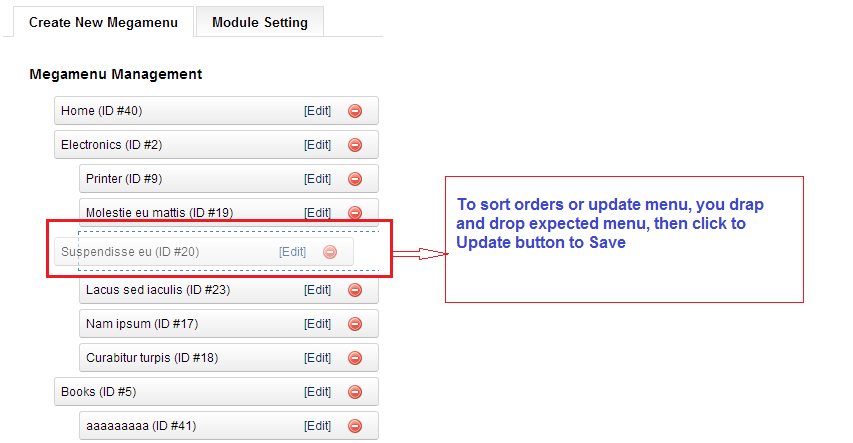
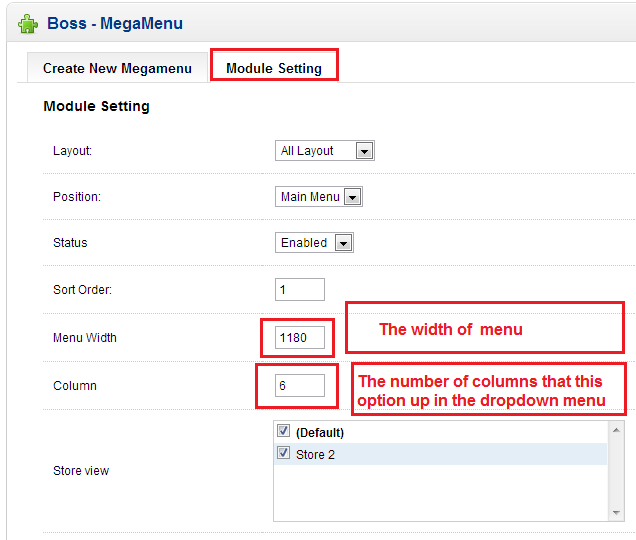
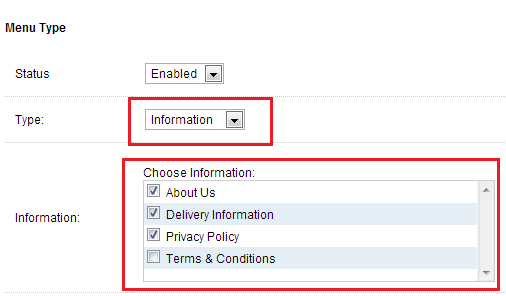
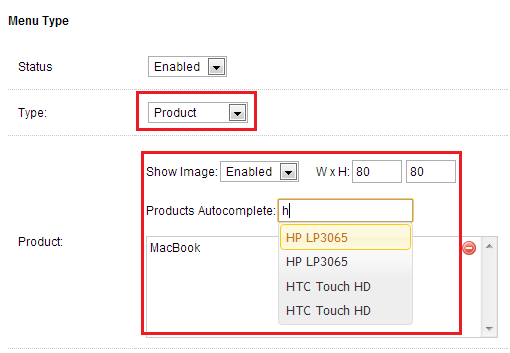
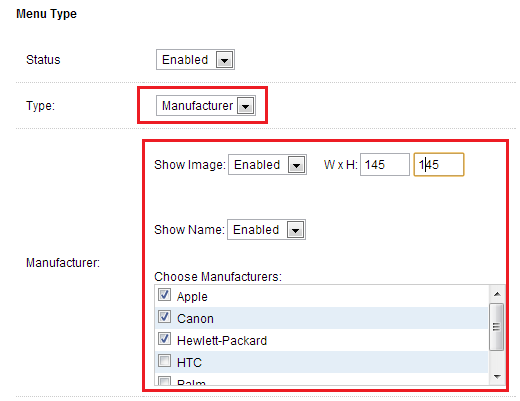
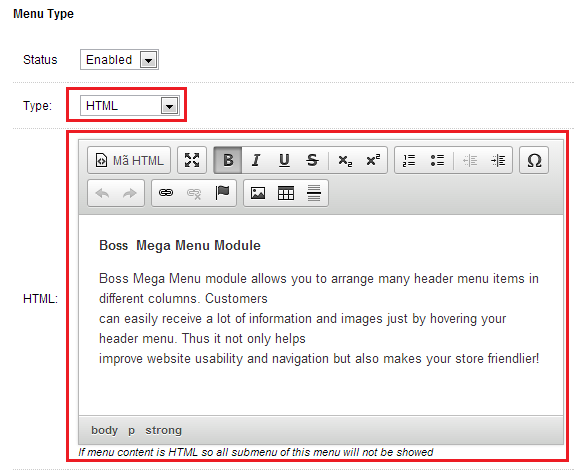
- Boss - MegaMenu
- Boss - Quickshop
- Boss - Revolution Slider
- Boss - Static Block
- Boss - Tag Cloud
- Boss - Zoom
- Boss - Blog
2. Alternatively: setup your workspace using Quick-Start package
Package opensource-full-package.zip
Install opensource-full-package.zip is very quickly with 5 steps below.
» Step 1 : Extract opensource-full-package.zip and upload all the files and folders to your server from the opensource-full-package folder.
» Step 2 : Find sample-database.sql and import the sql file your database.
» Step 3 : On your server, Find boss_reconfig.php, open and configure this file
- $dbhost = "database host name";
- $dbname = "database name";
- $dbuser = "database user";
- $dbpass = "database password";
- $prefix = "";
» Step 4 : Run this file on your web browser
e.g. http://www.example.com/boss_reconfig.php
This script will reconfigure 2 file: config.php and admin/config.php, make sure the folders and files are writable
» Step 5 : Visit the store homepage
e.g. http://www.example.com/
For Linux/Unix, you need chmod 0755 or 0777 for all the files and folders
Admin panel located in http://www.example.com/admin/
username: demo
password: demo123
3. Building Theme from Opencart_OpenSource template
Step 1. Build New Theme
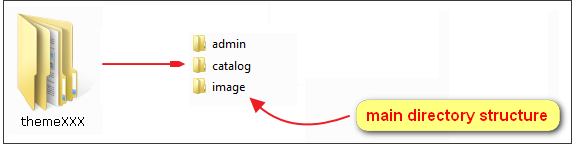
1. Copy bt_framework folder and rename to mytheme on catalog/view/theme/, the folder tree will be like this:
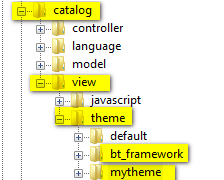
2. Now go to Admin -> System -> Setting - > Edit Store ->Tab Store -> template -> mytheme Refresh your frontpage.
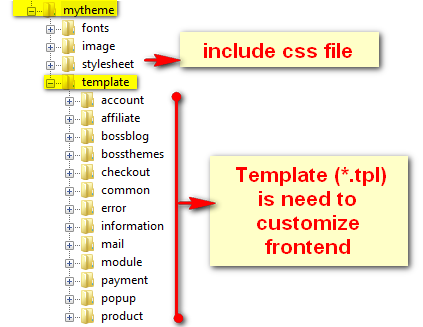
Step 2. Customizing Template
1. Structure of mytheme
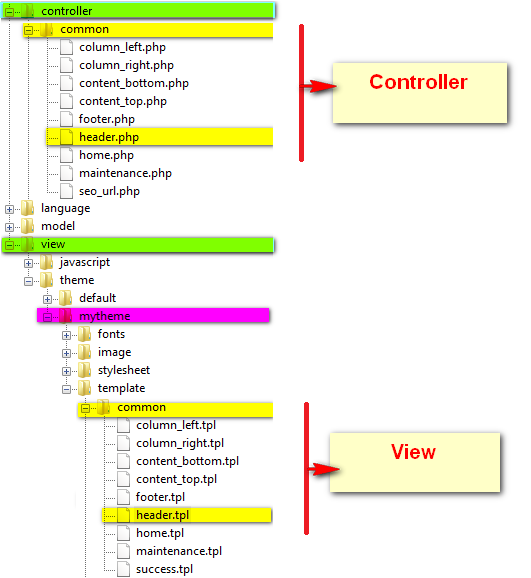
Before build new theme. We must know opencart's MVC
Learn more details please see step Development Guide
4. Packing up your template
Template files structure
You find all file and foldel that content has changed. After that copied to the corresponding folder in template's structure.
3. Editing Content
When you accessing route=product/category url. Opencart call controller/product/product.php. orther page when you accessing route=folder/file, Opencart call controller/folder/file. At each controller you can see file template that is called in controller file.

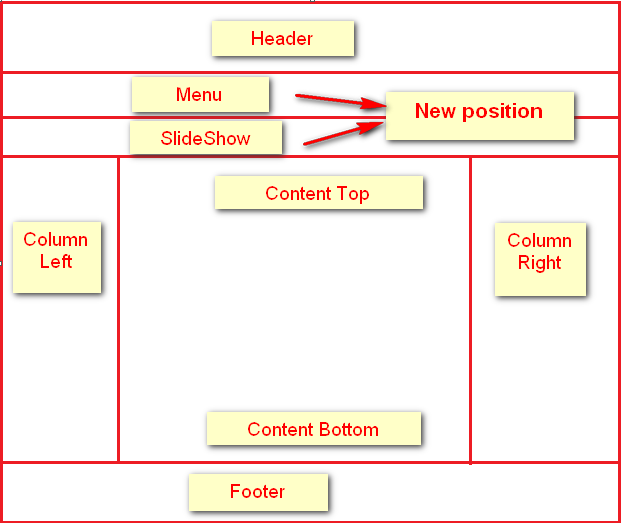
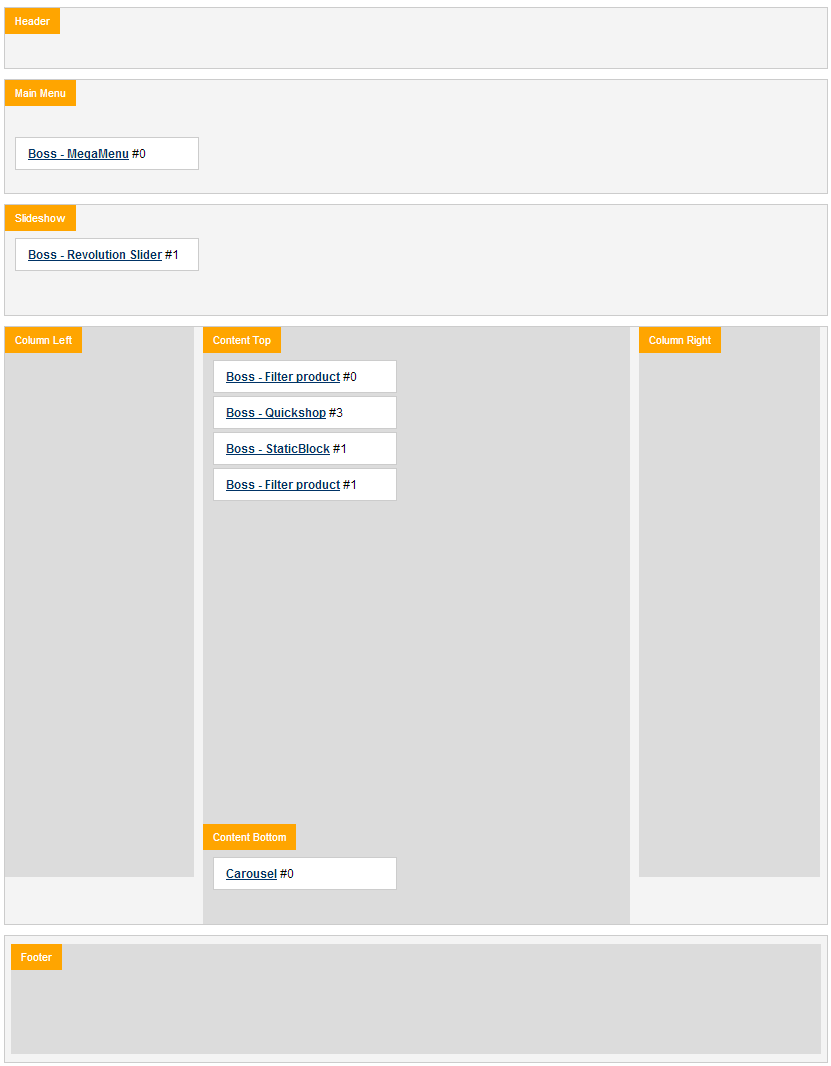
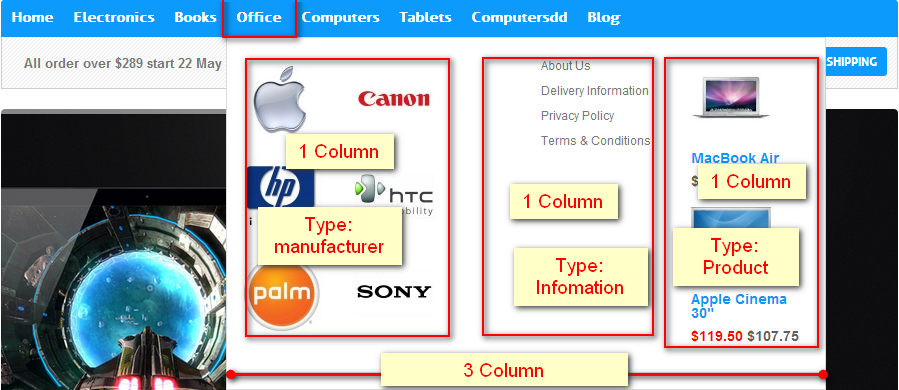
Modules are added in content depend on position and layout
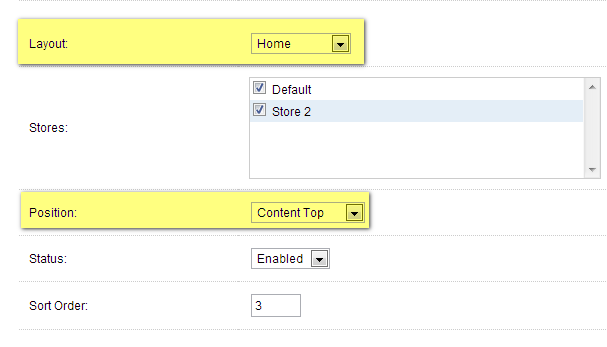 You can add module via order layouts In back end, Go to Extension > Modules > Boss - Theme Editor > Edit

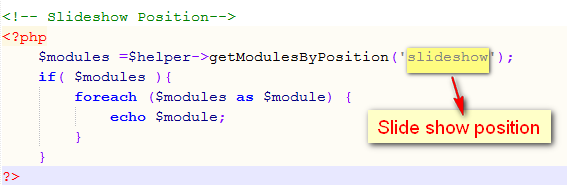
6. Building Slideshow
In template open catalog/view/theme/mytheme/template/common/header.tpl
See more detail please read Boss - Revolution Slider config
5. Display 3rd-party modules
Config module to display in front-end
Step 1: Downloading a 3rd Party Module
Step 2: Uploading the module to OpenCart
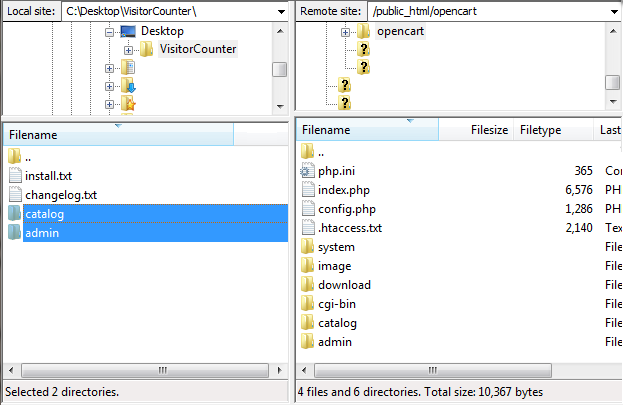
Oftentimes developers will include specific install information in the module download package in a txt file. Most module files just need to be uploaded to the catalog and admin folders of the store. These files can be uploaded via a FTP client like Filezilla.
In the screenshot below, the FTP client is connected to our store located in public_html/opencart. We saved our module, VisitorCounter on our computer's Desktop. We now need to transfer the contents of the module's catalog and admin folders from our desktop to our store's catalog and admin folders. This can be achieved by selecting and dragging the catalog and admin folders from the left side(Local Site) to the scroll bar on right side(Remote Site). The contents of these folders will be automatically sorted into their correct file path. The module files should not overwrite any existing files in the OpenCart store directory.
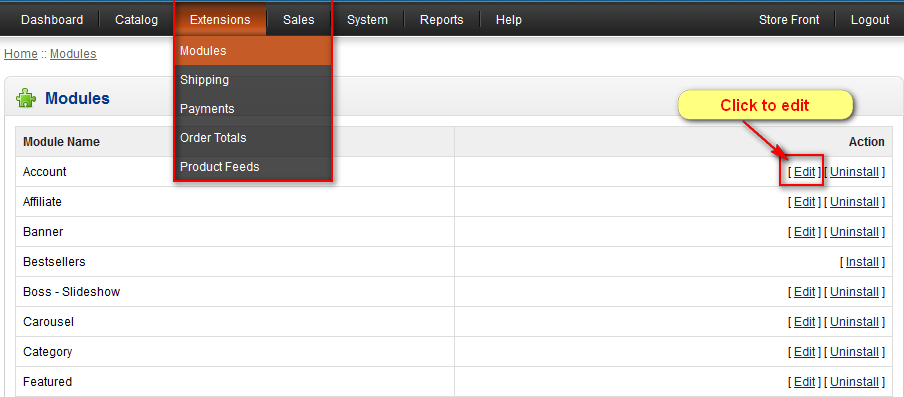
Step 3: In back end, Go to Extension > Modules > module_name > click on Install and then Edit
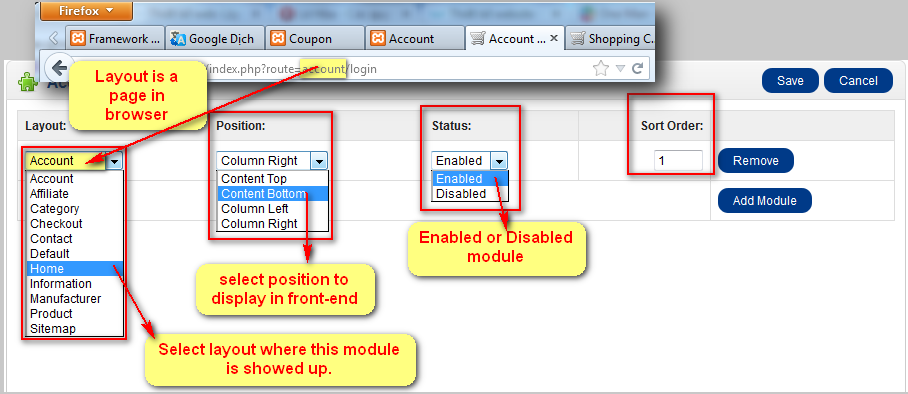
Step 4: Config to display in front-end.
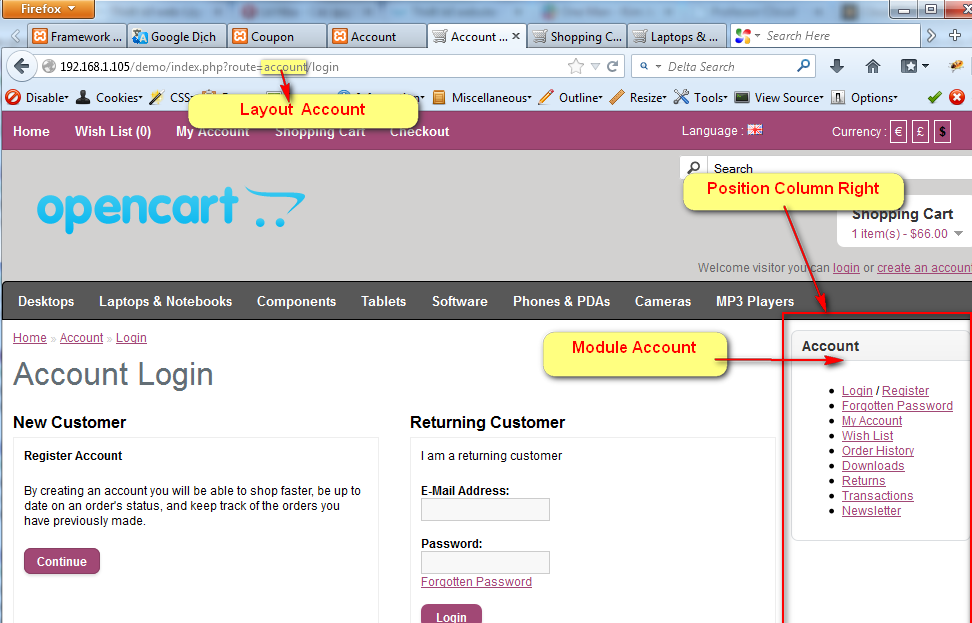
Step 5: Check in front-end
Customize module
In chapter "Building template" we khnown structure of module's file. If you want customize you fint files in url: catalog/view/theme/mytheme/template/module/module_name.tpl. You see class of module in .tpl file, after you can customize css if you want.
Learn more details please see step Module Reference
1. Boss - Blog
1. Introduction
Blogis a good instrument for everybody to get closer to each other, and so does your business. It keeps you acknowledge of what clients are thinking about your products, and service. Moreover, your sales program, such as promotion, store news, upcoming products and other news come much easier and friendlier. This extension also brings you a win-win situation. Customers have better products and services as your responses, and you gain more and more potential clients through word of mouth.
2. Module installation
2.1 Modify index.php
Boss - Blog needs a small modification to the /index.php in the root OpenCart folder. There are one possibilitie you can edit the file manually.
Open index.php with your pefered text editor.
Near the end of the file, around line number 222 (for OC 1.5.x) you should find the following two lines:
// SEO URL's

					$controller->addPreAction(new Action('common/seo_url'));
Now, insert these two line immediately after them:
// SEO URL's Boss Blog

					$controller->addPreAction(new Action('bossblog/seo_url_blog'));
2.2 Install module Boss-Blog
Remember install module Boss-Blog before 4 module (Boss - Blog Category, Boss - Blog Recent Comment, Boss - Blog Recent Post, Boss - Blog Tag Cloud)
Administration
Go to Extension > Modules > Boss - Blog > click on Istall an then Edit
- Ability to add / edit / delete Boss - Blog module
- Management Blog categories: insert / edit / delete Blog Categories
- Management Articles: insert / edit / delete Articles
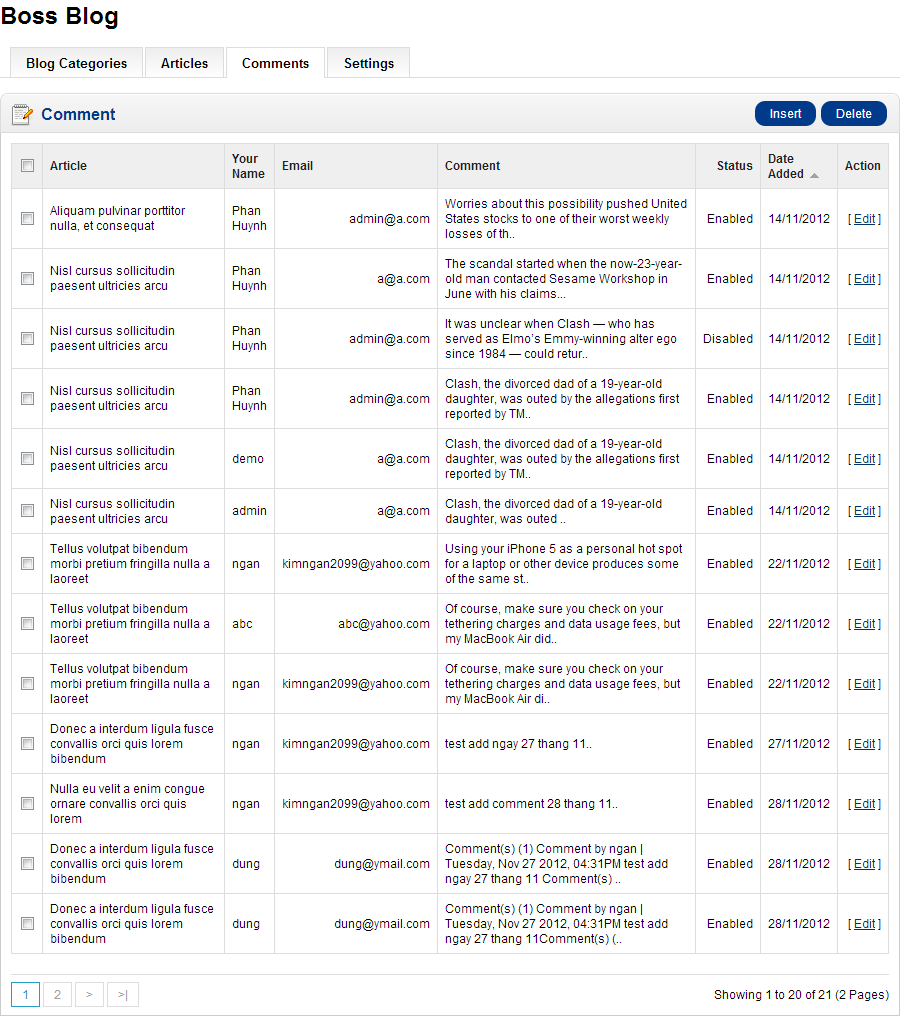
- Management Comments: insert / edit / delete comment
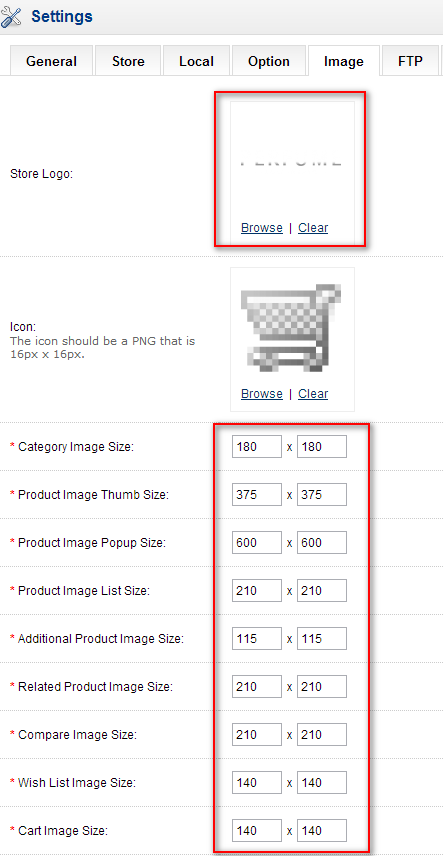
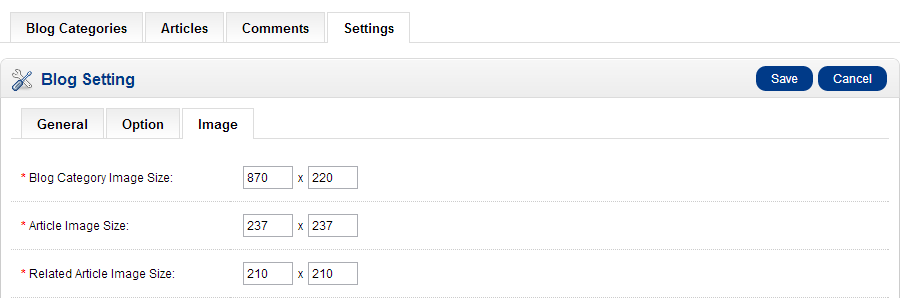
- Ability setting size image, patigation, allow comment...
Store Front
- Display a list of posts (image, time post, author and title of article)
- Display a detail of the article (name, content, comments, author...)
- Display a list of comments and allowing comments if the post allows comment
- Display a list of recent comment
- Display a list of recent posts
- Display a list of tags
- Display a list of category (name, subcategory, count article / category..)
- Display detailed of all Articles under each category
- Search for the article name, tag, category
You can see more introduce in http://bossthemes.com/opencart-extensions/blog-module.html
2.3 Config module
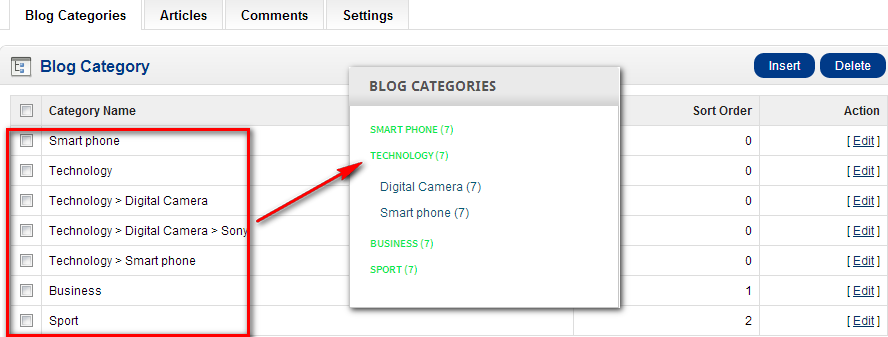
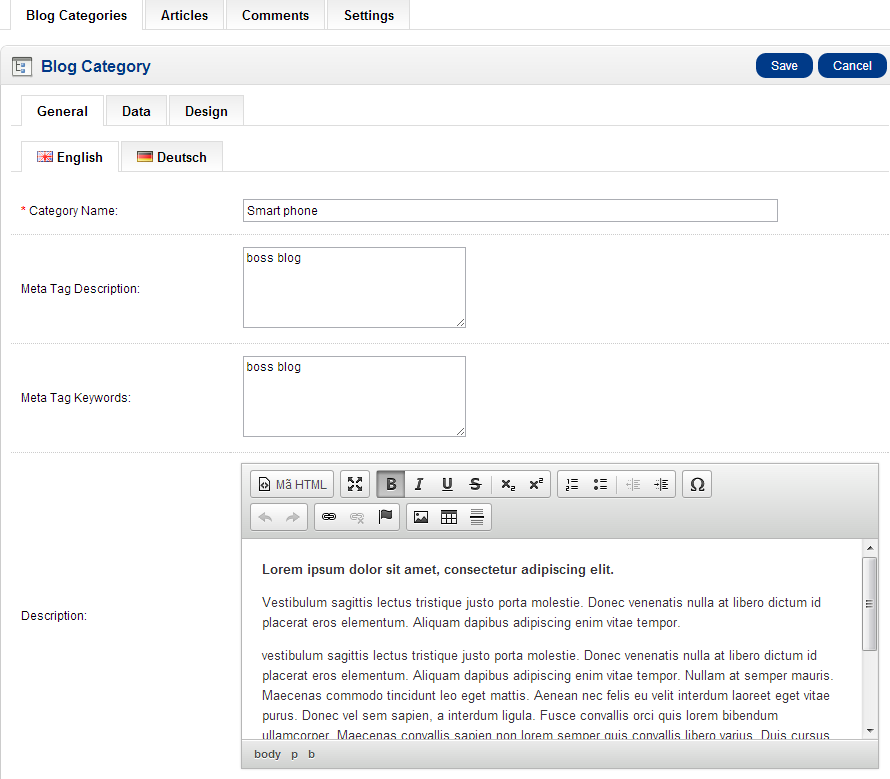
» Blog Category And Edit
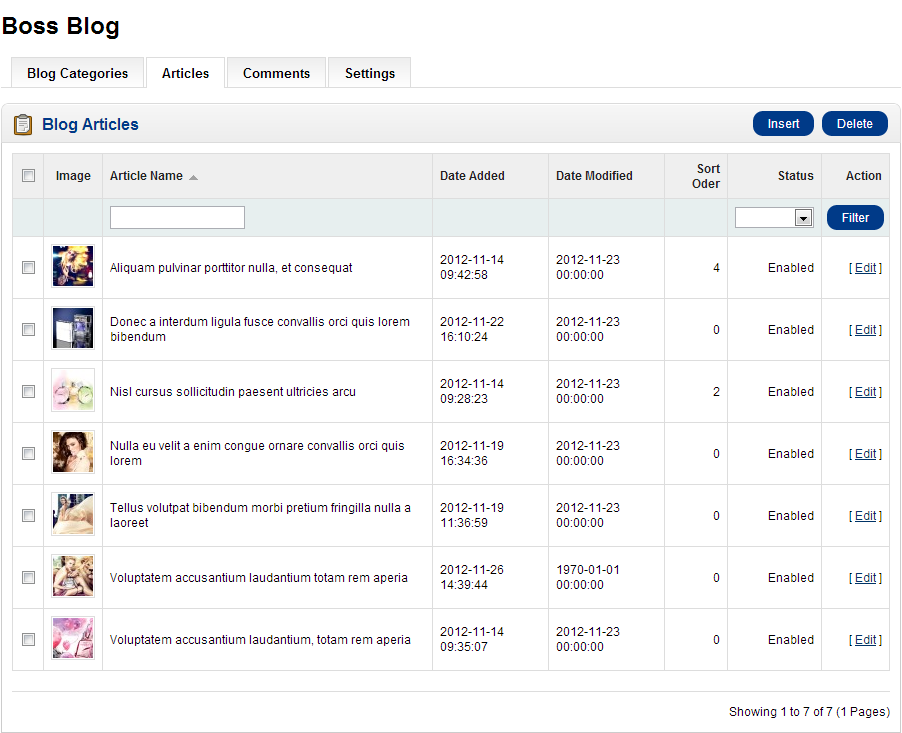
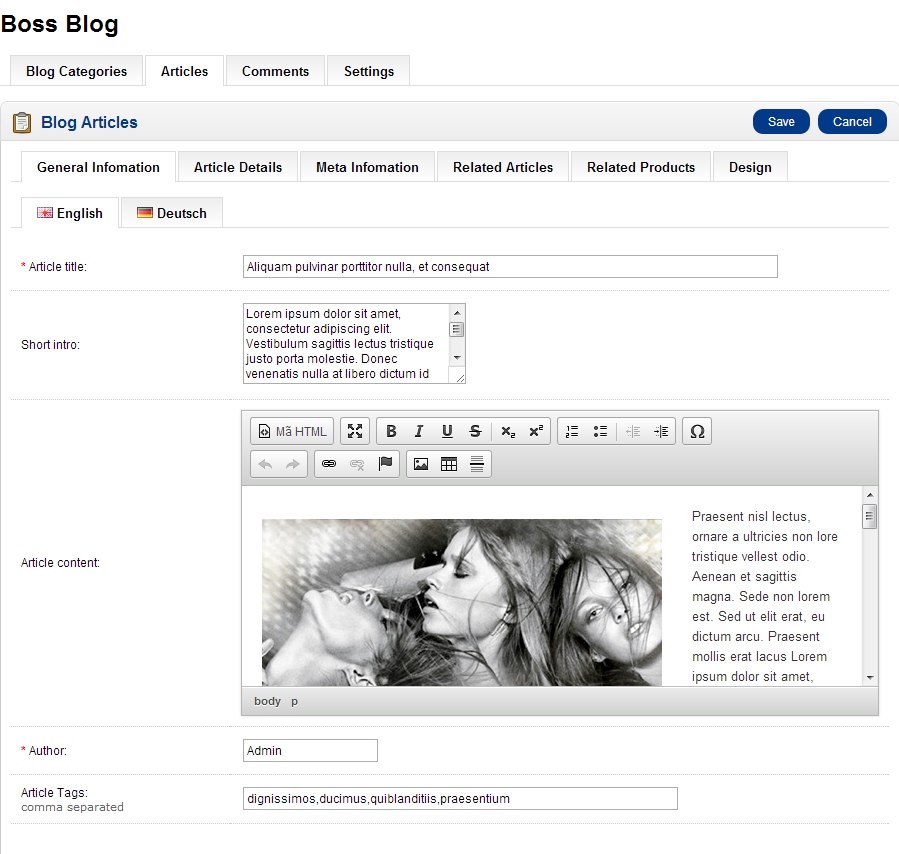
 » Blog Articles And Edit
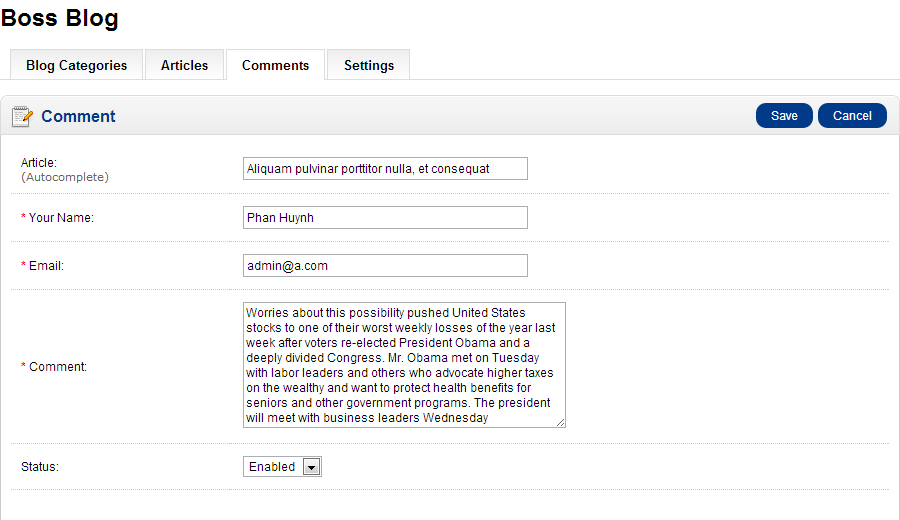
 » Blog Comment And Edit
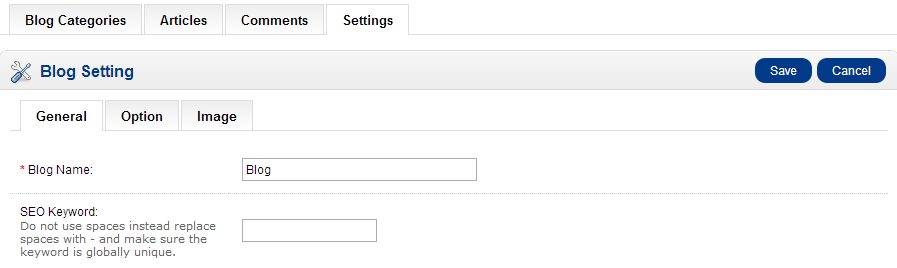
 » Blog Setting

3. Customize
If you want customize code you fint files in url: catalog/view/theme/mytheme/template/bossblog/bossblog.tpl.
Css of this module is config in file: catalog/view/theme/mytheme/stylesheet/bossblog.css
You can customize code and css of module if you want.
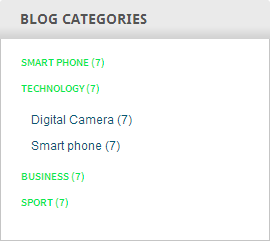
2. Boss - Blog Category
1. Introduction
Boss - Blog Category is show list categories of blog. I can filter article by this list category. It retrieves category and display them randomly in left, right, top and bottom positions. Easy to use, simply setup in admin and save.
2. Module installation
» In back office go to Extension > Modules > Boss - Blog Category > Edit
 » In front end
3. Customize
If you want customize code you fint files in url: catalog/view/theme/mytheme/template/bossblog/blogcategory.tpl.
Css of this module is config in file: catalog/view/theme/mytheme/stylesheet/bossblog.css
You can customize code and css of module if you want.
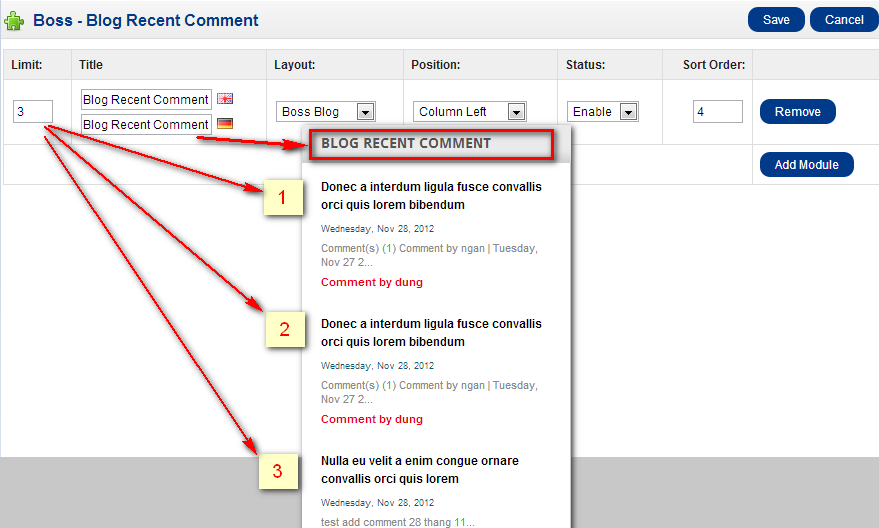
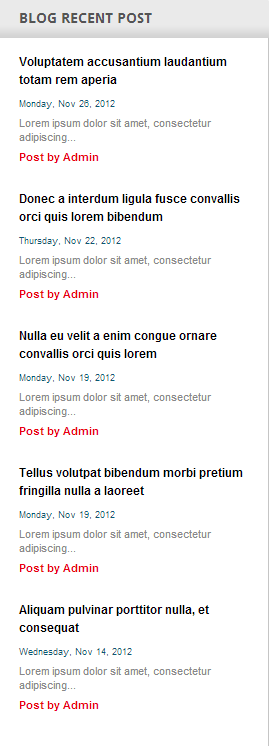
4. Boss - Blog Recent Post
1. Introduction
Boss - Blog Recent Post is show latest articles of blog. Module can set display randomly in left, right, top and bottom positions. Easy to use, simply setup in admin and save.
2. Module Introduction
» In back office go to Extension > Modules > Boss - Blog Recent Post > Edit
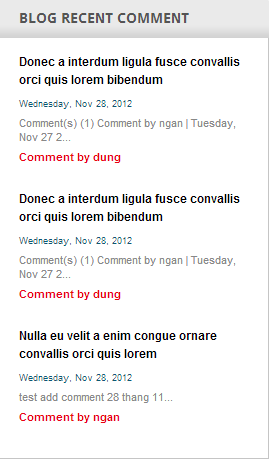
 » In front end
3. Customize
If you want customize code you fint files in url: catalog/view/theme/mytheme/template/bossblog/comment.tpl.
Css of this module is config in file: catalog/view/theme/mytheme/stylesheet/bossblog.css
You can customize code and css of module if you want.
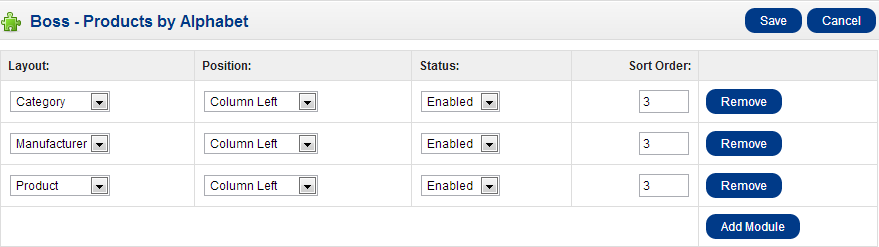
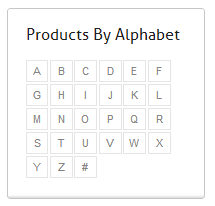
5. Boss Alphabet
1. Introduction
Boss - Products By Alphabetmodule allows the user to display all the products in a alphabetical manner and on selecting displays all products starting with that character. Admin can add this module on column right, column left, content top, content bottom display positions on the front end
2. Module installation
In back end, Go to Extension > Modules > Boss - Products by Alphabet click on Install and then Edit.
You can add new or remove a module alphabet, customize layout, position, status
 » In front end
3. Customize css
If you want customize you fint files in url: catalog/view/theme/mytheme/template/module/boss_alphabet.tpl. You see class of module in .tpl file, after you can customize css if you want.
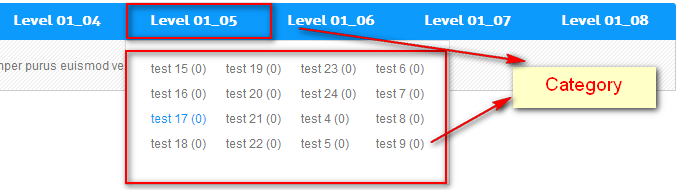
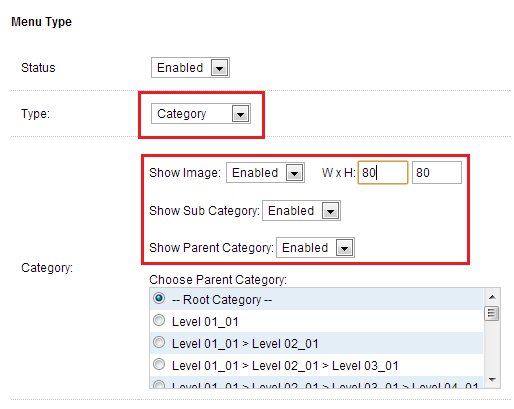
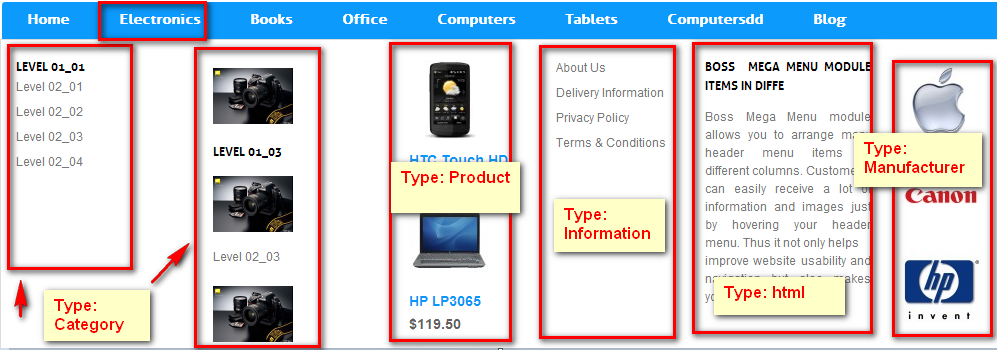
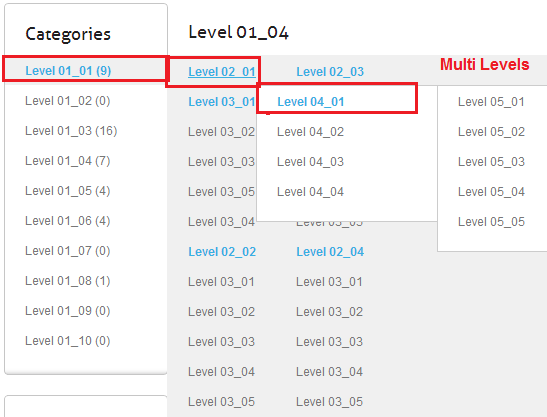
6. Boss Category
1. Introduction
Boss Category is show list category with unlimit level. You can set display any position in front-end, beside you can set number of column when hover each category.
2. Module installation
In back end, Go to Extension > Modules > Boss - Category > click Install and then Edit.
You can add new or remove a module boss category, customize layout, position, column(s), status
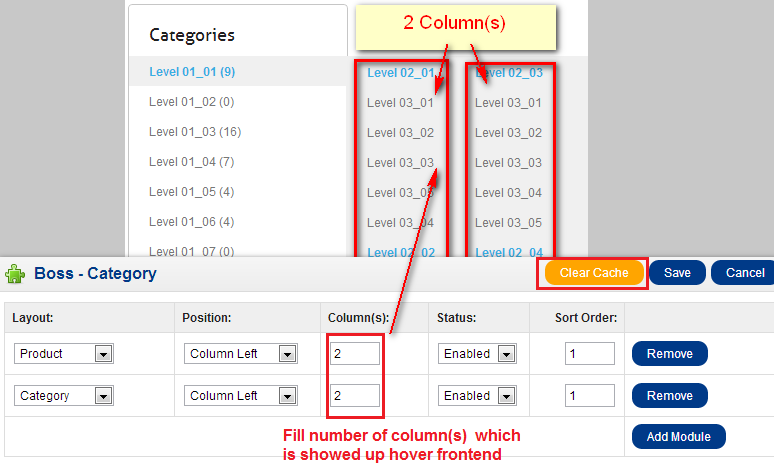
» In front end, There are multi level category which is showed up frontend
Open template: catalog/view/theme/mytheme/template/module/boss_category.tpl if you want customize in front-end.
3. Customize
If you want customize code you fint files in url: catalog/view/theme/mytheme/template/module/boss_category.tpl.
Css of this module is config in file: catalog/view/theme/mytheme/stylesheet/boss_category.css
You can customize code and css of module if you want.
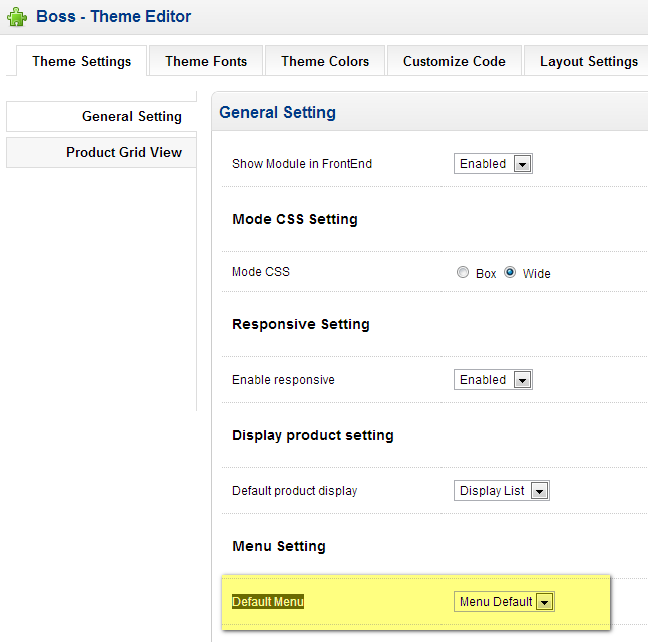
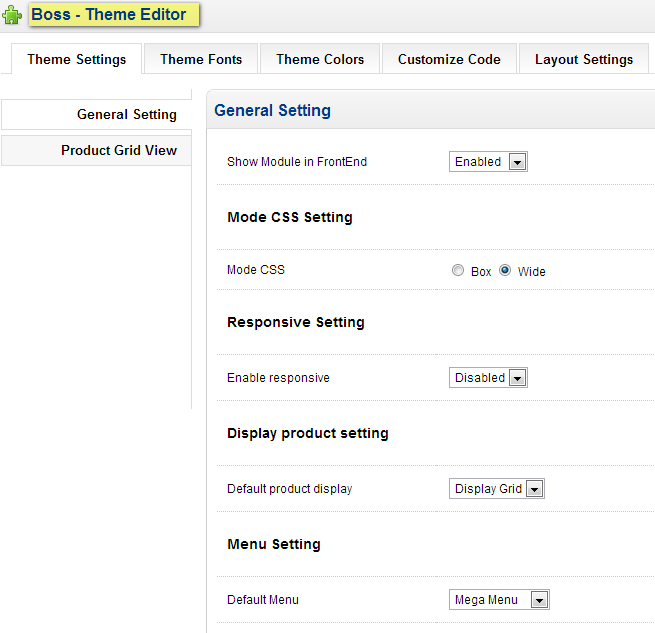
7. Boss - Editor Themes
1. Introduction
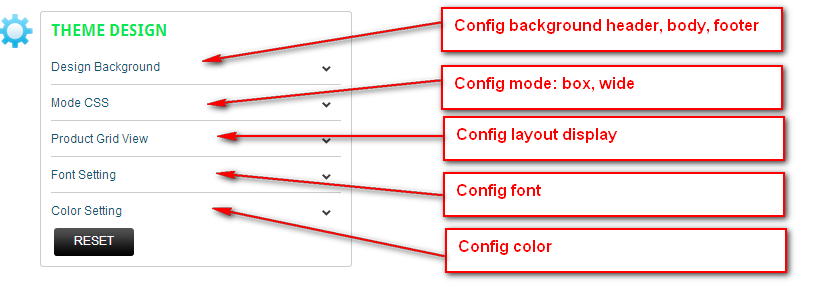
This Boss - Editor Themes help us setting basic for theme as: Setting font, setting color, customize code, quick select module for each layout by layout setting...
2. Module installation
- In your back end, go to Extensions > Modules > Boss - Editor Themes > click on Install and then Edit.
- This module helps you to customize your website's interface easily - column for your website, color and font for impotant elements of website.
3. Using theme setting options in your code and customize theme setting options
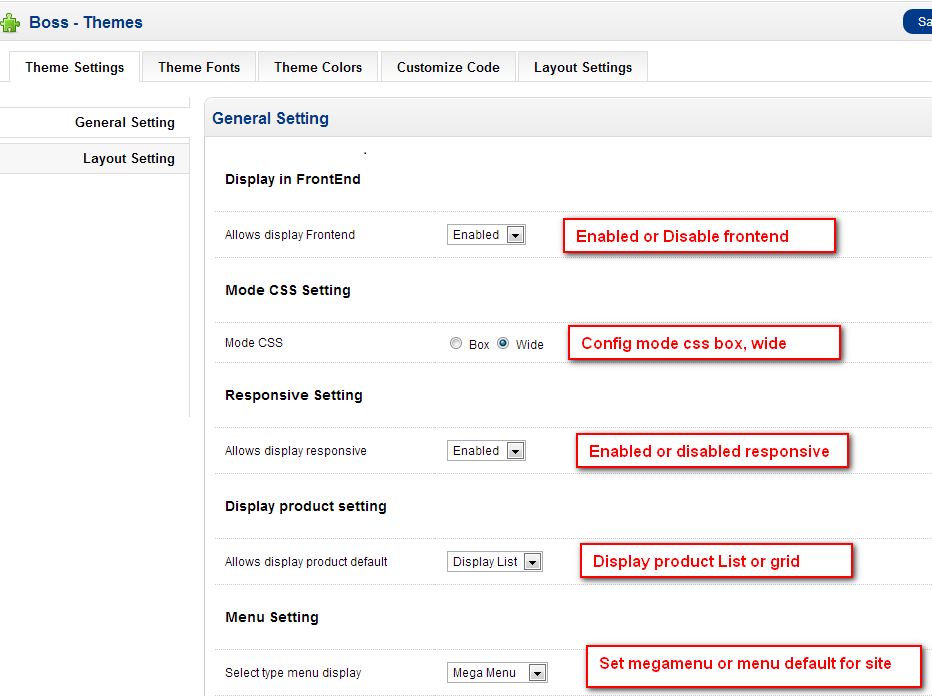
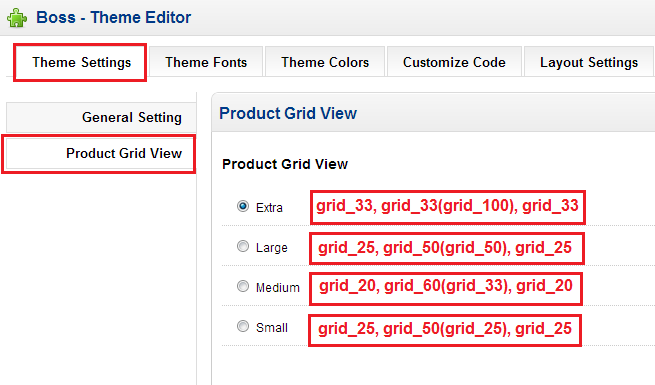
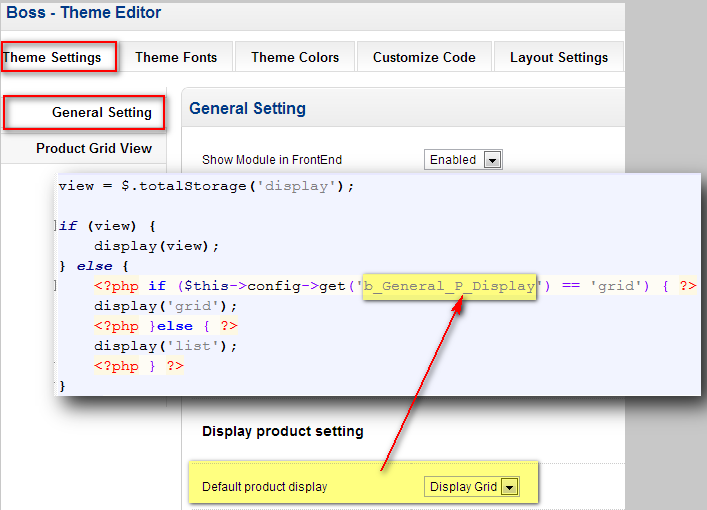
3.1. Theme Settings
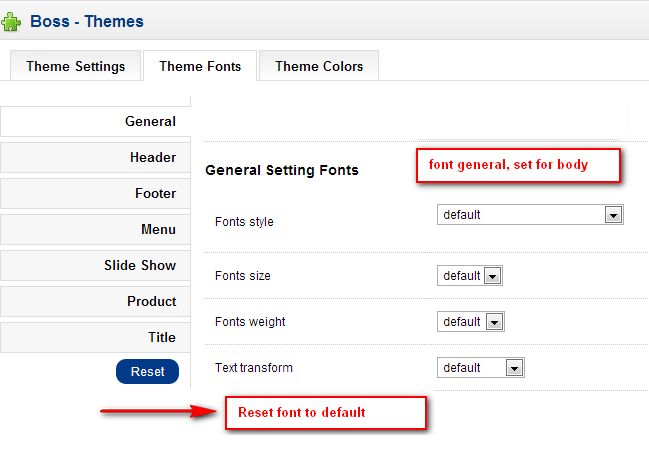
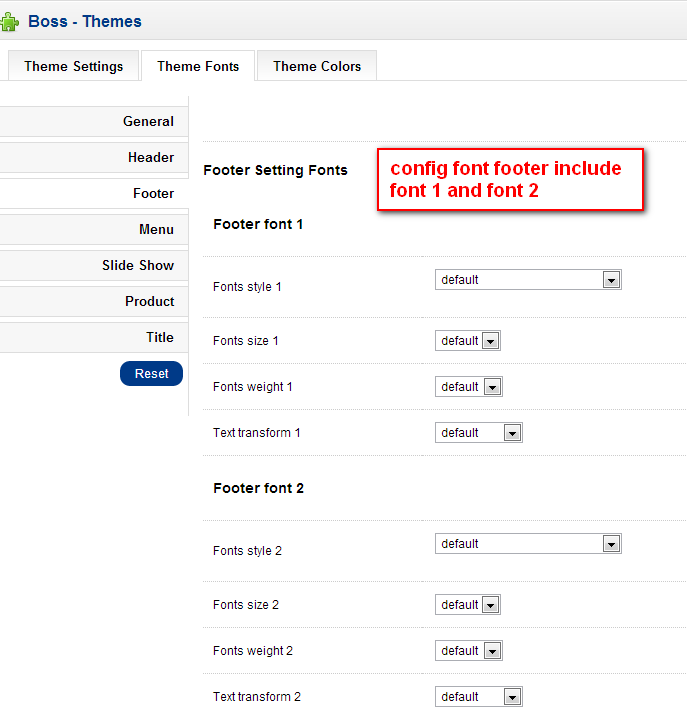
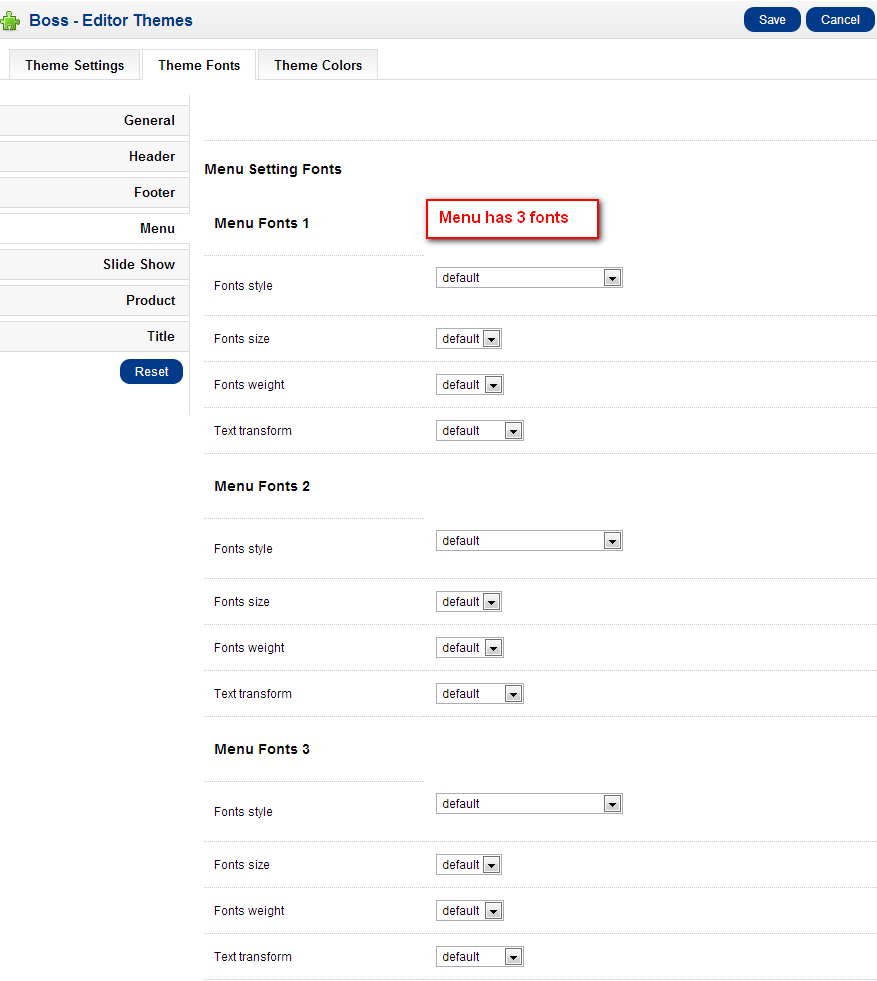
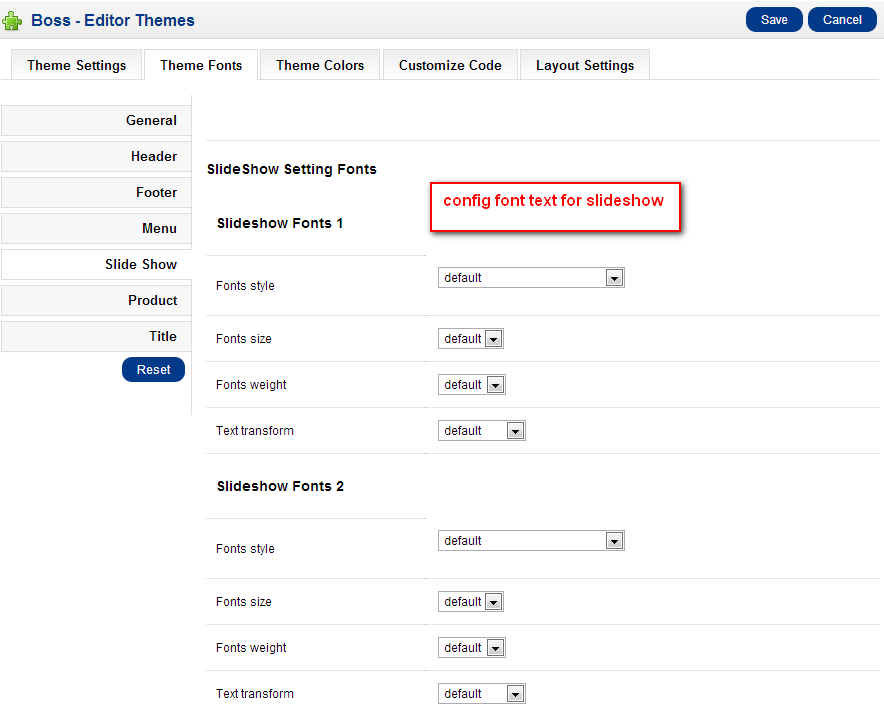
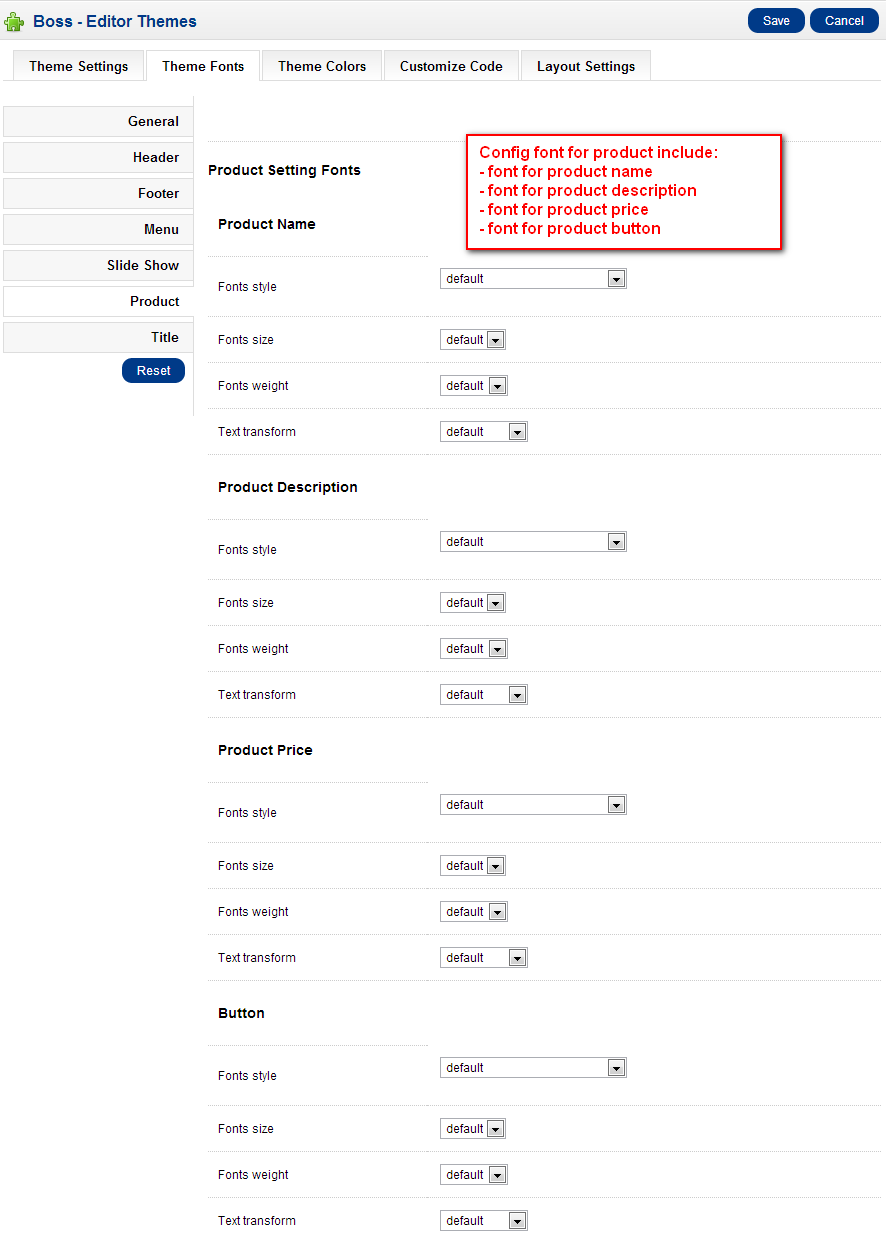
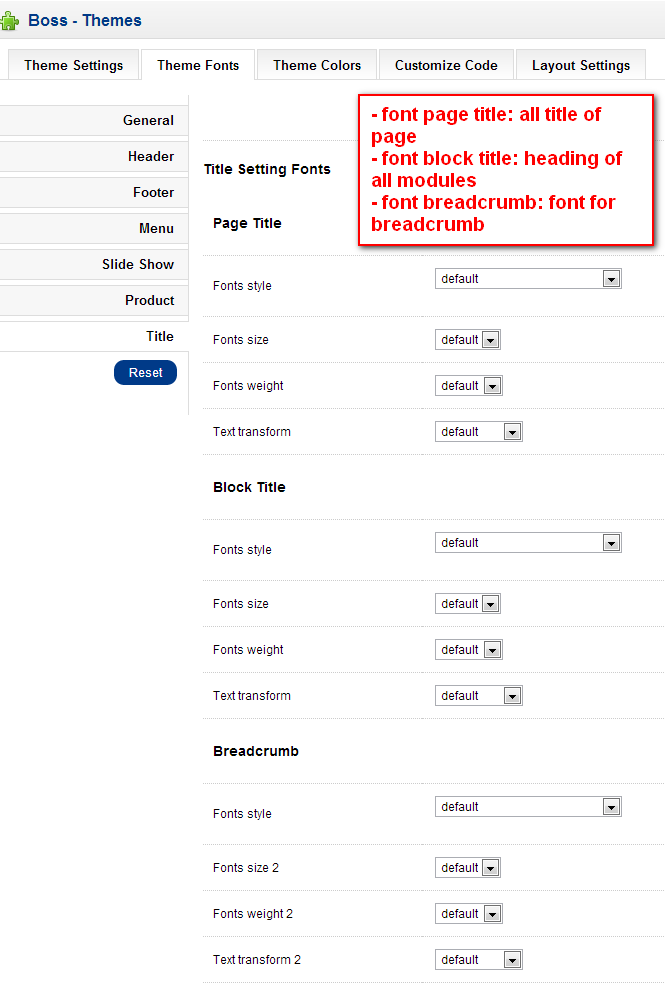
3.2. Theme Fonts
All data of font setting are saved in font_setting.xml : config_xml/font_setting.xml
Structure of font_setting.xml synchronous with front-end and back-end's structure.
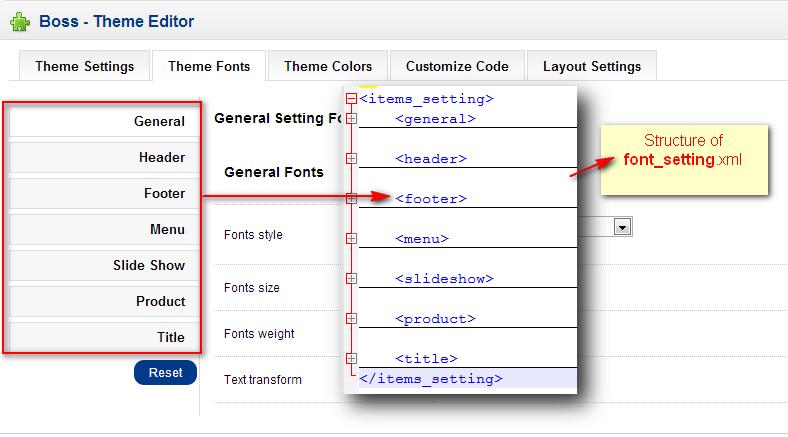
Structure detail of each item

Add new (or edit) item in back-end font config. You copy (edit) 1 item and edit this new item
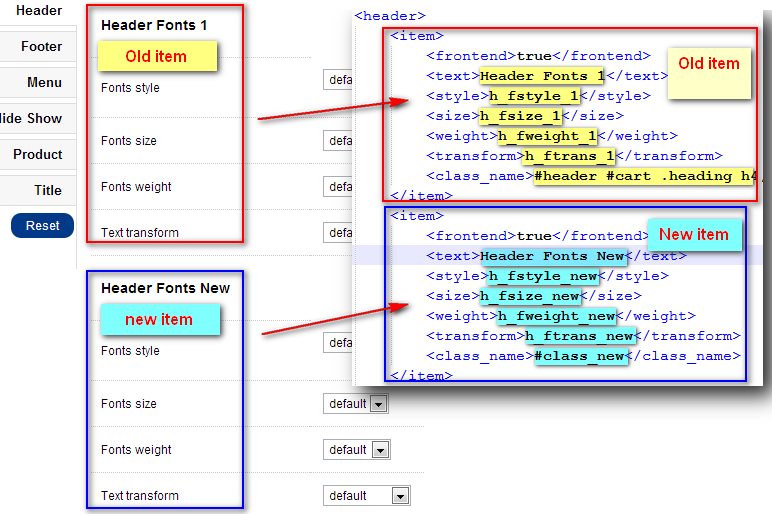
Config font in back-end
Config font in front-end
if you want show item in font-end you set frontend = true,if you don't want show item in font-end you set frontend = false

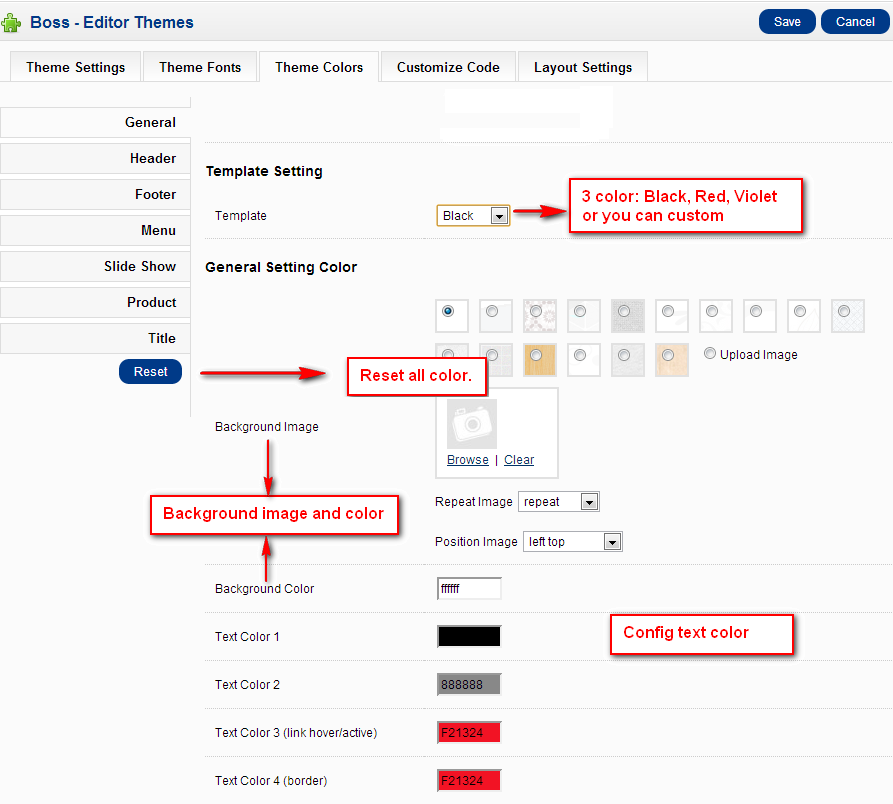
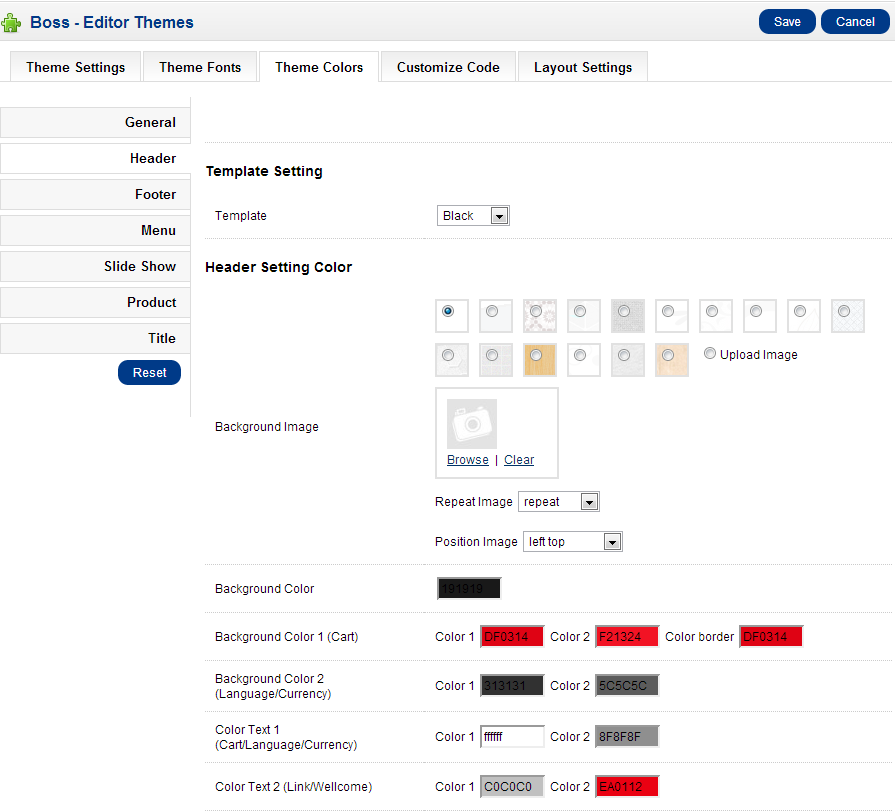
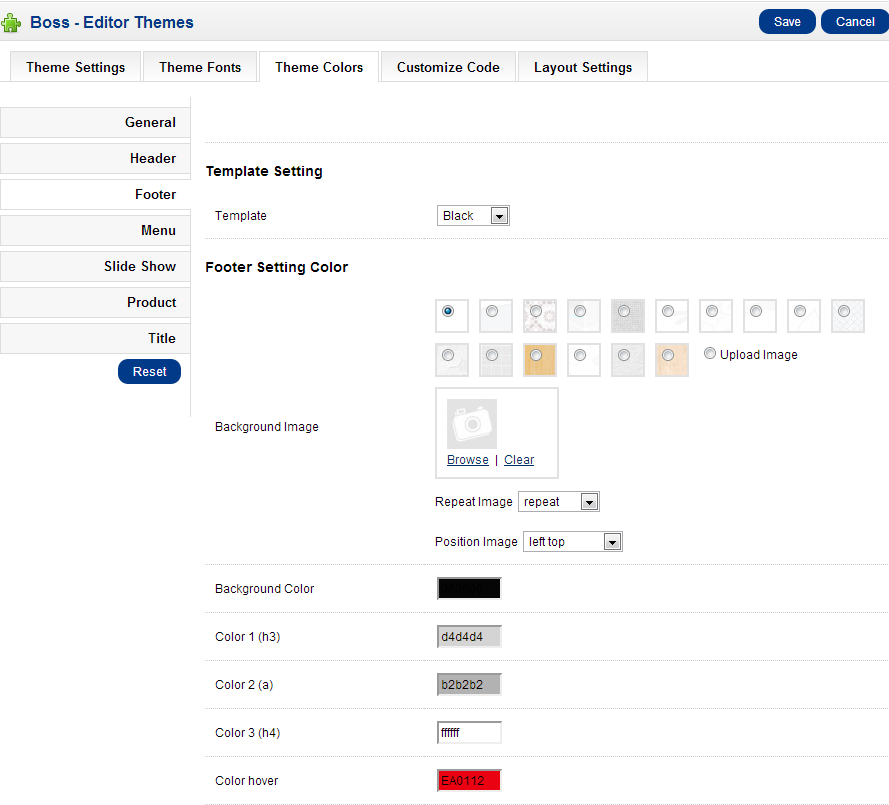
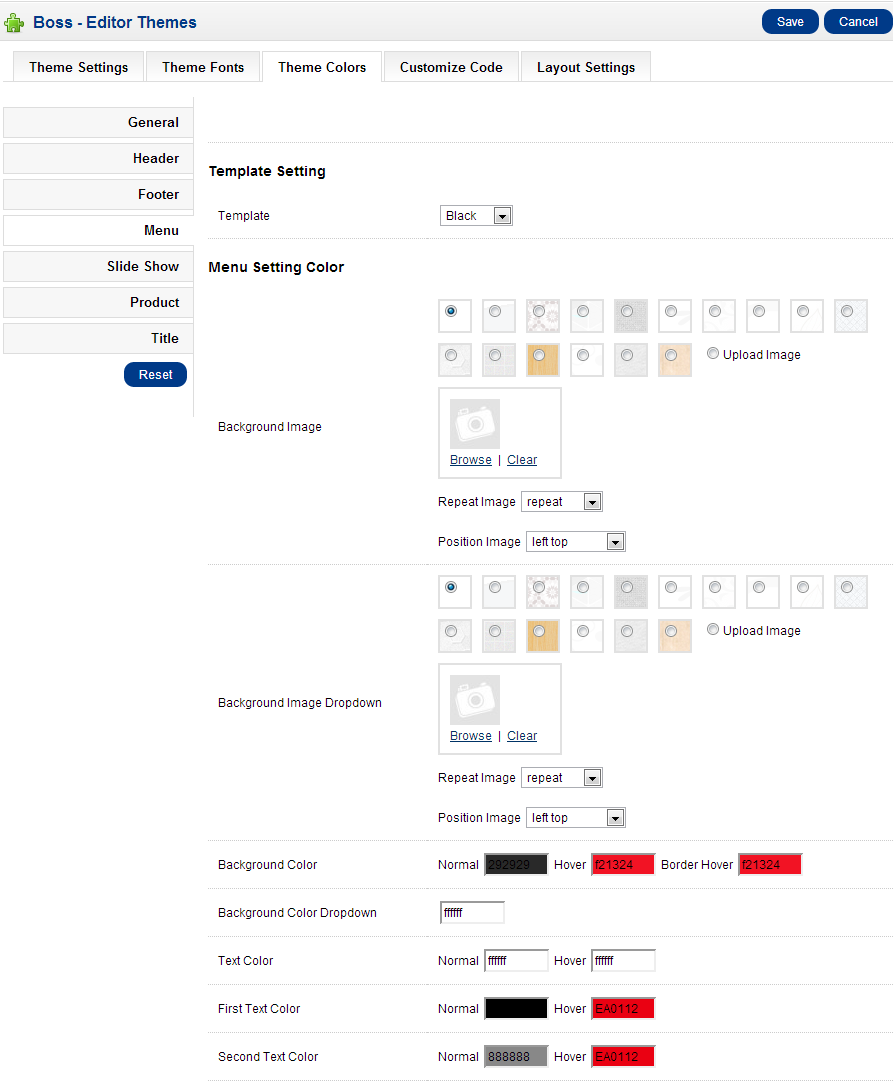
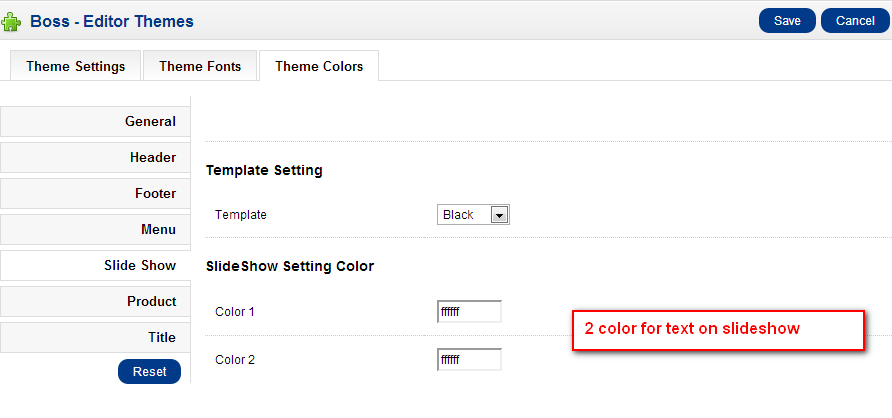
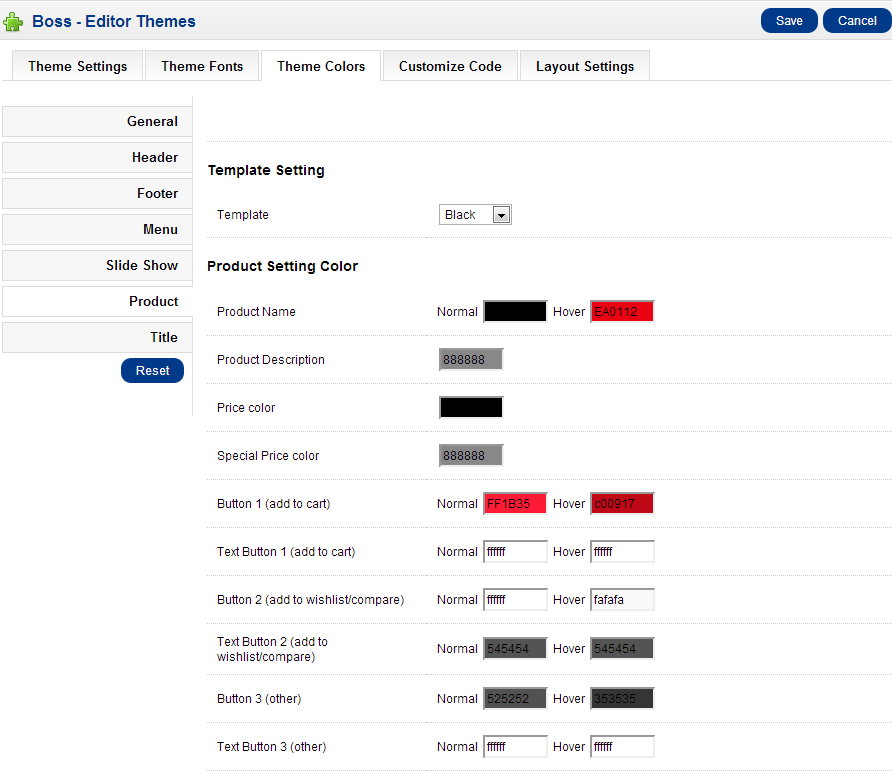
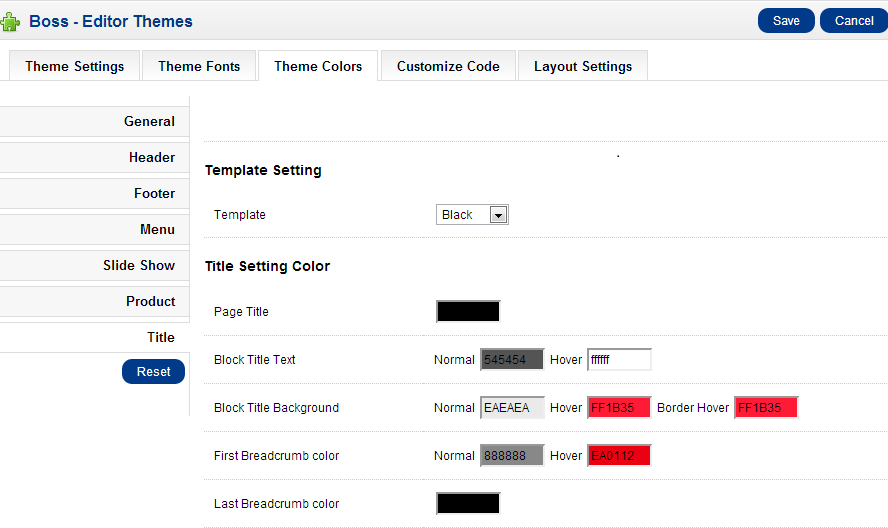
3.3. Theme Color
All data of font setting are saved in color_setting.xml : config_xml/color_setting.xml
Structure of color_setting.xml synchronous with front-end and back-end's structure.
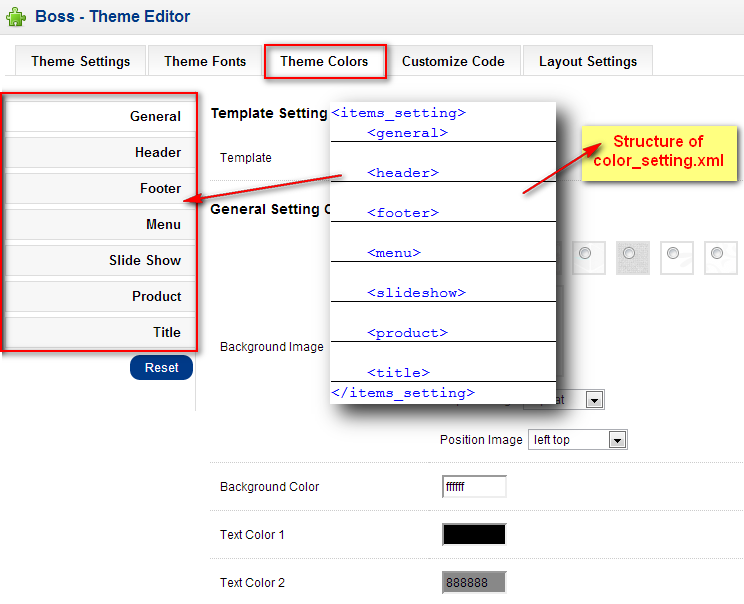
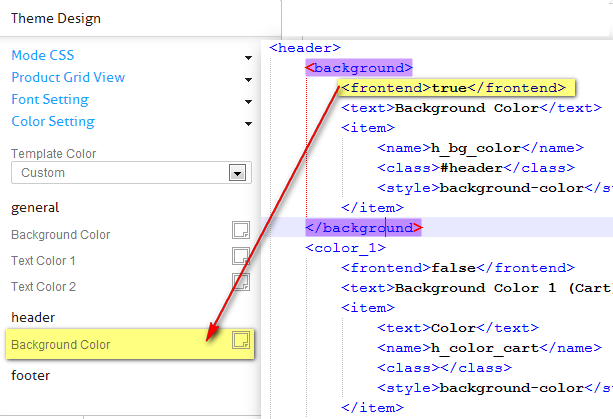
Structure detail of each item

Add new (or edit) item in back-end font config. You copy (edit) 1 item and edit this new item

Config color in back-end
Config font in front-end
if you want show item in font-end you set frontend = true,if you don't want show item in font-end you set frontend = false
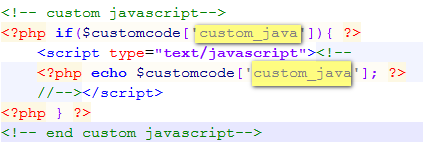
3.4. Customize code
Customize javascript
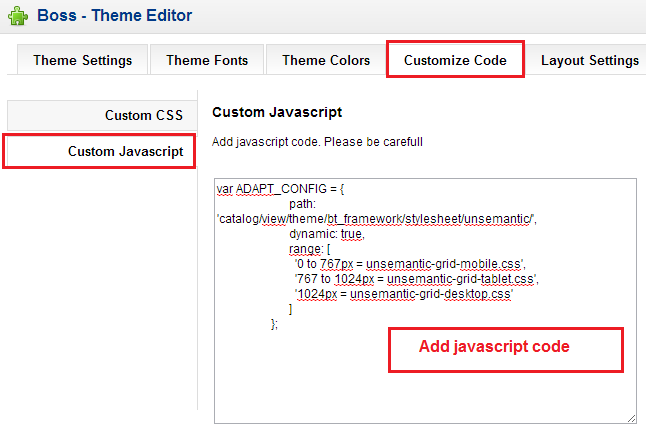
Go to header.tpl by url: catalog/view/theme/mytheme/common/header.tpl. You can see the code show javascript
 Customize CSS
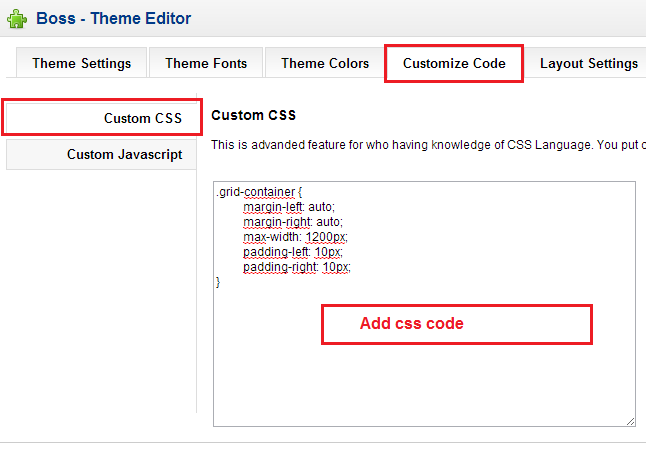
Go to header.tpl by url: catalog/view/theme/mytheme/common/header.tpl. You can see the code show CSS

3.5. Layout setting
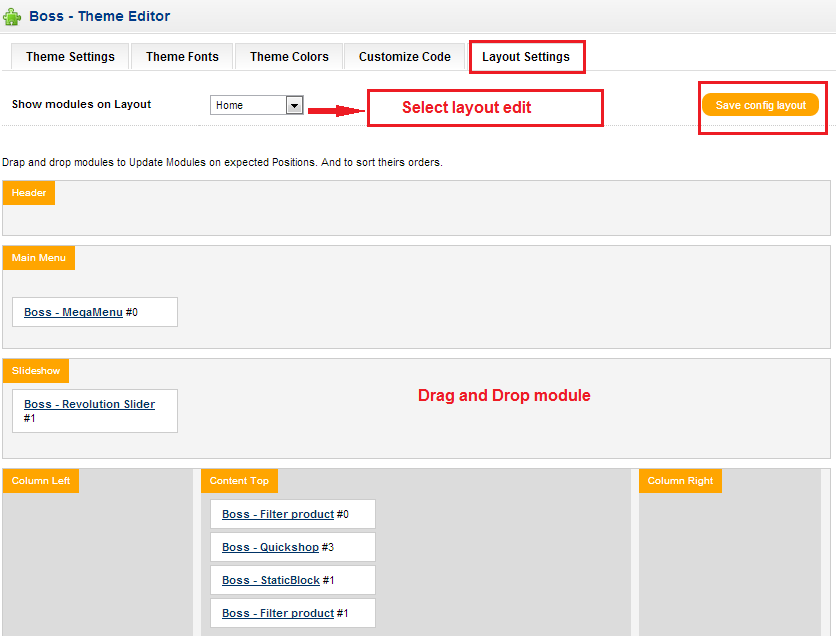
In your front-end you can change to see demo
4. Theme setting options reference
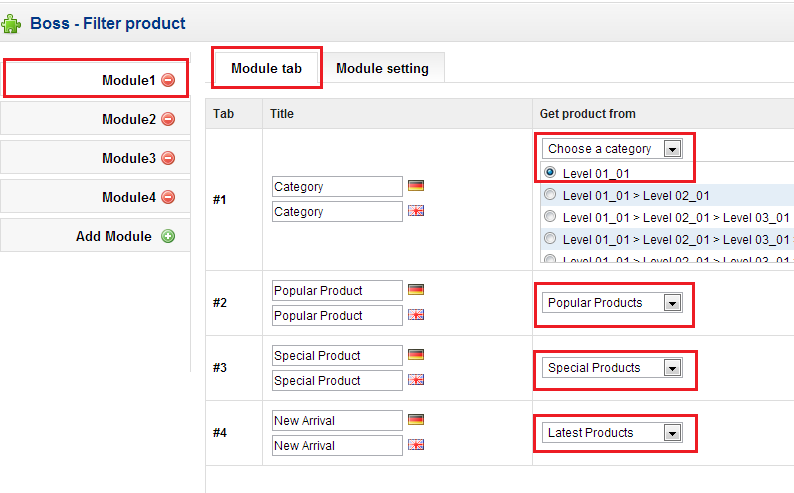
8. Boss - Filter Products
1. Introduction
Boss - Filter Products module allows the user to display filtered products, with conditions available: Popular products, Special products, Best seller products, Latest products or show product on selected categories
2. Module installation
In back end, Go to Extension > Modules > Boss - Filter Products > click on Install and then Edit
With this module You can add or remove any products style or categories, and customize title for themes.
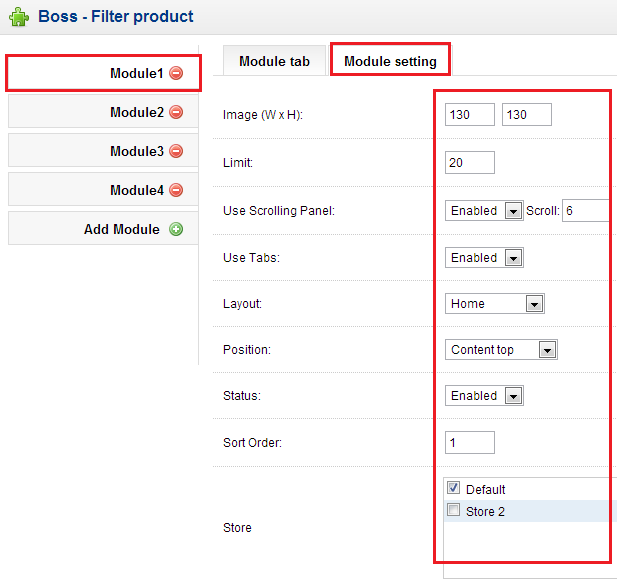
Then you customize module: image(WxH), Use Scrolling Panel(effect Scroll), tab, Layout, Possition, Status, Sort Order for each module rows. Beside you can add multi module for other layouts.
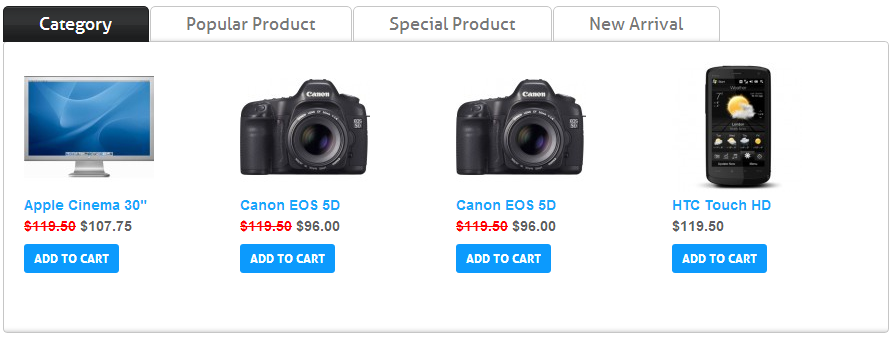
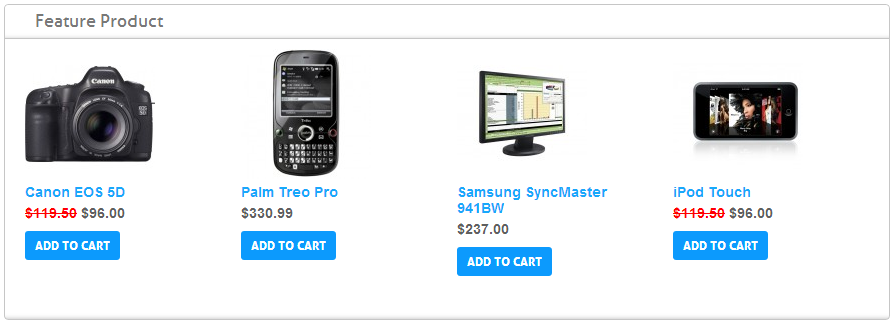
» In front end
Use Tab
No Use Tab
3. Customize code and css
If you want customize code you fint files in url: catalog/view/theme/mytheme/template/module/boss_filter_product.tpl.
Css of Boss Filter Product module is config in file: catalog/view/theme/mytheme/stylesheet/boss_filter_product.css
You can customize code and css of module if you want.
9. Boss - Label Products
1. Introduction
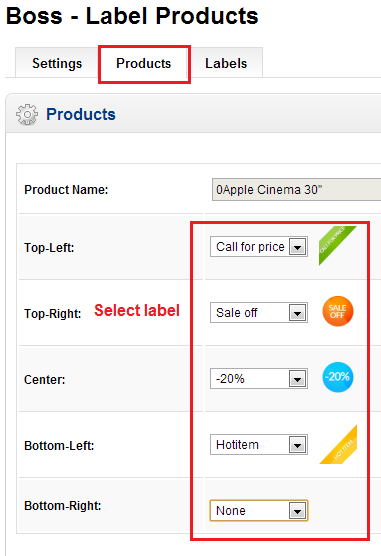
Boss-Label Product module will stick images to your product image. You can stick maximal 5 images for each product Top-Left, Top-Right, Center, Bottom-Left, Bottom-Right.
Many Labels that you can choose to add free Shipping, new product, discount, best seller, special offer and may more image to your product.
You can set module enable or disable on product page, category page, manufacturer page, special page or search page
2. Module installation
In back end, Go to Extension > Module > Boss - Label Products click on Install and then Edit
Boss-Label Product module will stick images to your product image. You can stick maximal 5 images for each product Top-Left, Top-Right, Center, Bottom-Left, Bottom-Right.
Many Labels that you can choose to add free Shipping, new product, discount, best seller, special offer and may more image to your product.You can set module enable or disable on product page, category page, manufacturer page, special page or search page.
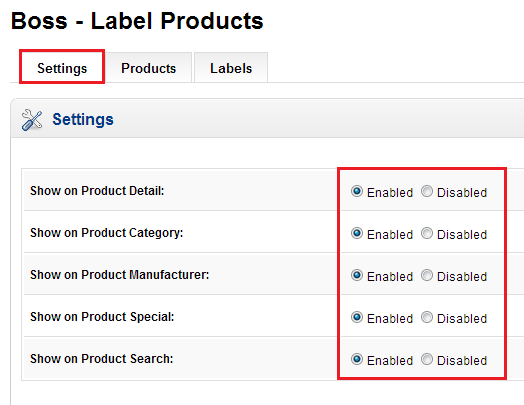
2.1. Setting
You can set module enable or disable on product page, category page, manufacturer page, special page or search page
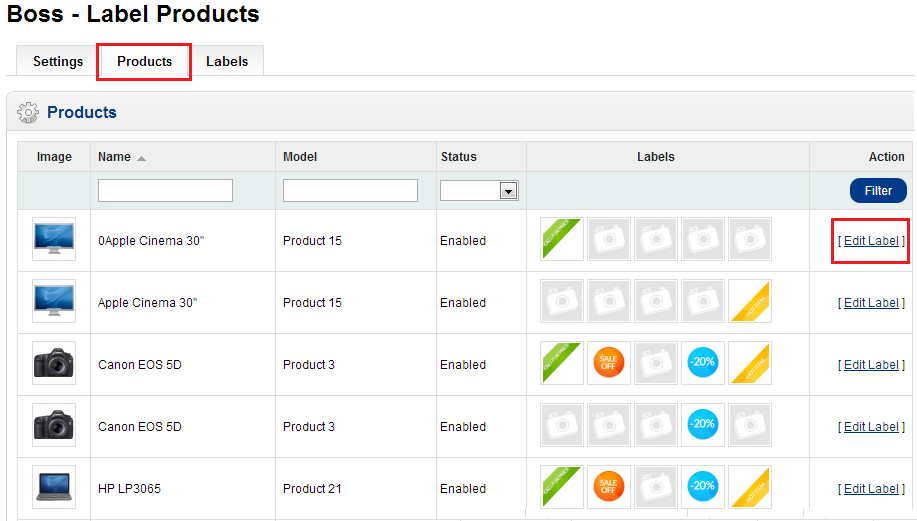
2.2. Manage Products
Product label list
Choose label for each product
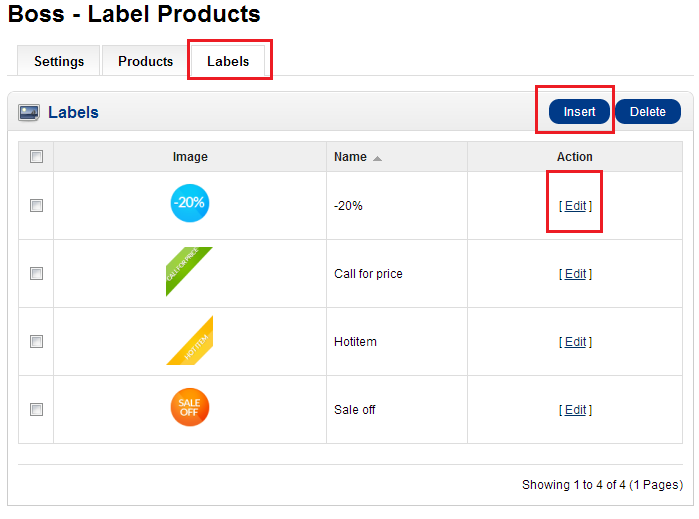
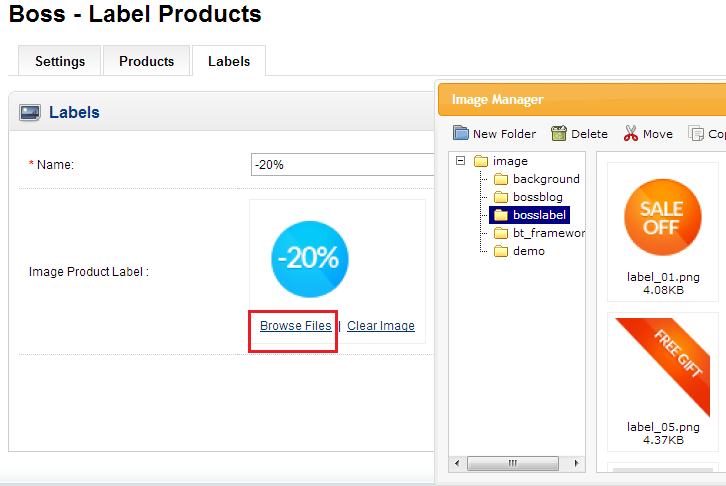
2.3. Manage Labels
Show label list
Add new (edit) label
» In front end
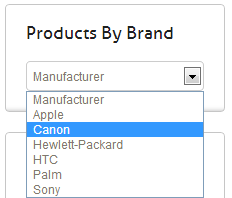
10. Boss - Manufacturer
1. Introduction
Boss Manufacturer is show list manufacturer. I can filter product by this list manufacturer. It retrieves manufacturers and display them randomly in left, right, top and bottom positions.Easy to use, simply setup in admin and save. TagCloud has been tested in most major browsers.
2. Module installation
In back end, Go to Extension > Modules > Boss - Manufacturer click on Install and then Edit
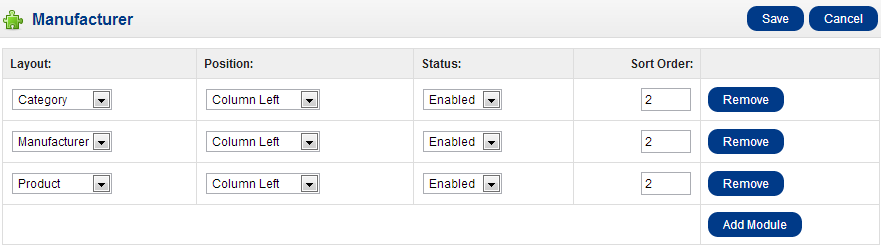
» In front end
3. Customize
If you want customize you fint files in url: catalog/view/theme/mytheme/template/module/boss_manufacturer.tpl. You see class of module in .tpl file, after you can customize code and css if you want.
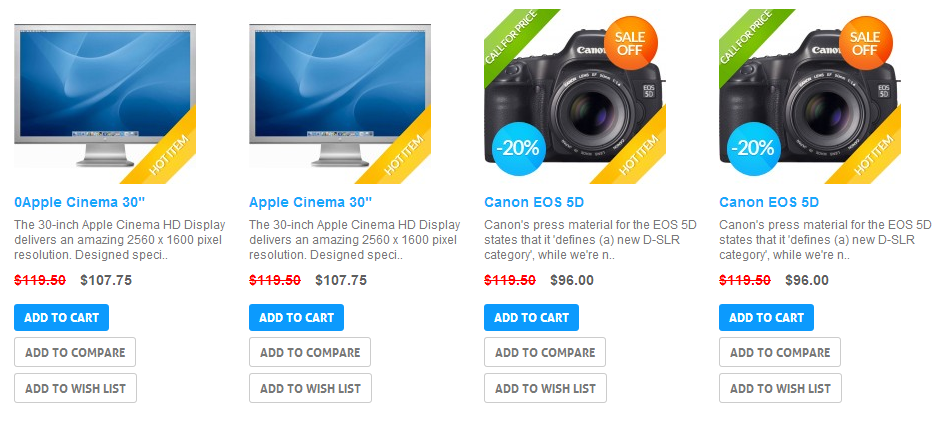
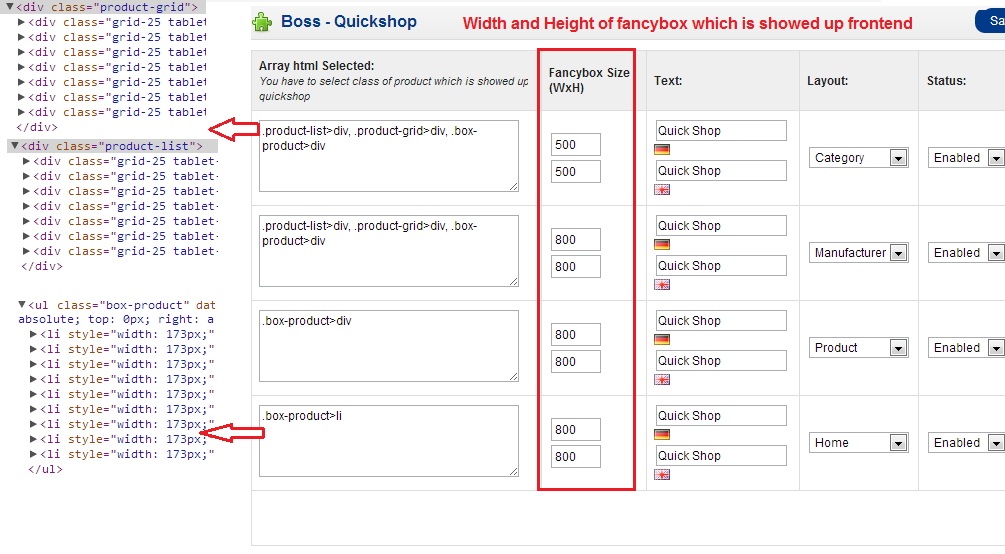
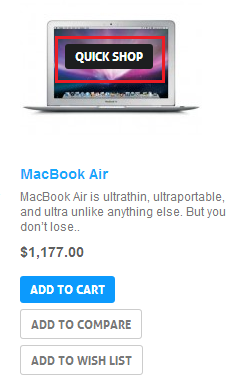
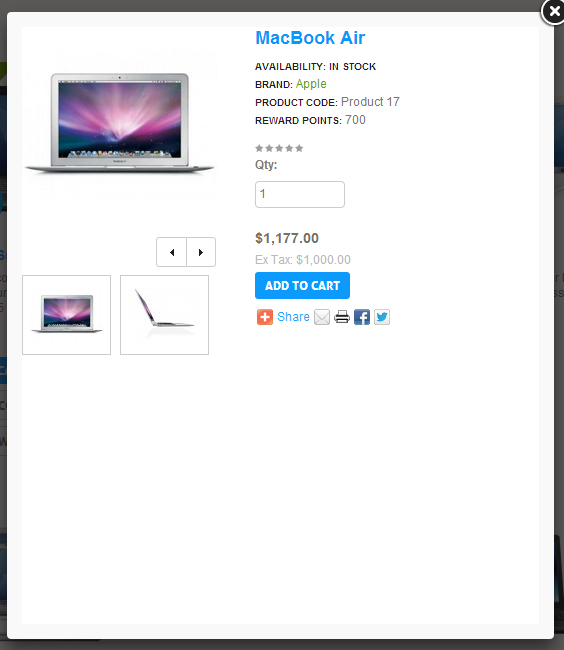
12. Boss - Quickshop
1. Introduction
Boss-Zoom module use cloud zoom and colorbox simultaneously
Boss-Zoom has two beautiful effects: Zoom on hover and Enlarge on click. In this version works only at product page.
This still run when product only have addition image (no Thumb image). When disable or uninstall module, product page will return page before install.
2. Module installation
In back end, Go to Extension > Modules > Boss - Quickshop > click Install and then Edit.
You can add quickshop in any layout and any product that you like.
 » In front end
3. Customize
Module used javascript that auto add code this module in product detail page. You can see this javascript and code html at url: catalog/view/theme/mytheme/template/module/boss_zoom.tpl
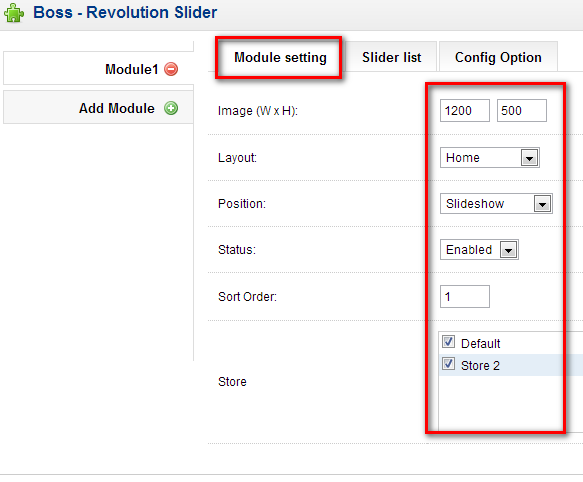
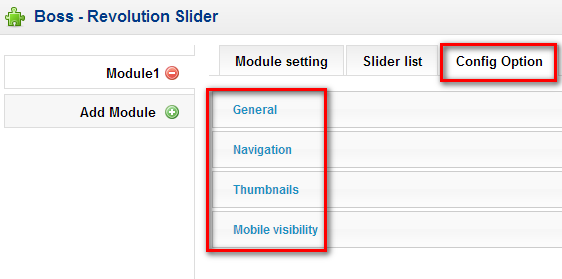
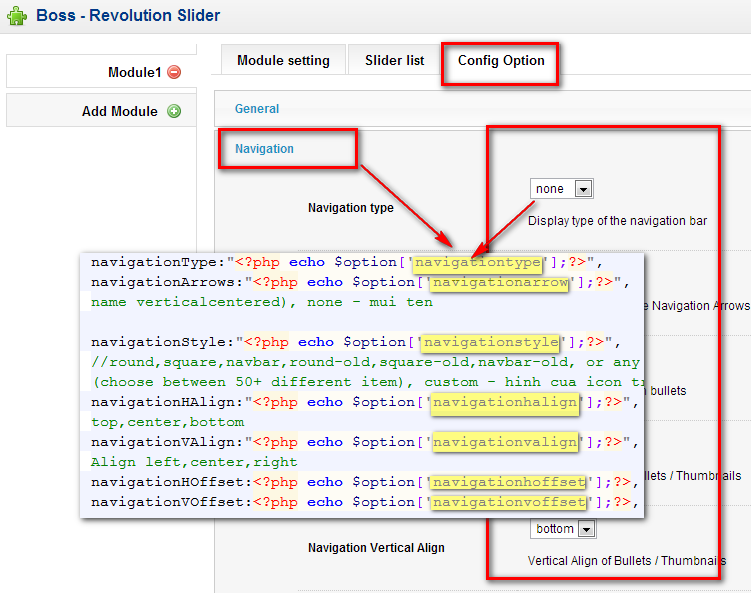
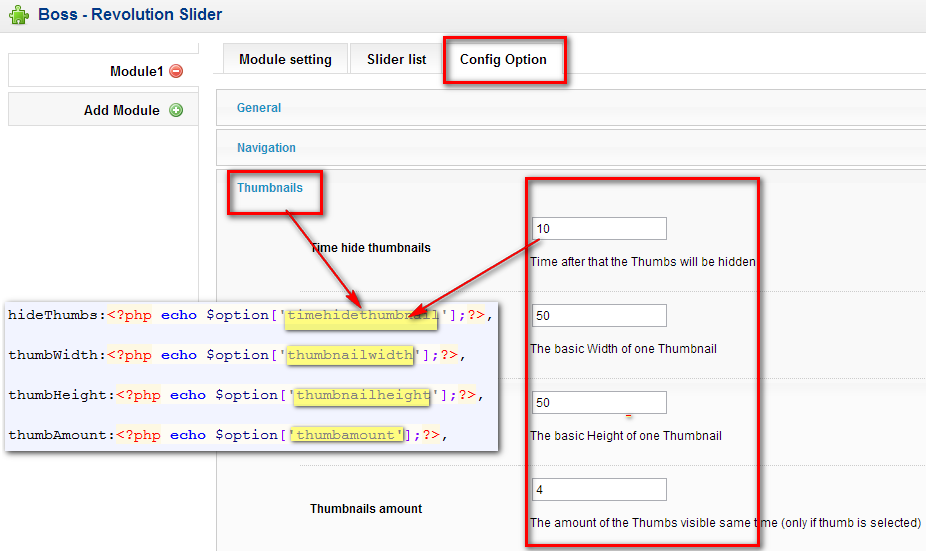
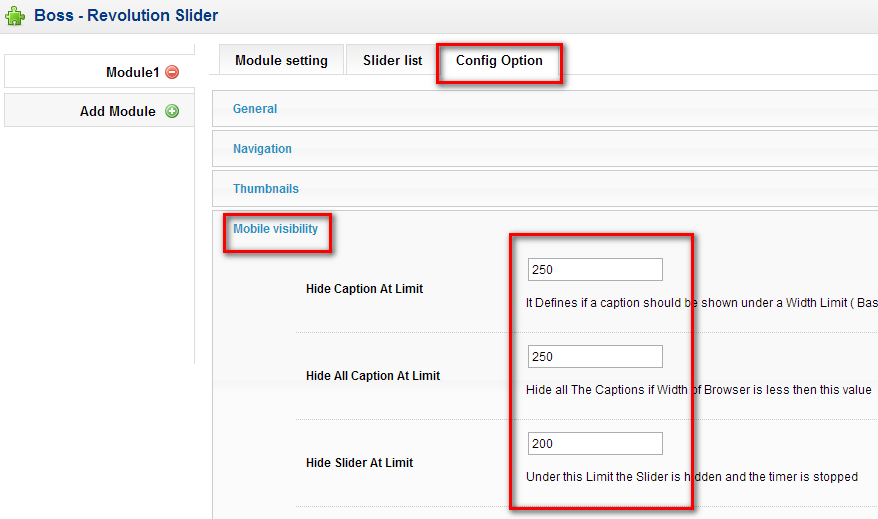
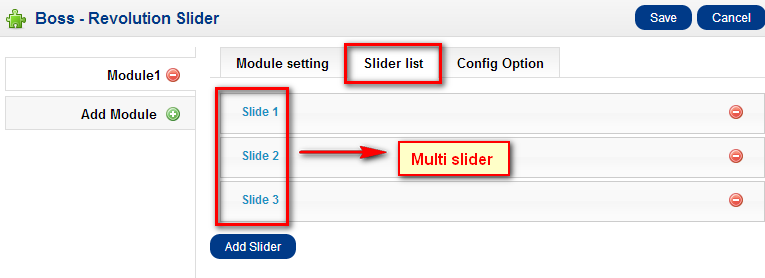
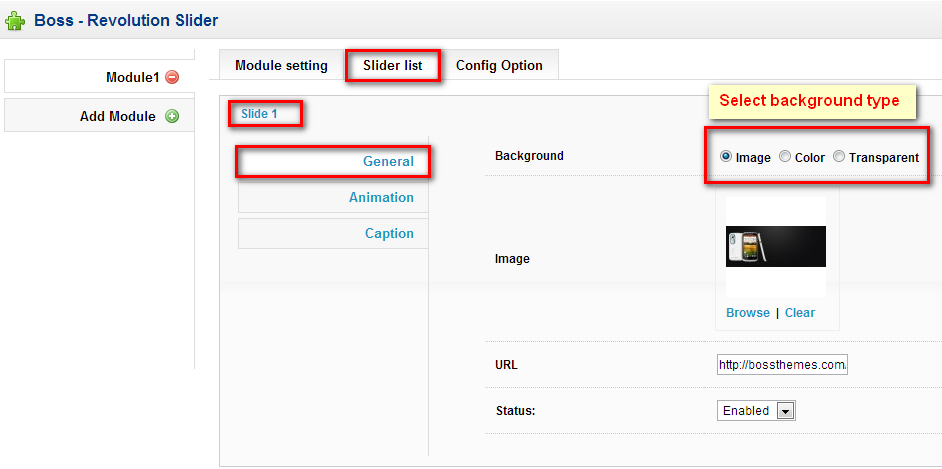
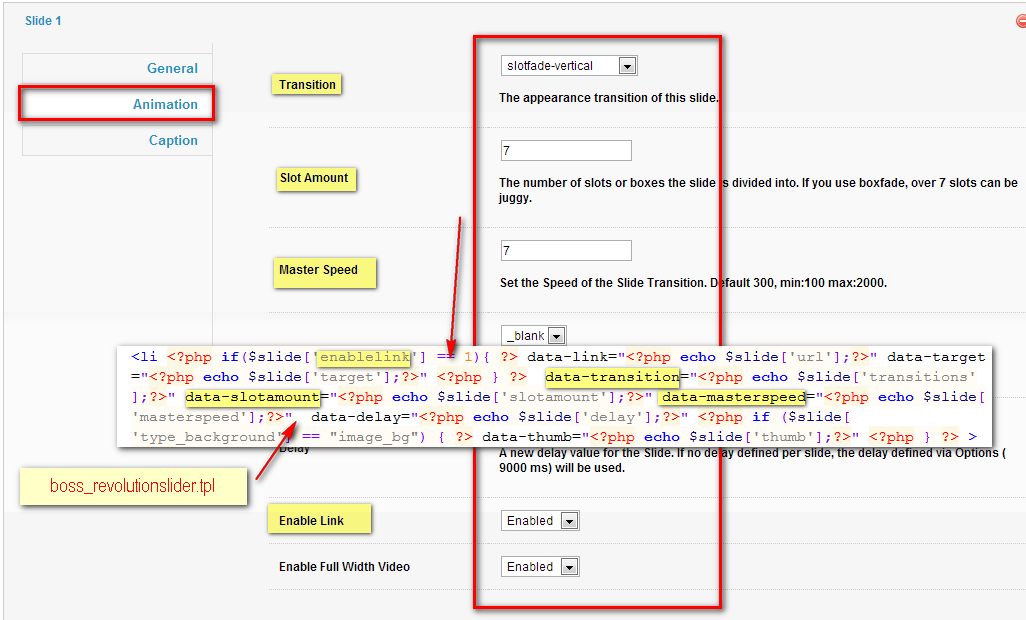
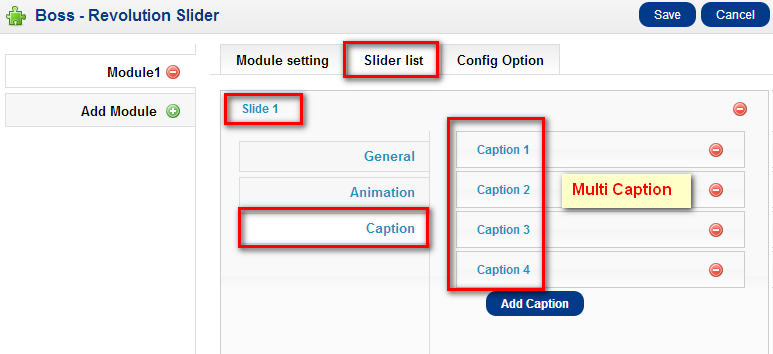
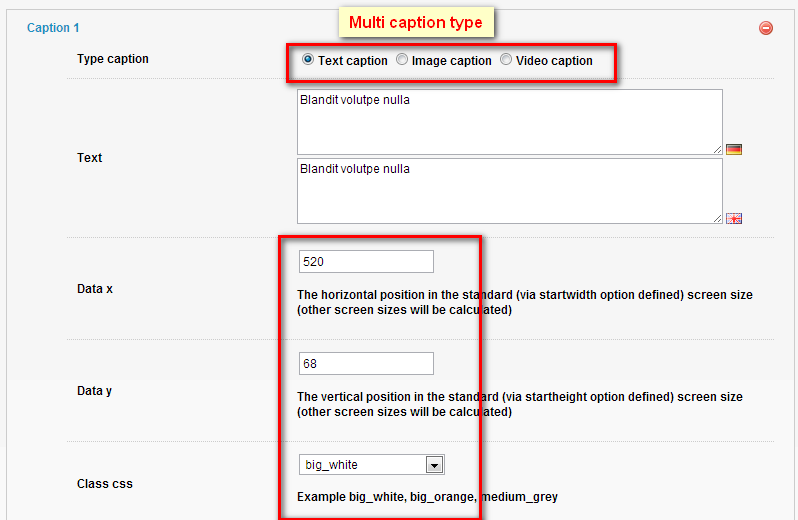
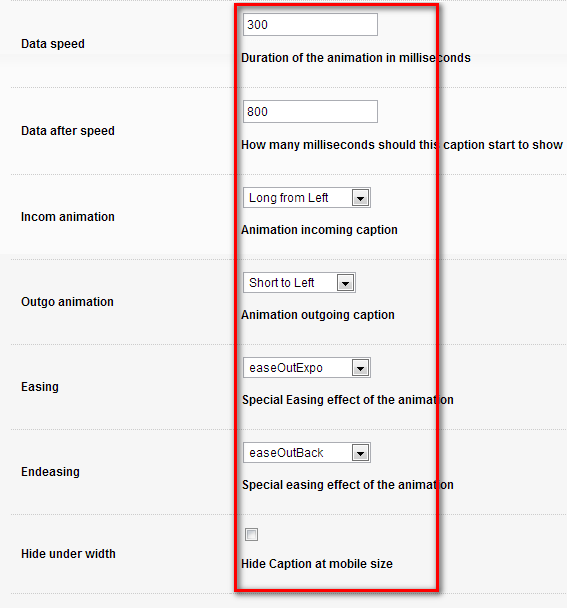
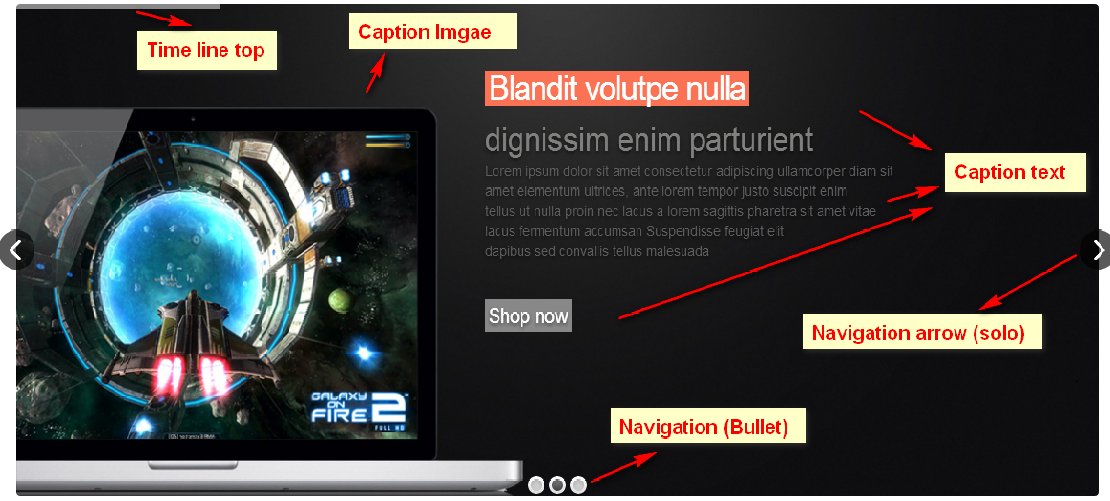
13. Boss - Revolution Slider
1. Introduction
Slider Revolution is a fully developed slide displaying system offering the capability to show images, videos and captions paired with simple, modern and fancy 3D transitions.
On top of that, Slider Revolution is fully responsive and mobile optimized and can take on any dimensions
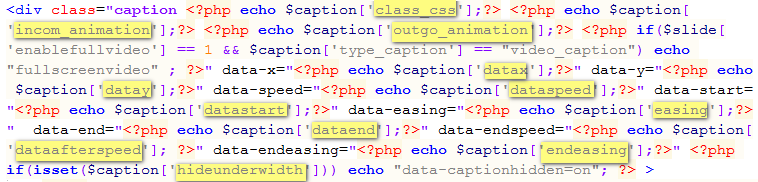
3. Customize
If you want customize code you fint files in url: catalog/view/theme/mytheme/template/module/boss_revolutionslider.tpl.
Css of Boss Filter Product module is config in file: catalog/view/theme/mytheme/stylesheet/boss_revolutionslider.css
You can customize code and css of module if you want.
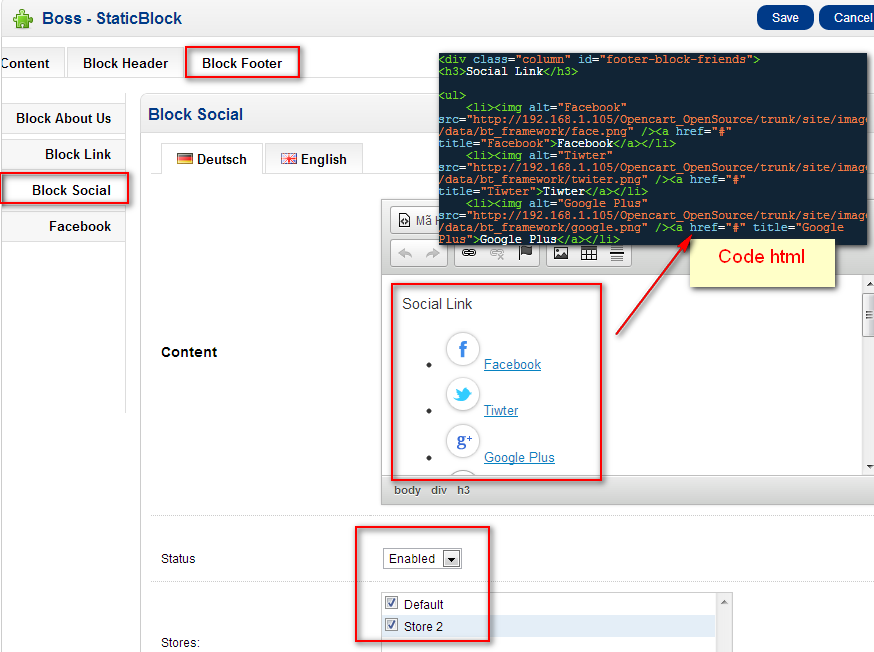
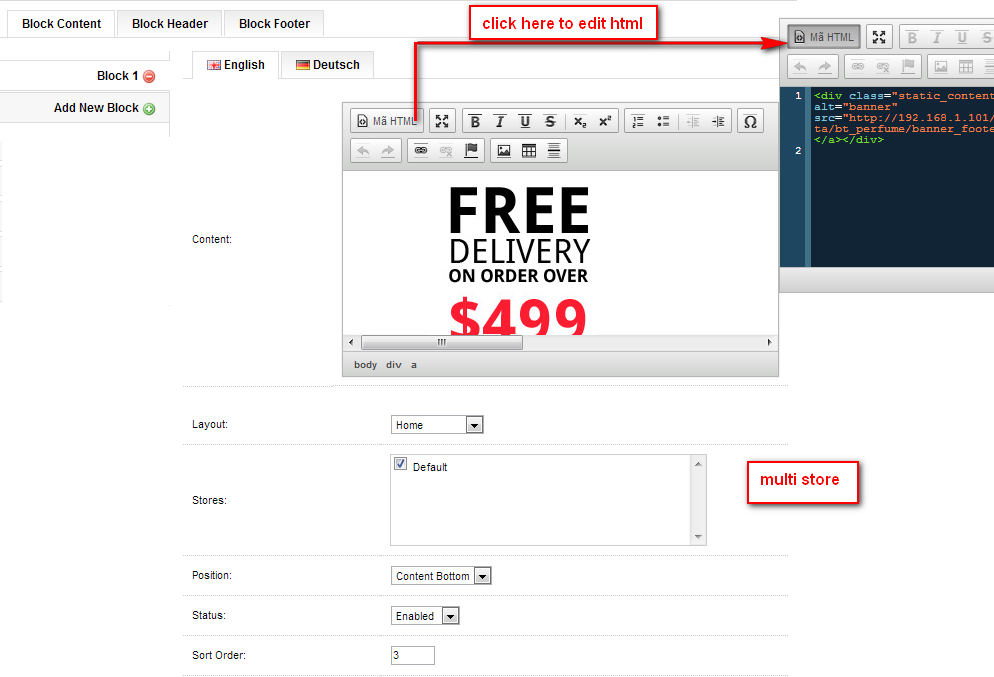
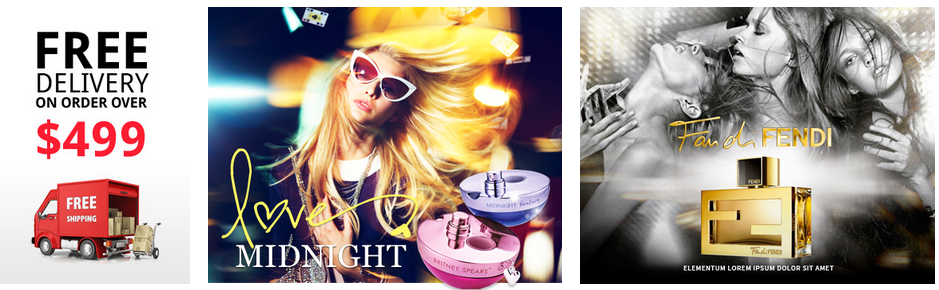
14. Boss Static Block
1. Introduction
Static block allow to add image, html... on any opencart pages. It also support streaming video from other video hosting services such as youtube, vimeo...
2. Module installation
In back end, Go to Extension > Modules > Boss - Static Block > Edit.
With this module, you can add a static content for your website and specified position display it, and choose Multistore.
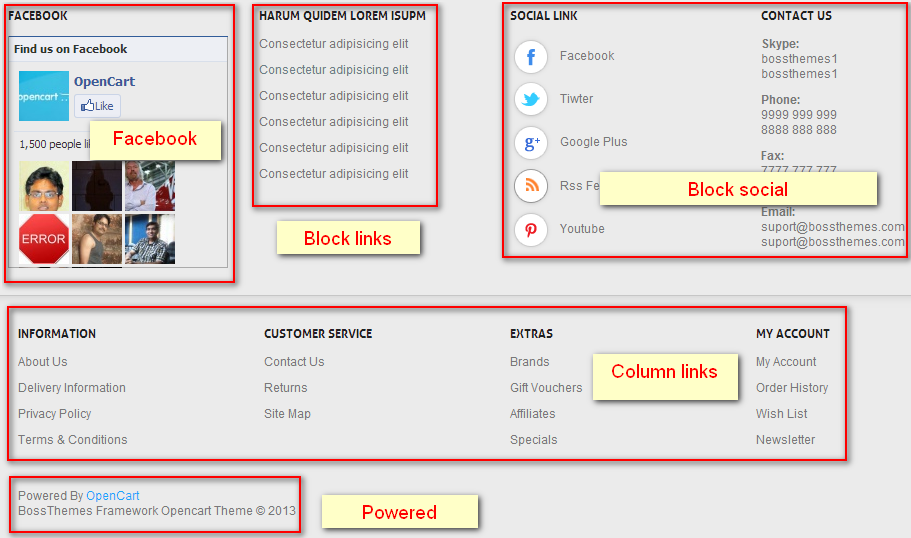
 » In front end
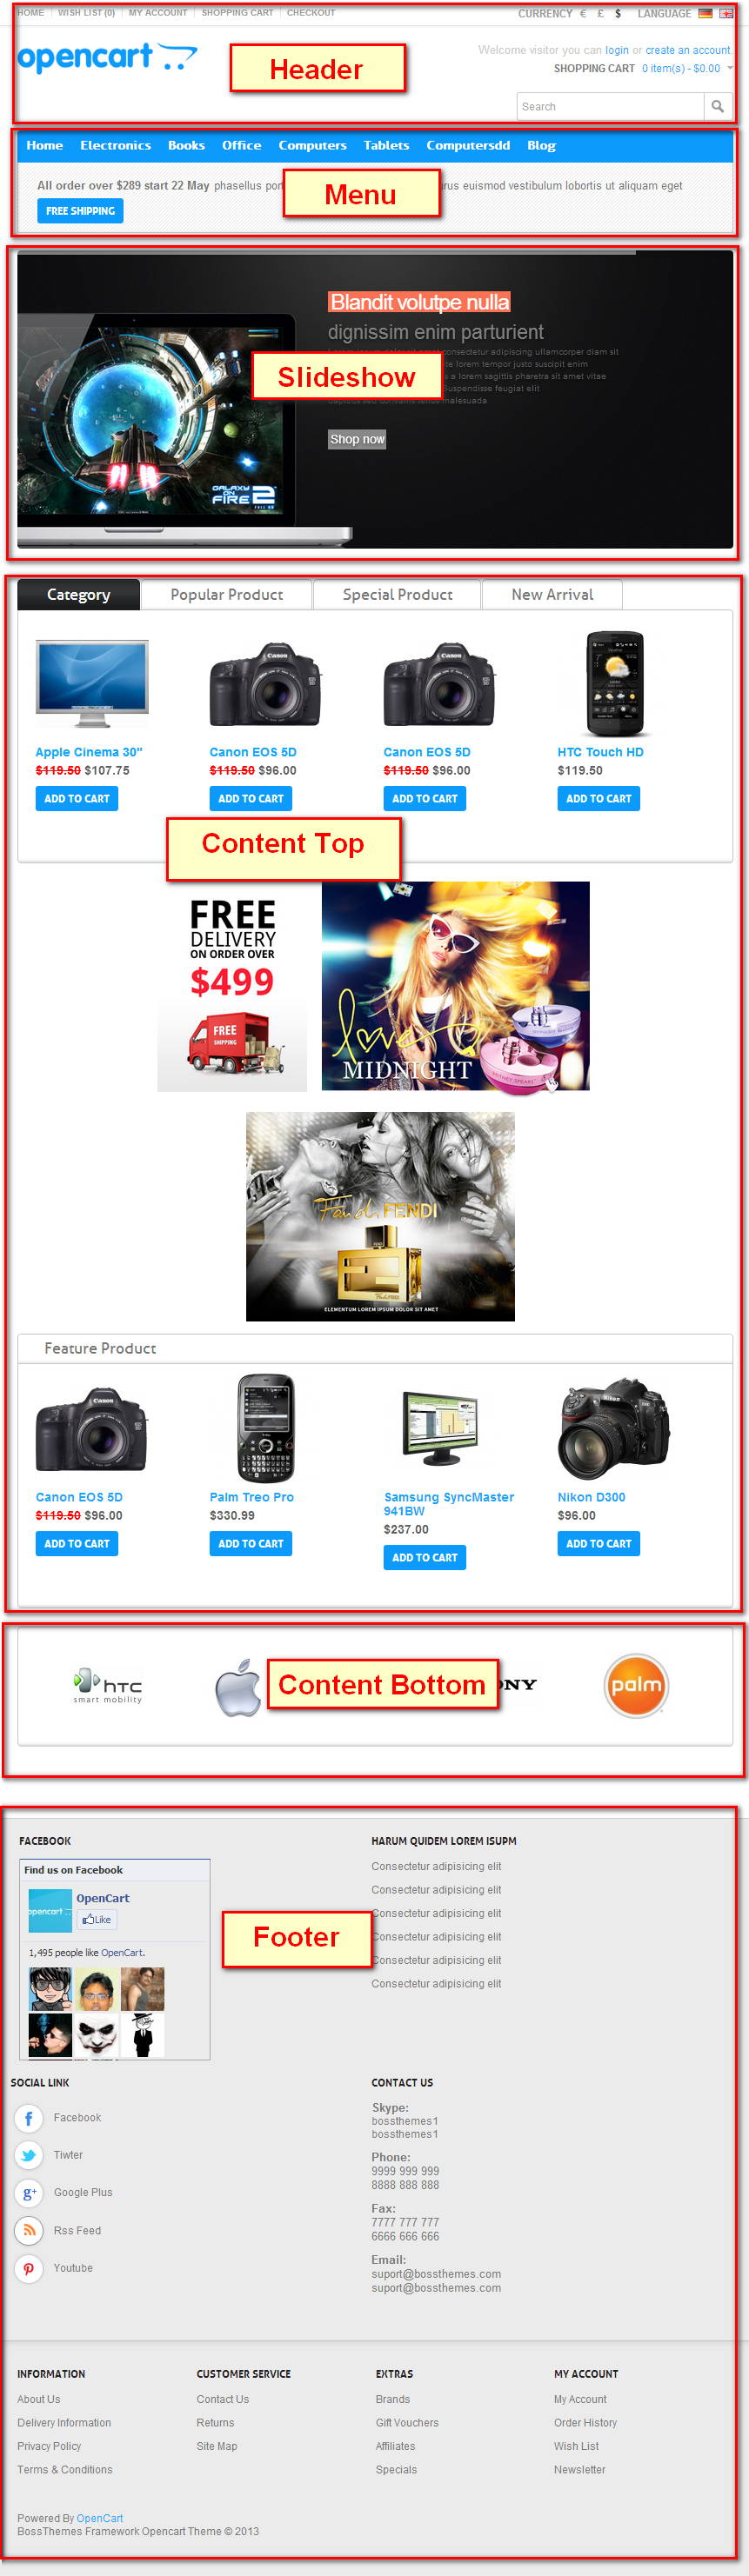
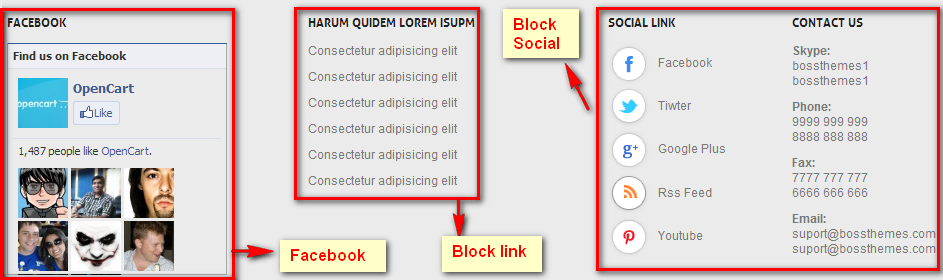
Block Content: block 1, 2, 3 are same, block 4, 6, 7 are same, and block 7
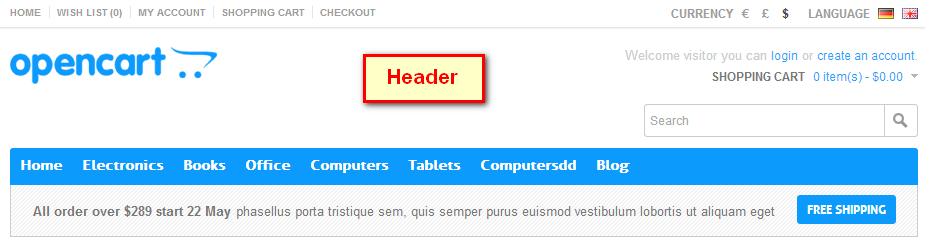
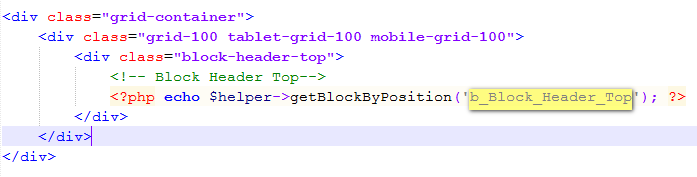
Block Header: Header Banner

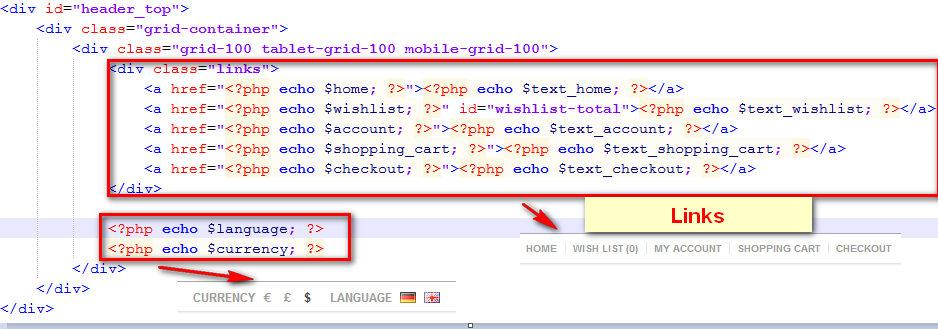
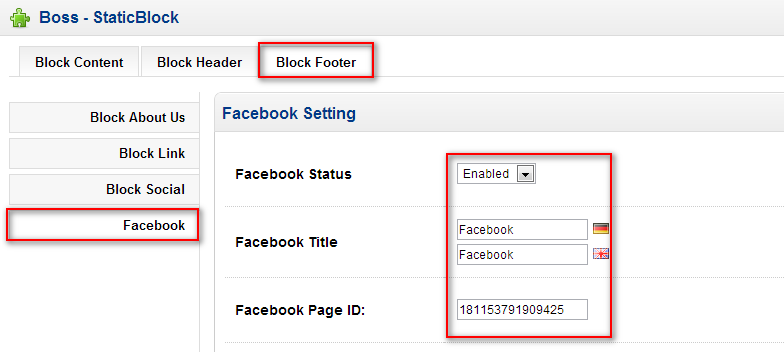
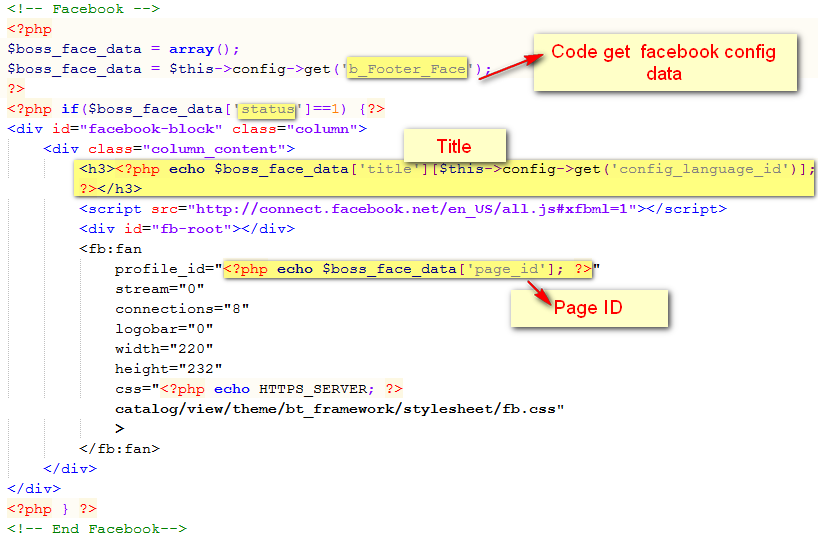
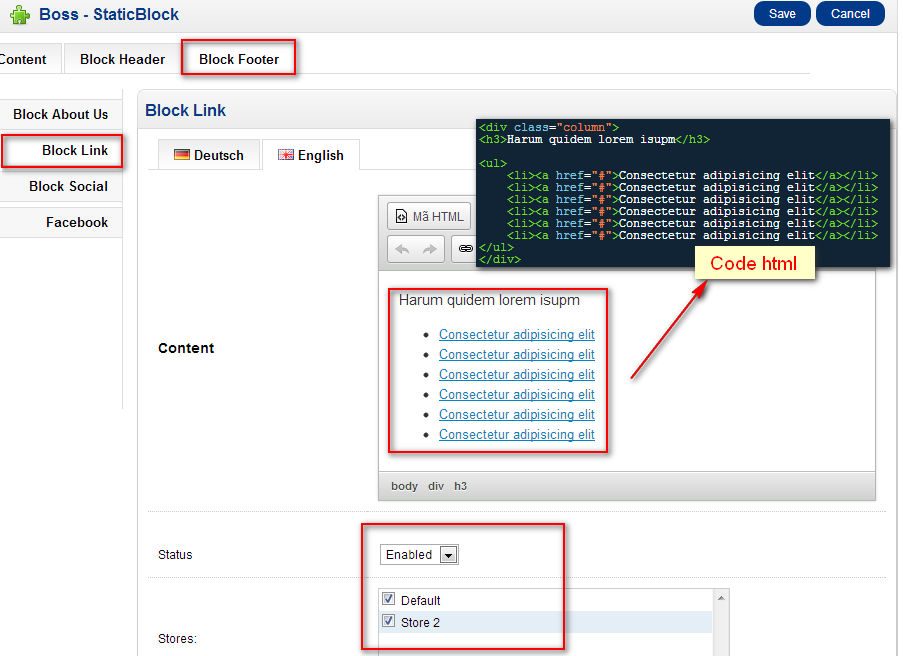
Block footer: Facebook, Block links, Block social
3. CSS your static blocks
You can css for block, it depend on class or id name you written in each block.
15. Boss - Tag Cloud
1. Introduction
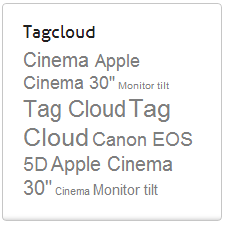
TagCloud is a random tag cloud module. It retrieves your products tags and display them randomly in left, right, top and bottom positions.
TagCloud is multi-language ready. Title can edit in back-end. Module detects the active template. Easy to use, simply setup in admin and save. TagCloud has been tested in most major browsers.
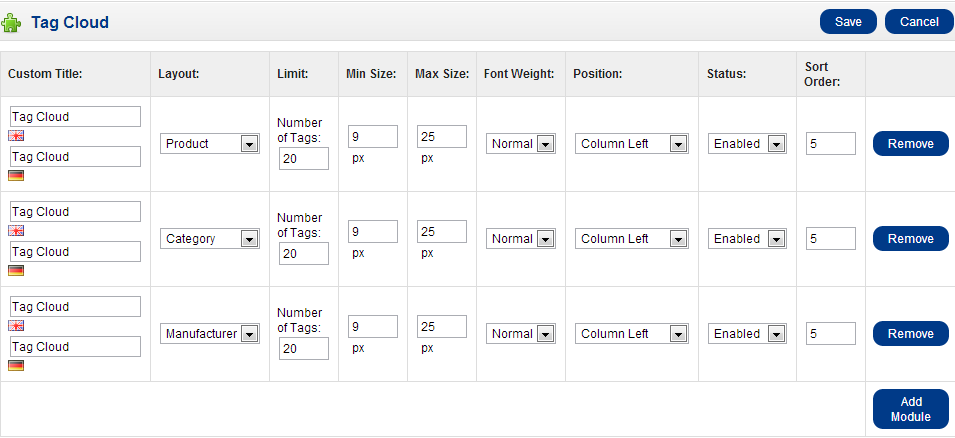
2. Module installation
In back end, Go to Extension > Modules > Boss - Tag Cloud > click on Install and then Edit
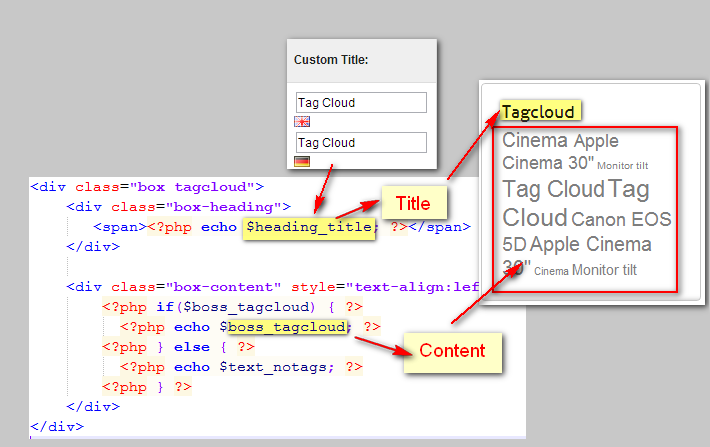
Open template file: catalog/view/theme/mytheme/module/boss_tagcloud.tpl
» In front end
3. Customize css and code
If you want customize you fint files in url: catalog/view/theme/mytheme/template/module/boss_tagcloud.tpl. You see class of module in .tpl file, after you can customize code and css if you want.
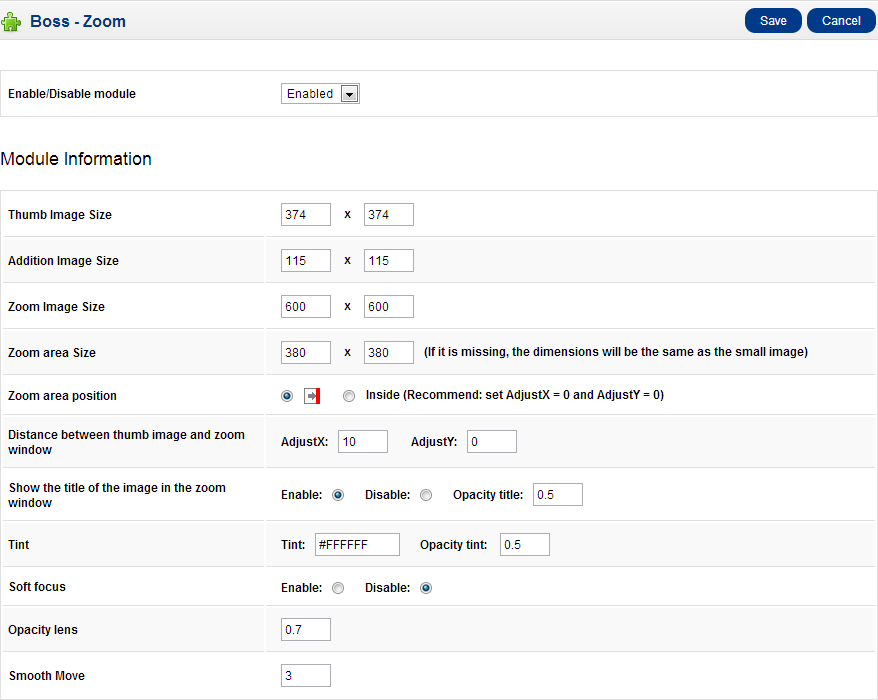
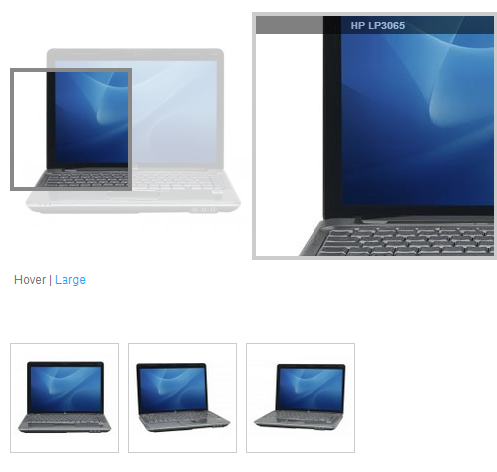
16. Boss - Zoom
1. Introduction
Boss-Zoom module use cloud zoom and colorbox simultaneously.
Boss-Zoom has two beautiful effects: Zoom on hover and Enlarge on click. In this version works only at product page. This still run when product only have addition image (no Thumb image). When disable or uninstall module, product page will return page before install.
2. Module installation
 » In front end
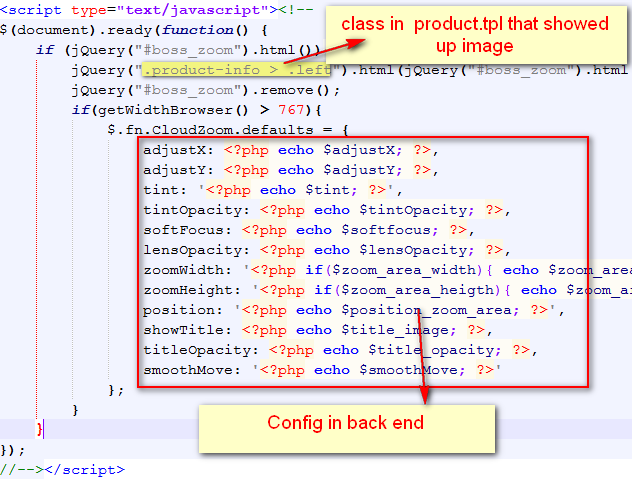
3. Customize code
Boss zoom is added auto by javascript. Open template file: catalog/view/theme/mytheme/module/boss_zoom.tpl. You can see this javascript funciton
Css of Boss-Zoom module is config in file: catalog/view/theme/mytheme/stylesheet/cloud-zoom.1.0.3.css. You can customize css of module if you want.
Credits & Support
Credits
Jquery and CSS framework are used framework:
Support