Oswad Market theme is designed by www.bossthemes.com.
Theme have many features that default Opencart does not support (session theme features).
Please contact us via mail support@bossthemes.com to have best support.
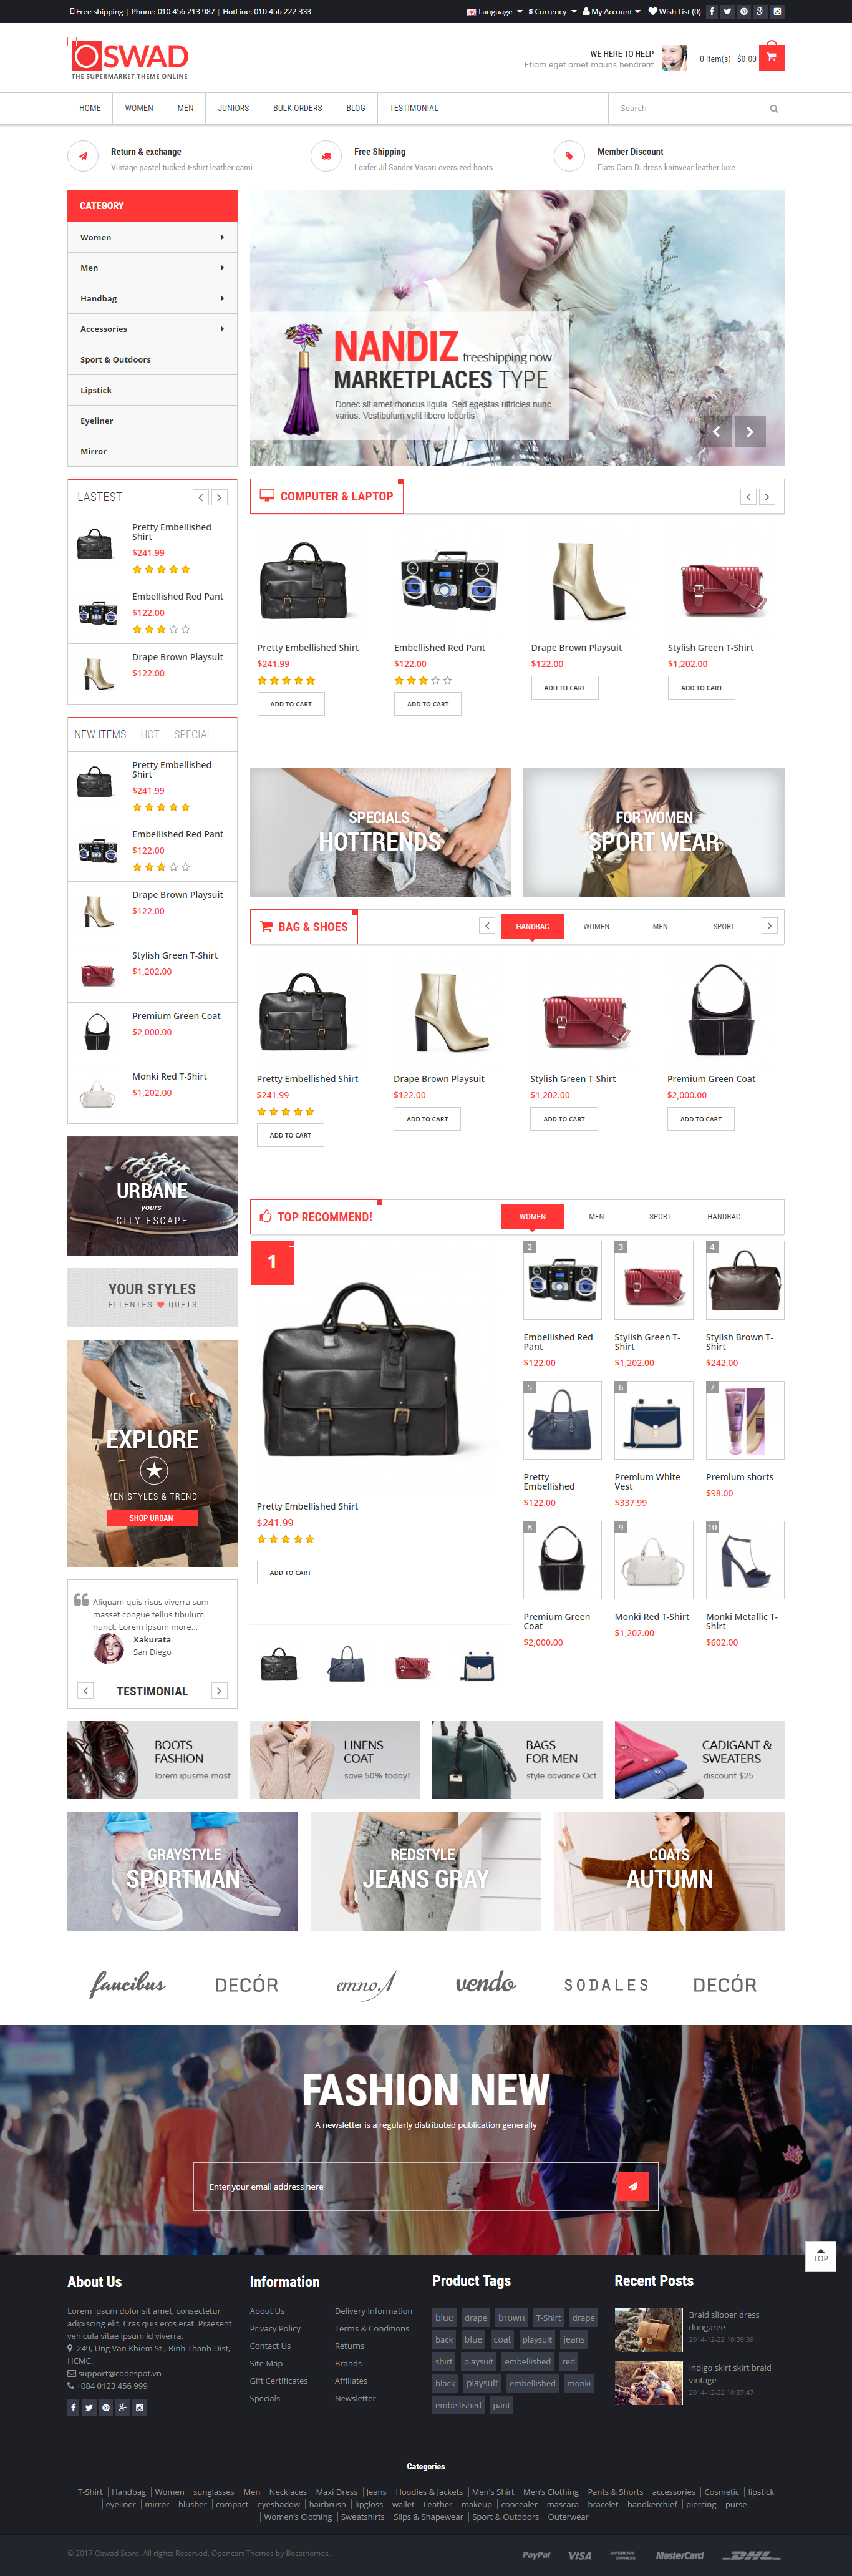
Install oswad-market-v23-full-package.zip is very quick. Find and Extract the oswad-market-v23-full-package.zip.
- 1Full package: The package includes all source of the theme.
- 2Sample data: File database sample includes all data of product, category, setting ... the demo site illustrates Oswad Market.
- 3Upload: Upload all the files and folders to your server from the oswad-market-v23-full-package folder.
- 4configure boss_reconfig.php:
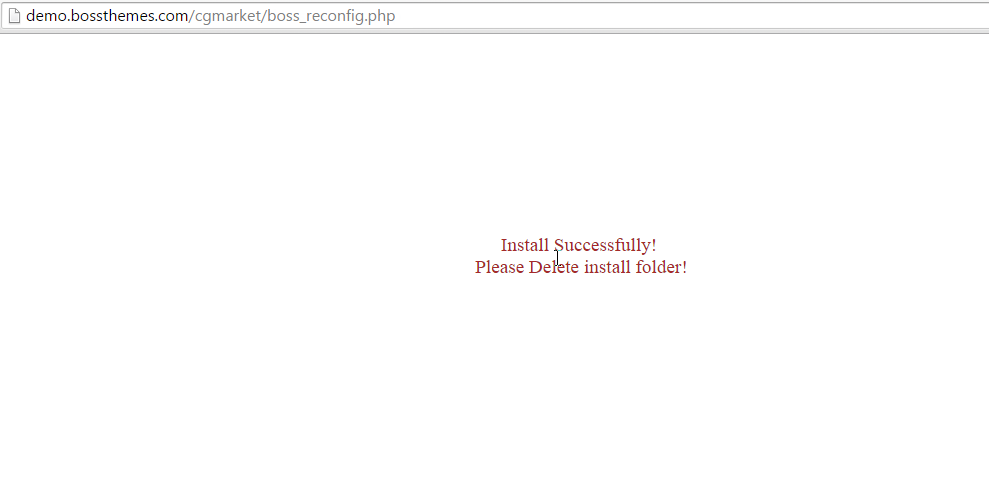
- 5Config: Run boss_reconfig.php file on web browser. ex: http://domain.com/boss_reconfig.php
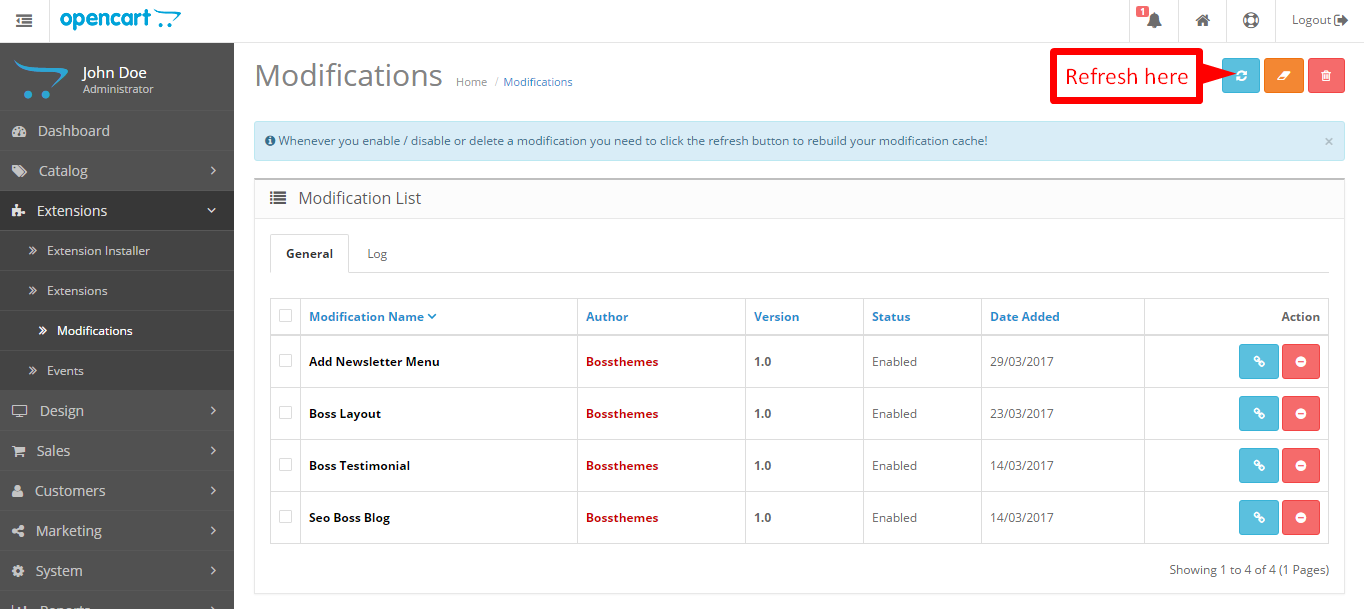
- 6Refresh modifications: Go to Admin->Extensions->Modification Click on Refresh button.
Extract the oswad-market-v23-full-package.zip.
Find sample-database.sql and import the sql file to your database
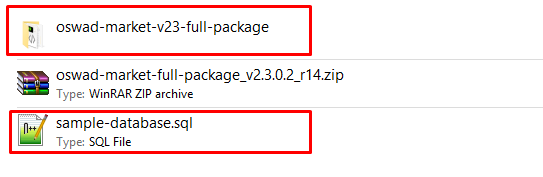
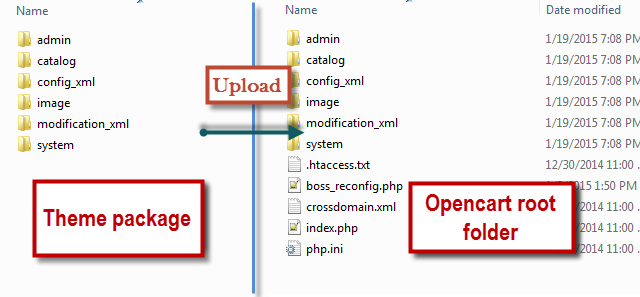
Upload all the files and folders to your server from the oswad-market-v23-full-package folder.
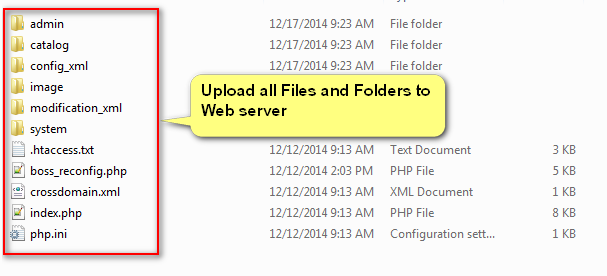
On your server, find boss_reconfig.php, open and configure this file
Run boss_reconfig.php file on web browser
Refresh modifications Go to Admin > Extensions > Modification > Refresh
Visit the store homepage e.g. http://www.example.com
For Linux/Unix, you need chmod 0755 for all the folders, chmod 0644 for
all the files
Admin panel located in http://www.example.com/admin/
username: demo
password: demo123
You can jewelry demo video at: Install Oswad Market full package
Important!
As OpenCart 2.3.X.X has been just released, many modules have not been compatible with it. Please check that all of the old modules and old extensions you want to use in your store are compatible before installing OpenCart 2.3.X.X
Upgrading directly from OpenCart 1.5 and opencart 2.0.0.0 to OpenCart 2.3.X.X is currently not possible. You can check the existing issues in community forums and GitHub. Visit our support forums to keep you informed about the latest version of OpenCart 2.3.X.X.
Make sure to have installed OpenCart 2.3.X.X working before you start to install the theme.
Find and Extract the oswad-market-v23-theme-package.zip.
- 1Theme package: Upload 6 folders in file (admin, catalog, config_xml, image, modification_xml, system,) the upload folder and merge them with the original files in your project (OpenCart 2.3.X.X).
- 2Settings for Oswad Market theme: Select store template bt_oswad_market in backend.
- 3Install Modification:
- 4Refresh Modification: Whenever you enable / disable or delete a modification, you click the refresh button to rebuild your modification cache!
- 5Access & Modify Permission: Access and modify permission for blog page and create all layout.
- 6Create All Layouts: Create all layouts for some layout.
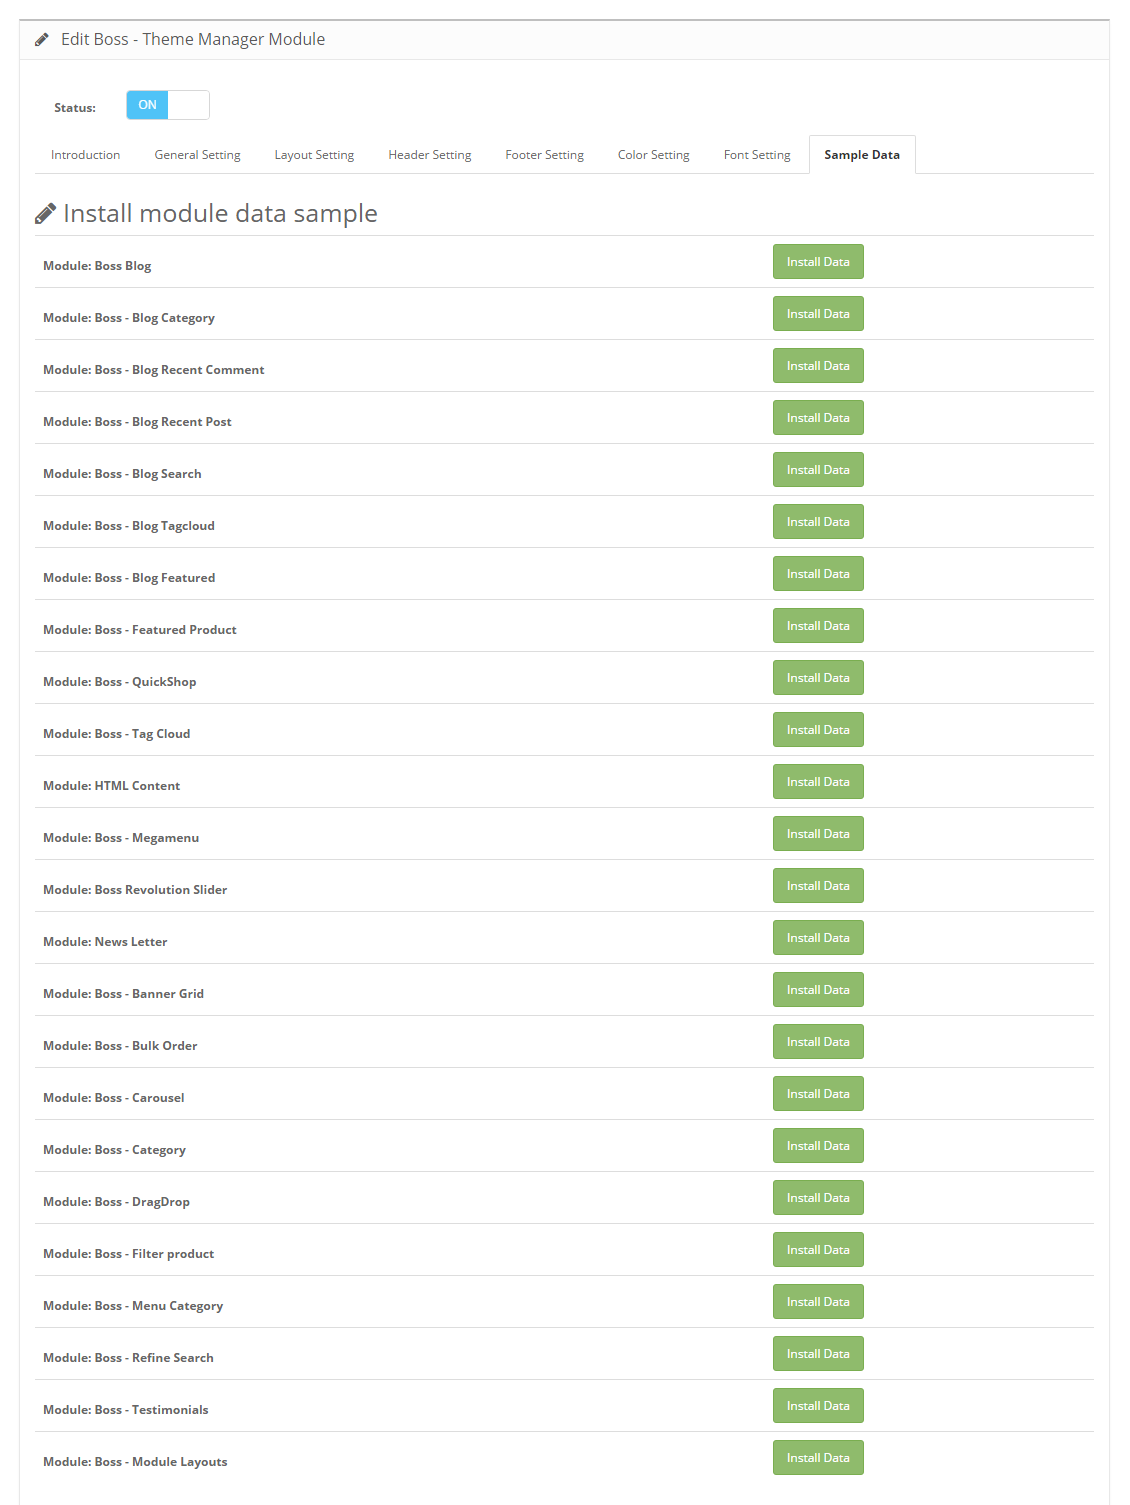
- 7Install Data Sample: Install all data sample of demo site for each modules in this theme.
Extract file oswad-market-v23-theme-package.zip.
- Note: Package version must be the same as your project opencart version.
In back end, Go to Extensions > Themes > install > Eidt -> Enabled tab, select the template OswadMarket - Opencart Themes by Bossthemes .

In back end, Go to System > Setting > edit > Store tab, select the template bt_oswad_market .

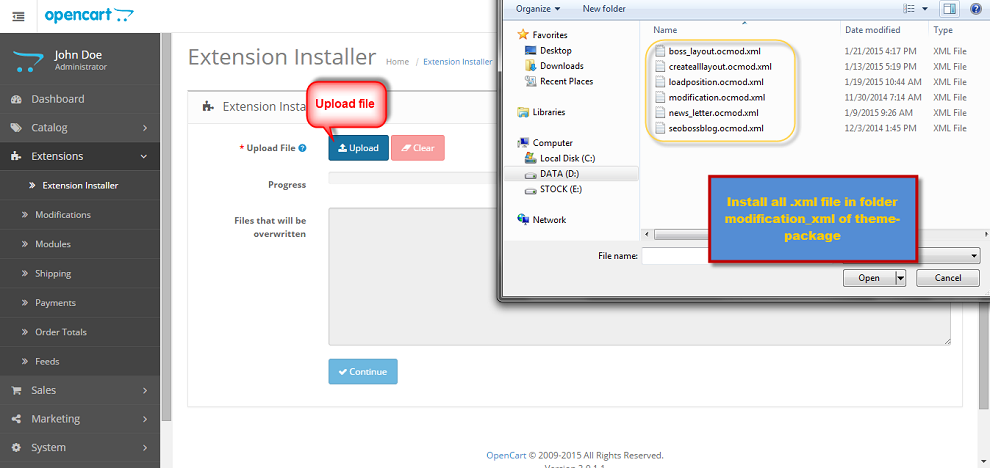
In back end, Go to Extension > Extension Installer, press on the Upload button and browse to folder modification_xml and install all .xml files in this folder.
In back end, Go to Extension > Extension Installer, press on the Upload button and browse to folder modification_xml and install all .xml files in this folder.
In back end, Go to System > Setting > edit > Store tab, select the template OswadMarket - Opencart Themes by Bossthemes .
In back end, Go to Extension > Extension Installer, press on the Upload button and browse to folder modification_xml and install all .xml files in this folder.
In back end, Go to Extension > Modification, click on the refresh button to rebuild your modification cache.
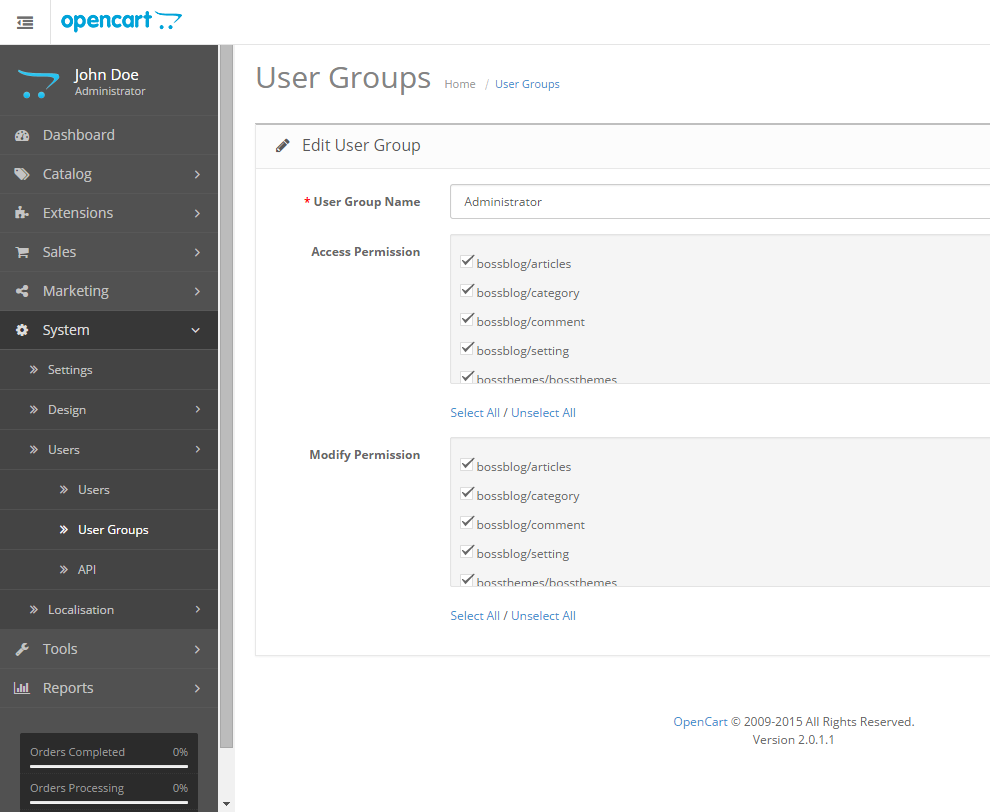
In back end, Go to System > Users > User Groups > Edit Administrator, click Sellect All for Access and Modify Permission.
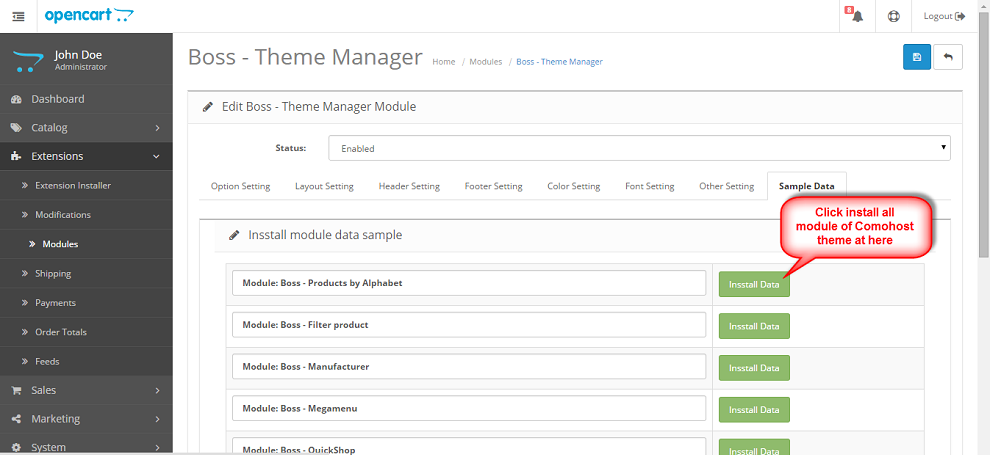
In back end, Go to Extension > Module > Boss - Theme Manager, click Install this module Then Edit it. Go to tab Data Sample to install data sample for this theme.
When you click to install module Boss - Theme Manager. All old modules setting are cleared.
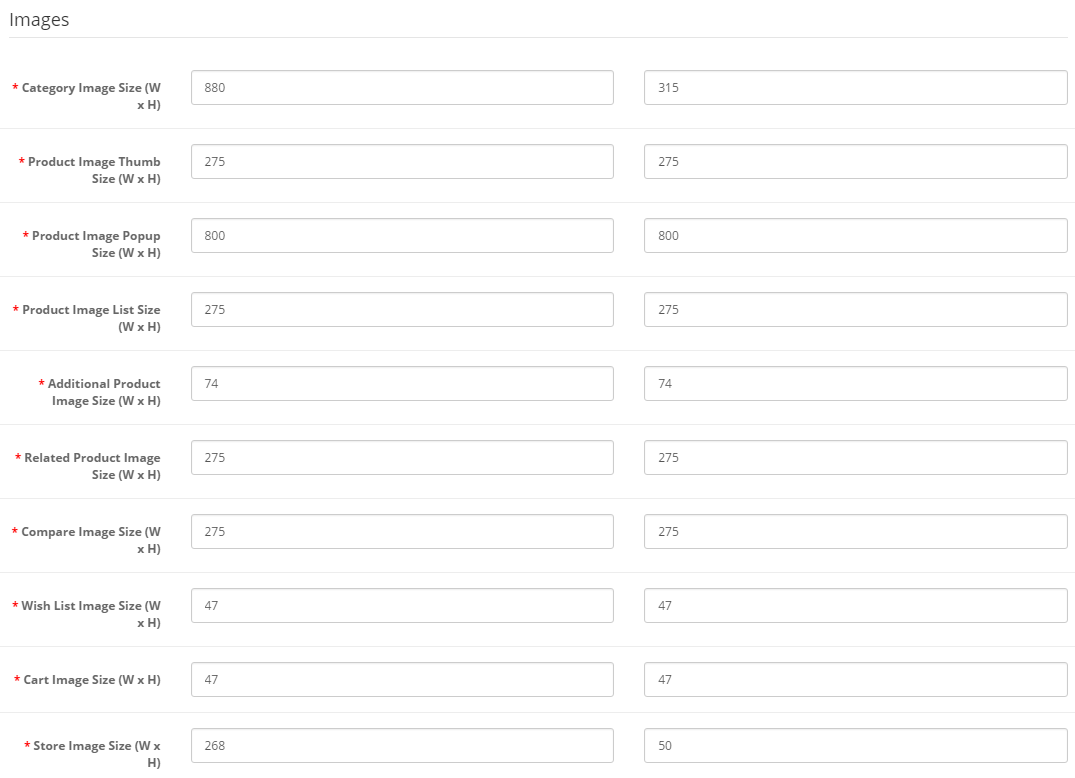
In back end, go to Admin > Extension > Theme > OswadMarket - Opencart Themes by Bossthemes > Edit > Image section
- 1Category Image Size: The size of category image shown in category page with name and description of category.
- 2Product Image Thumb Size: The size of product image in page of product detail.
- 3Product Image Popup Size: The size of product image in page of product detail when viewing large popup.
- 4Product Image List Size: The size of product image shown as grid/list in category, search and special page.
- 5Additional Product Image Size: The size of additional product image shown below image thumb in page of product detail.
- 6Related Product Image Size: The size of related product image in page of product detail.
- 7Compare Image Size: The size of product image in compare page.
- 8Wish List Image Size: The size of product wishlist image in wishlist page.
- 9Cart Image Size: The size of product image in dropdown cart in header.
- 10Store Image Size: The size of stores image.
In back end, Go to System > Setting > edit, you can config other option for your site as: image, email, store name, title...
You can read more details about each option here: Editing a store's settings
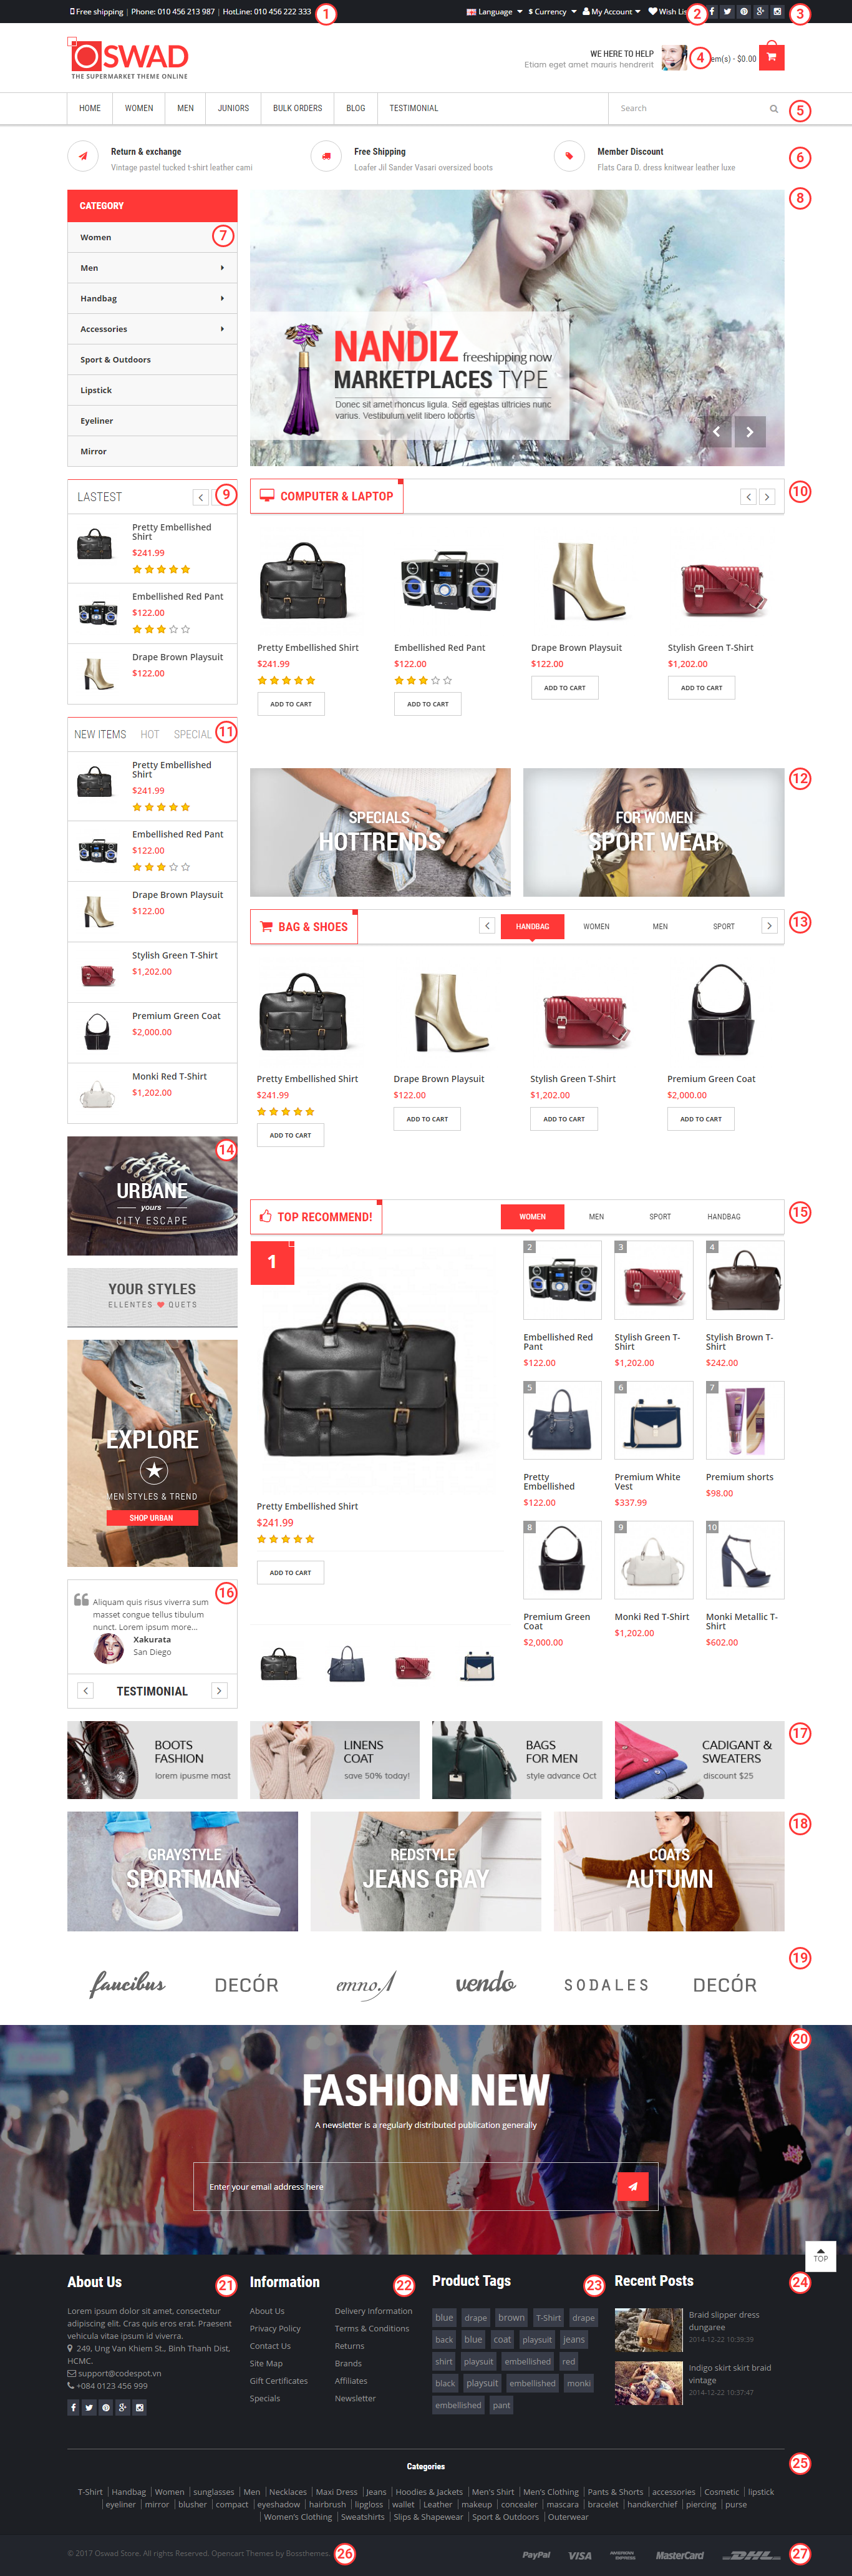
- 1 Theme Manager - Free Shipping
- 2 Theme Manager - Header link
- 3 Theme Manager - Follow us
- 4 Theme Manager - Header Ads
- 5 Megamenu - Header Main Menu
- 6 HTML Content - Free Shipping Feature
- 7 Menu Category - Homepage Left Category
- 8 Revolution Slider - Homepage Content Top
- 9 Featured Product - Lastest
- 10 Filter product - Computer & Laptop
- 11 Filter product - New, Hot, Special
- 12 Banner Grid - Homepage Content Top
- 13 Filter product - Bag & Shoes
- 14 Banner Grid - Banner Homepage Left
- 15 Filter product - Top Recommend
- 16 Testimonials - Homepage Left
- 17 Banner Grid - Bottom 4 Column
- 18 Banner Grid - Bottom 3 Column
- 19 Carousel - Bottom
- 20 News Letter - Footer
- 21 Theme Manager - About Us & Contact Us
- 22 Theme Manager - Footer link
- 23 Tag Cloud - Footer
- 24 Blog Recent Post - Footer
- 25 Theme Manager - Footer Category
- 26 Theme Manager - Powered by
- 27 Theme Manager - Payment link
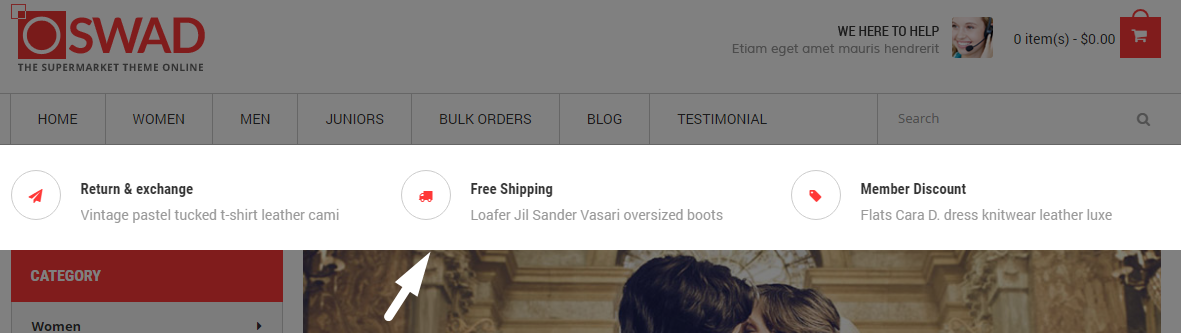
1. Theme Manager - Free Shipping
Frontend Appearance

Backend Setting
Step 1: Go to Admin CP > Extensions > Modules > Boss - Theme Manager > Edit.
Step 2: Click on the Header Setting tab and then select the Free Shipping tab.
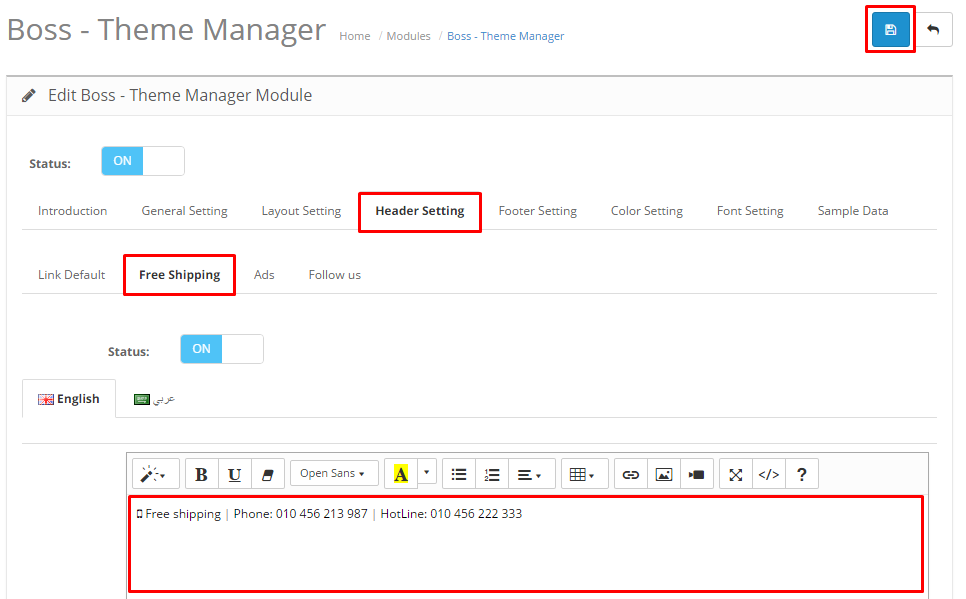
Step 3: Change the value in the text box and click Save Button in the top right corner to save your setting.
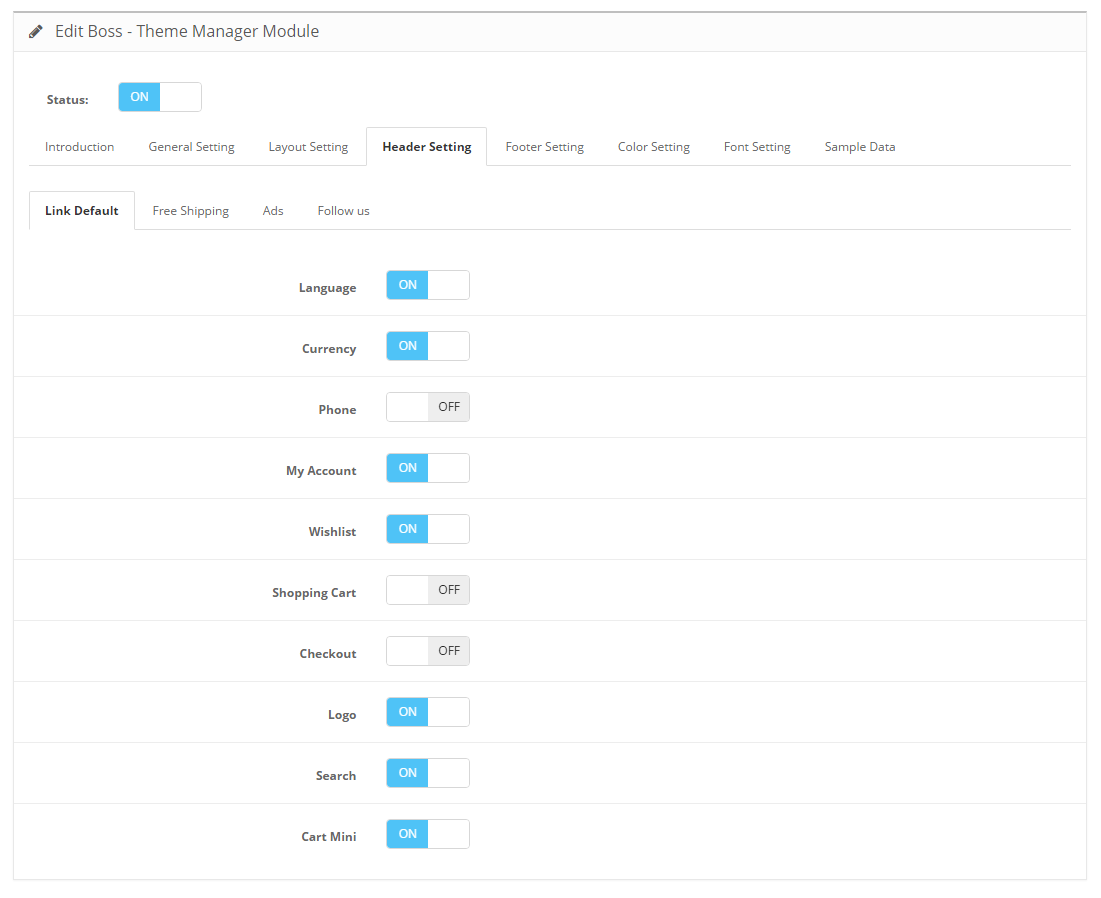
2. Theme Manager - Header link
Frontend Appearance

Backend Setting
Step 1: Go to Admin CP > Extensions > Modules > Boss - Theme Manager > Edit.
Step 2: Click on the Header Setting tab and then select the Link Default tab.
Step 3: Switch on or off to display or hide a link and click Save Button in the top right corner to save your setting.
3. Theme Manager - Follow us
Frontend Appearance

Backend Setting
Step 1: Go to Admin CP > Extensions > Modules > Boss - Theme Manager > Edit.
Step 2: Click on the Header Setting tab and then select the Follow us tab.
Step 3: Change the setting and click Save Button in the top right corner to save your setting.
4. Theme Manager - Header Ads
Frontend Appearance

Backend Setting
Step 1: Go to Admin CP > Extensions > Modules > Boss - Theme Manager > Edit.
Step 2: Click on the Header Setting tab and then select the Ads tab.
Step 3: Change the setting and click Save Button in the top right corner to save your setting.
5. Megamenu - Header Main Menu
Frontend Appearance

Backend Setting
Step 1: Go to Admin CP > Extensions > Modules > Boss - Megamenu > Header Main Menu > Edit.
Step 2: Change the setting and click Save Button in the top right corner to save your setting.
6. HTML Content - Free Shipping Feature
Frontend Appearance
Backend Setting
Step 1: Go to Admin CP > Extensions > Modules > HTML Content > Free Shipping Feature Header Bottom > Edit.
Step 2: Change the value in the text box and click Save Button in the top right corner to save your setting.
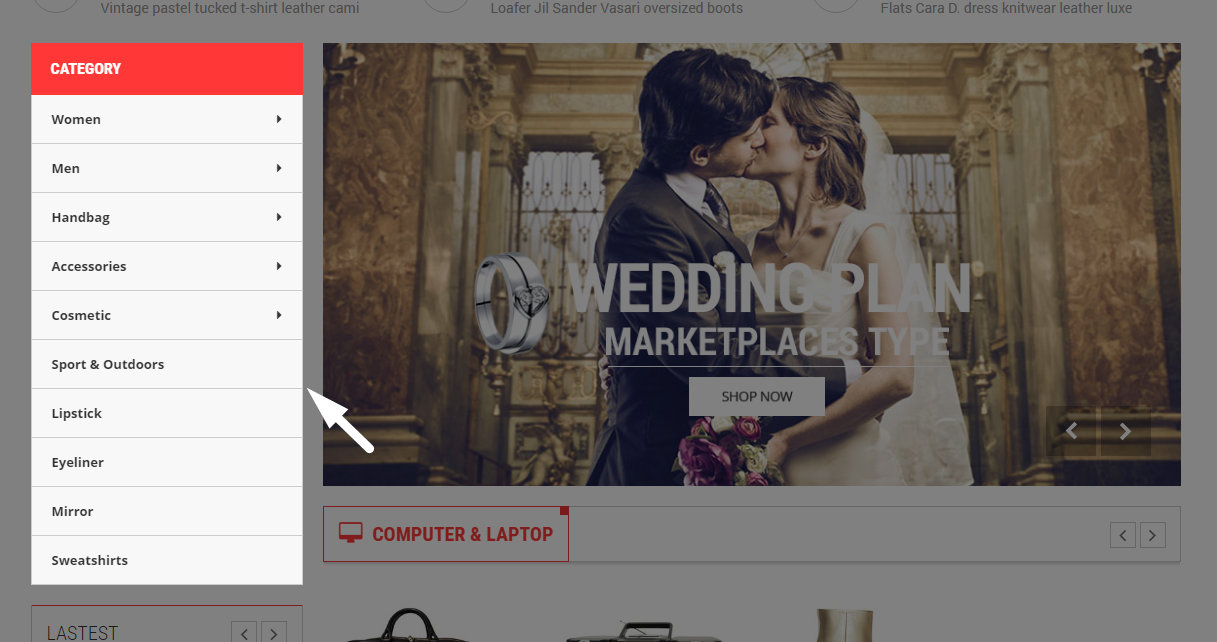
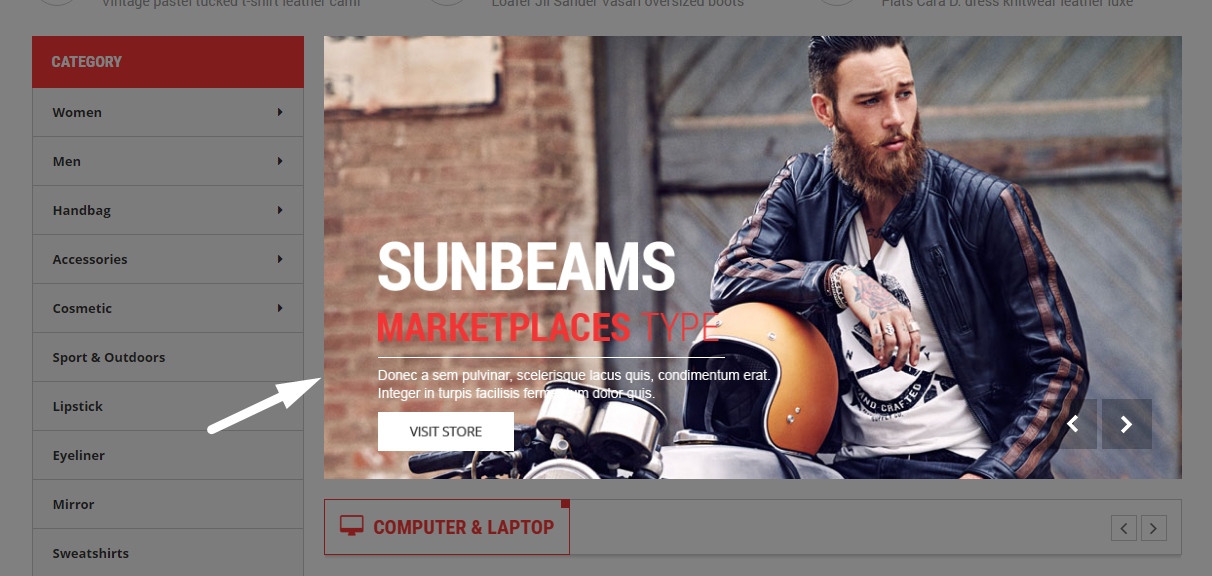
7. Menu Category - Homepage Left Category
Frontend Appearance
Backend Setting
Step 1: Go to Admin CP > Extensions > Modules > Boss - Menu Category > Homepage Left Category > Edit.
Step 2: Change the setting and click Save Button in the top right corner to save your setting.
8. Revolution Slider - Homepage Content Top
Frontend Appearance
Backend Setting
Step 1: Go to Admin CP > Extensions > Modules > Boss - Revolution Slider > Homepage Content Top > Edit.
Step 2: Change the setting and click Save Button in the top right corner to save your setting.
9. Featured Product - Lastest
Frontend Appearance
Backend Setting
Step 1: Go to Admin CP > Extensions > Modules > Boss - Featured Product > Homepage Left (Lastest ) > Edit.
Step 2: Change the setting and click Save Button in the top right corner to save your setting.
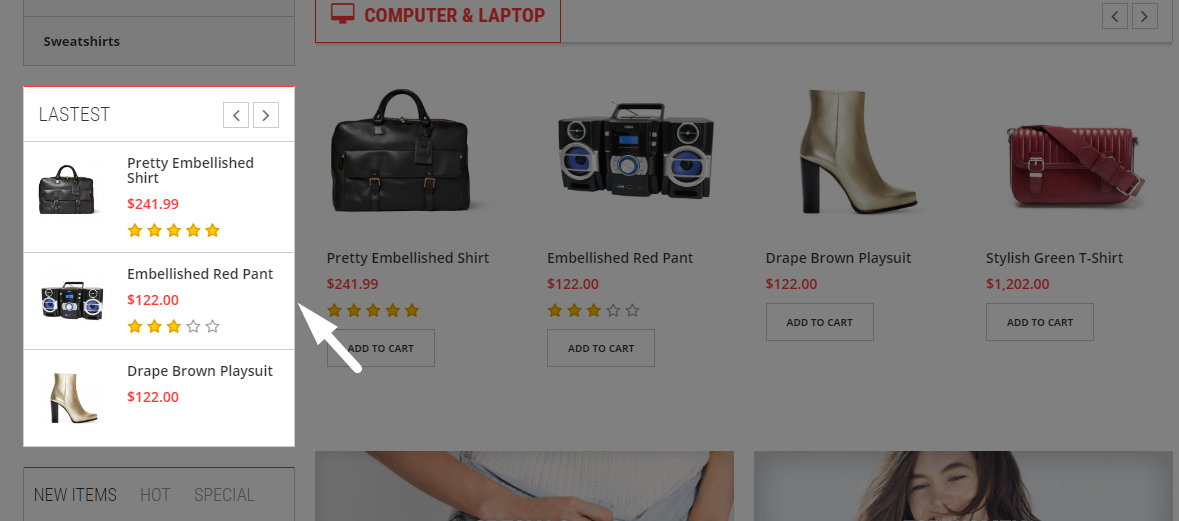
10. Filter product - Computer & Laptop
Frontend Appearance

Backend Setting
Step 1: Go to Admin CP > Extensions > Modules > Boss - Filter product > Homepage Content Top (Computer & Laptop) > Edit.
Step 2: Change the setting and click Save Button in the top right corner to save your setting.
10. Filter product - New, Hot, Special
Frontend Appearance
Backend Setting
Step 1: Go to Admin CP > Extensions > Modules > Boss - Filter product > Homepage Left (New, Hot, Special) > Edit.
Step 2: Change the setting and click Save Button in the top right corner to save your setting.
12. Banner Grid - Homepage Content Top
Frontend Appearance
Backend Setting
Step 1: Go to Admin CP > Extensions > Modules > Boss - Banner Grid > Homepage Content Top > Edit.
Step 2: Change the setting and click Save Button in the top right corner to save your setting.
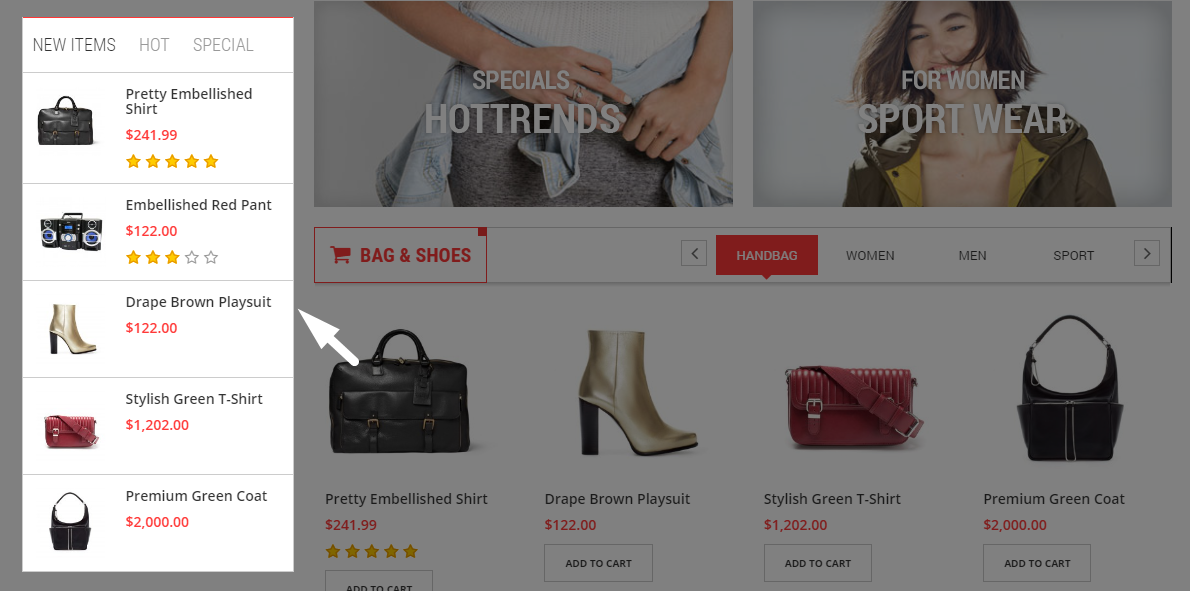
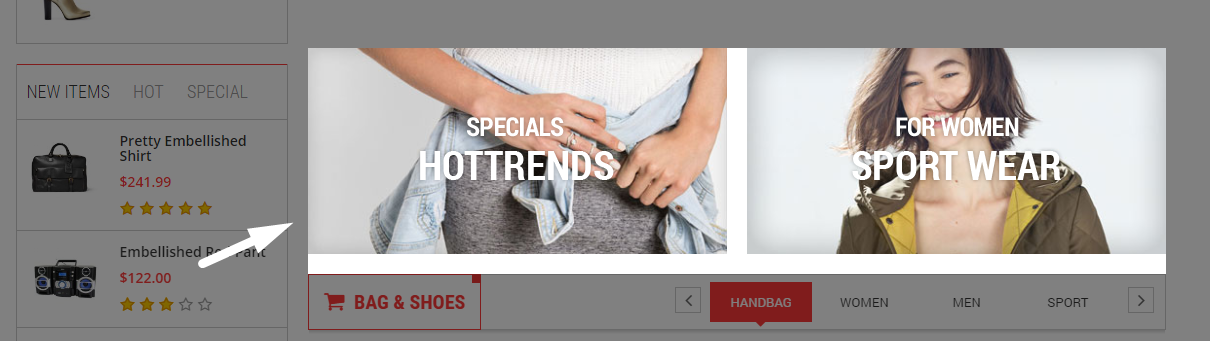
13. Filter product - Bag & Shoes
Frontend Appearance
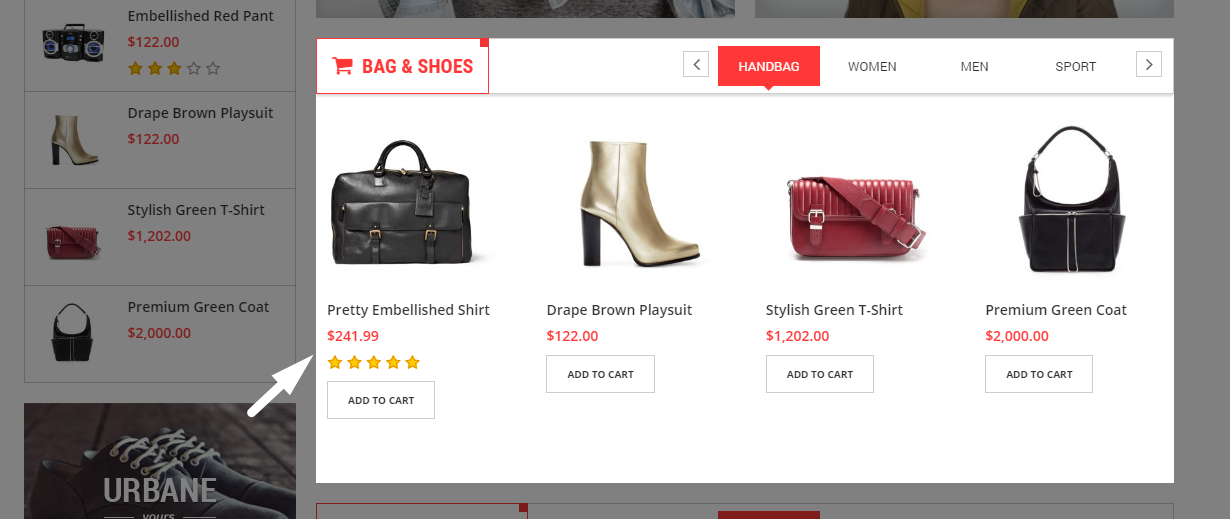
Backend Setting
Step 1: Go to Admin CP > Extensions > Modules > Boss - Filter product > Homepage Content Top (Bag & Shoes) > Edit.
Step 2: Change the setting and click Save Button in the top right corner to save your setting.
14. Banner Grid - Banner Homepage Left
Frontend Appearance
Backend Setting
Step 1: Go to Admin CP > Extensions > Modules > Boss - Banner Grid > Banner Homepage Left > Edit.
Step 2: Change the setting and click Save Button in the top right corner to save your setting.
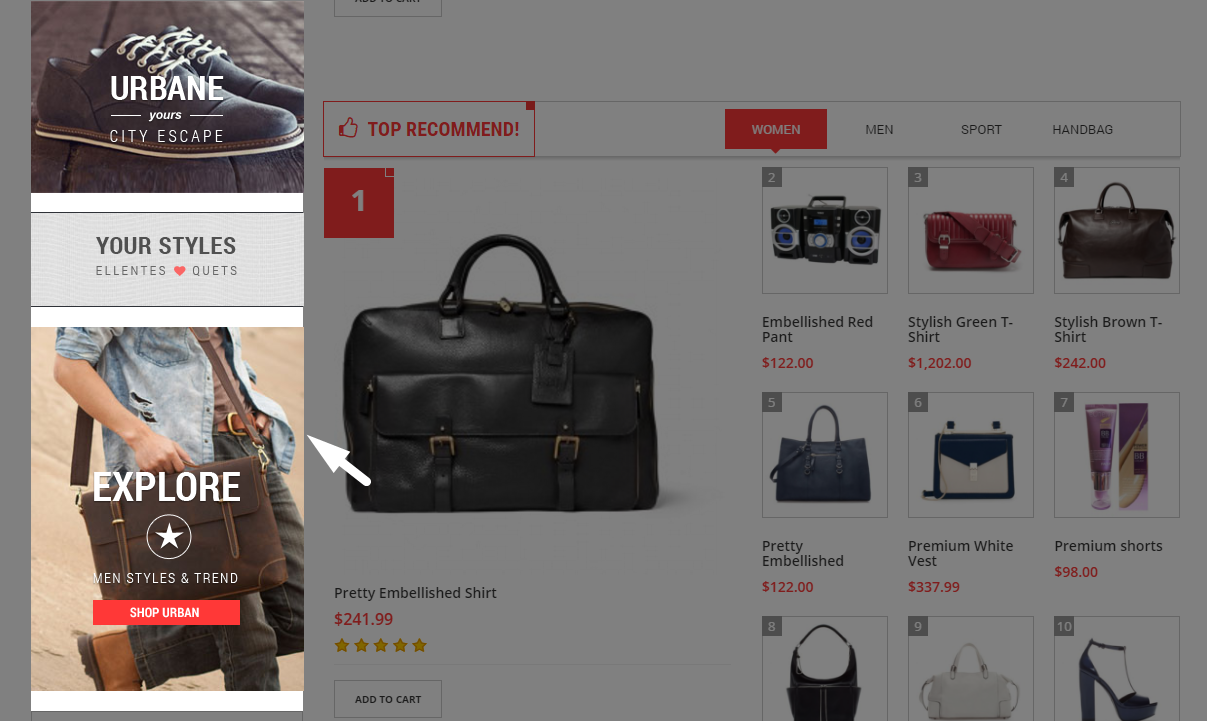
15. Filter product - Top Recommend
Frontend Appearance
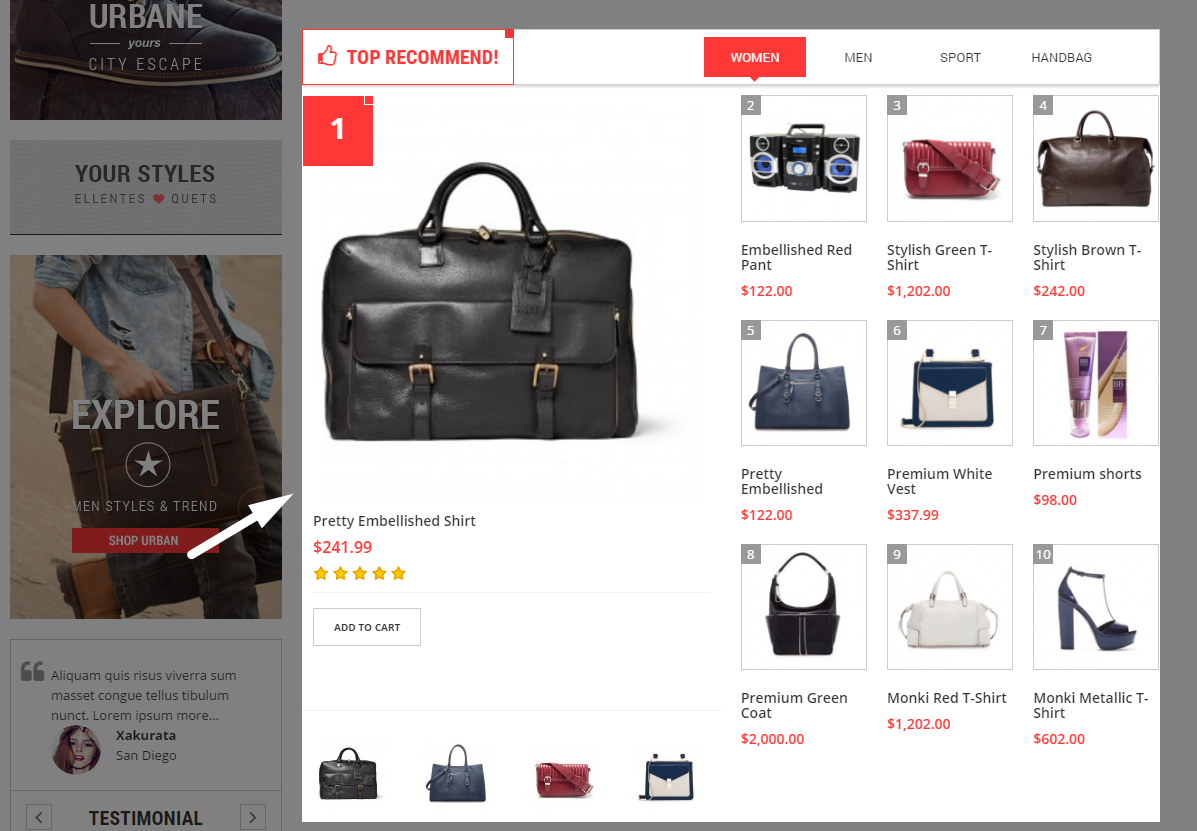
Backend Setting
Step 1: Go to Admin CP > Extensions > Modules > Boss - Filter product > Homepage Content Top (Top Recommend) > Edit.
Step 2: Change the setting and click Save Button in the top right corner to save your setting.
16. Testimonials - Homepage Left
Frontend Appearance
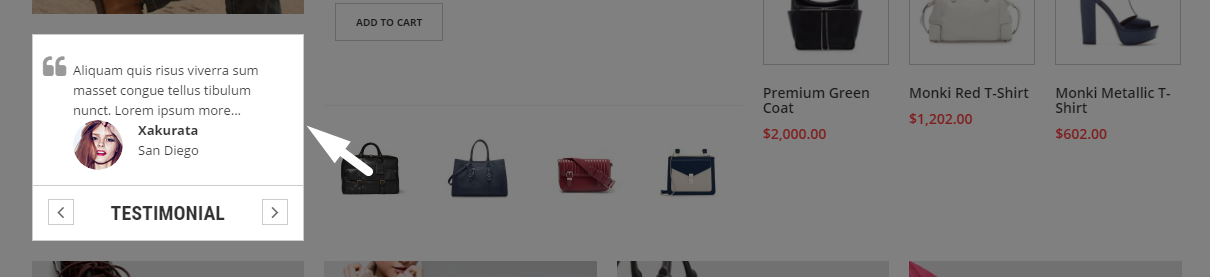
Backend Setting
Step 1: Go to Admin CP > Extensions > Modules > Boss - Testimonials > Homepage Left > Edit.
Step 2: Change the setting and click Save Button in the top right corner to save your setting.
17. Banner Grid - Bottom 4 Column
Frontend Appearance
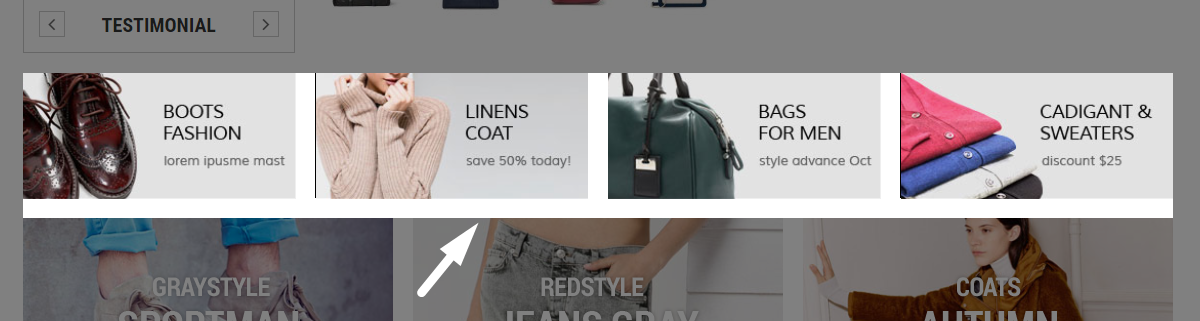
Backend Setting
Step 1: Go to Admin CP > Extensions > Modules > Boss - Banner Grid > Homepage Bottom 4 Column > Edit.
Step 2: Change the setting and click Save Button in the top right corner to save your setting.
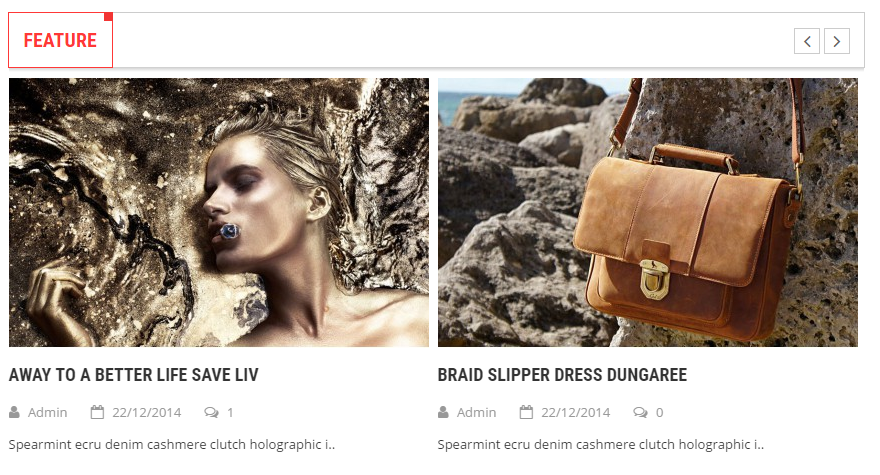
18. Banner Grid - Bottom 3 Column
Frontend Appearance
Backend Setting
Step 1: Go to Admin CP > Extensions > Modules > Boss - Banner Grid > Homepage Bottom 4 Column > Edit.
Step 2: Change the setting and click Save Button in the top right corner to save your setting.
19. Carousel - Bottom
Frontend Appearance

Backend Setting
Step 1: Go to Admin CP > Extensions > Modules > Boss - Carousel > Homepage Bottom > Edit.
Step 2: Change the setting and click Save Button in the top right corner to save your setting.
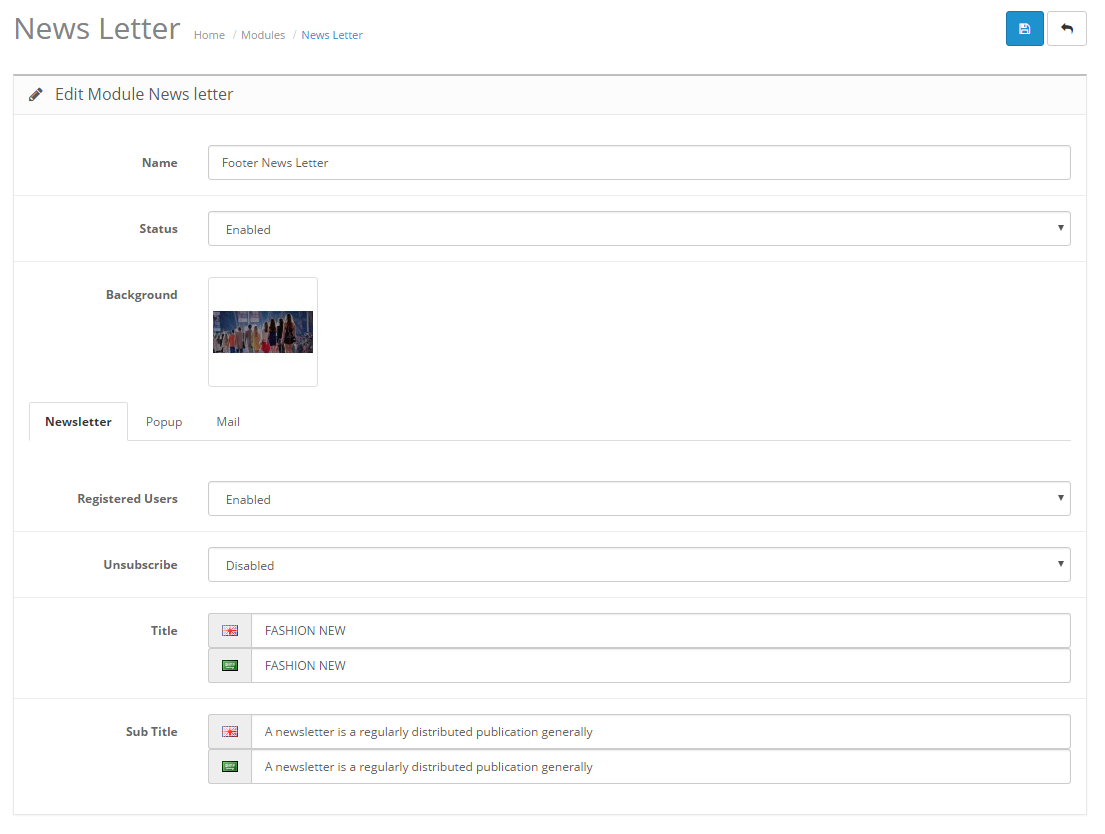
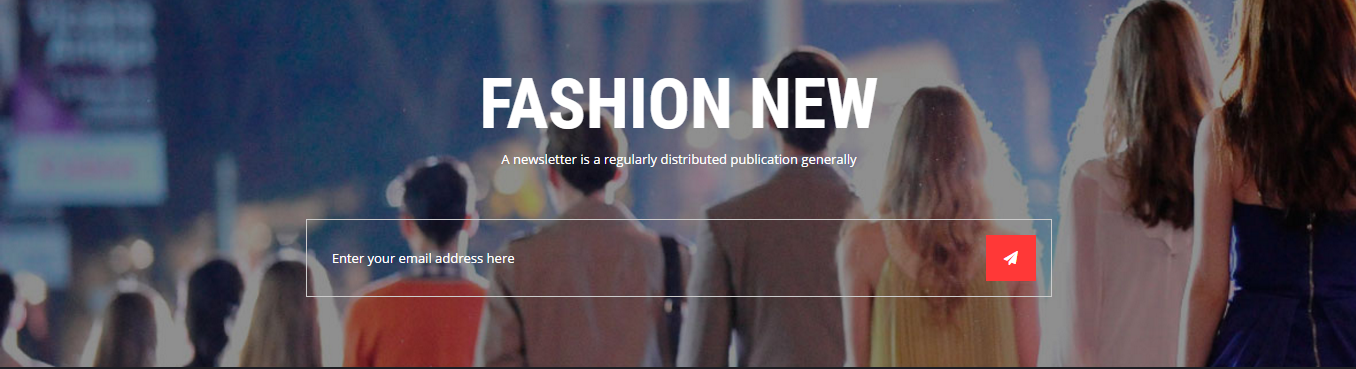
20. News Letter - Footer
Frontend Appearance
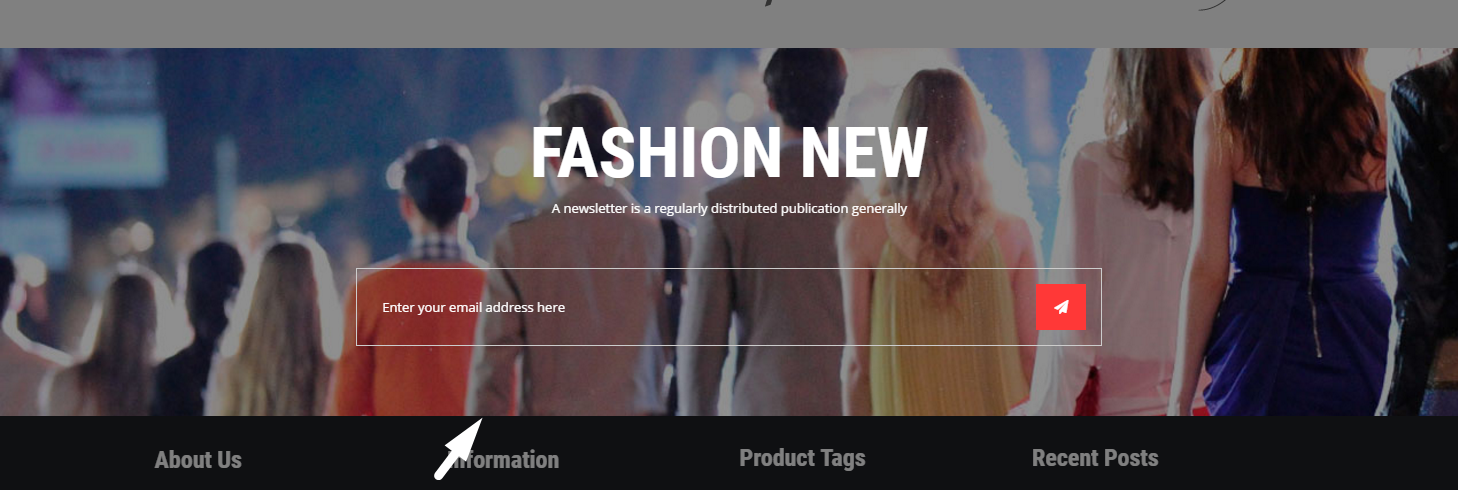
Backend Setting
Step 1: Go to Admin CP > Extensions > Modules > News Letter > Footer News Letter > Edit.
Step 2: Change the setting and click Save Button in the top right corner to save your setting.
21. Theme Manager - About Us & Contact Us
Frontend Appearance
Backend Setting
Step 1: Go to Admin CP > Extensions > Modules > Boss - Theme Manager > Edit.
Step 2: Click on the Footer Setting tab and then select the About us tab and Contact us tab.
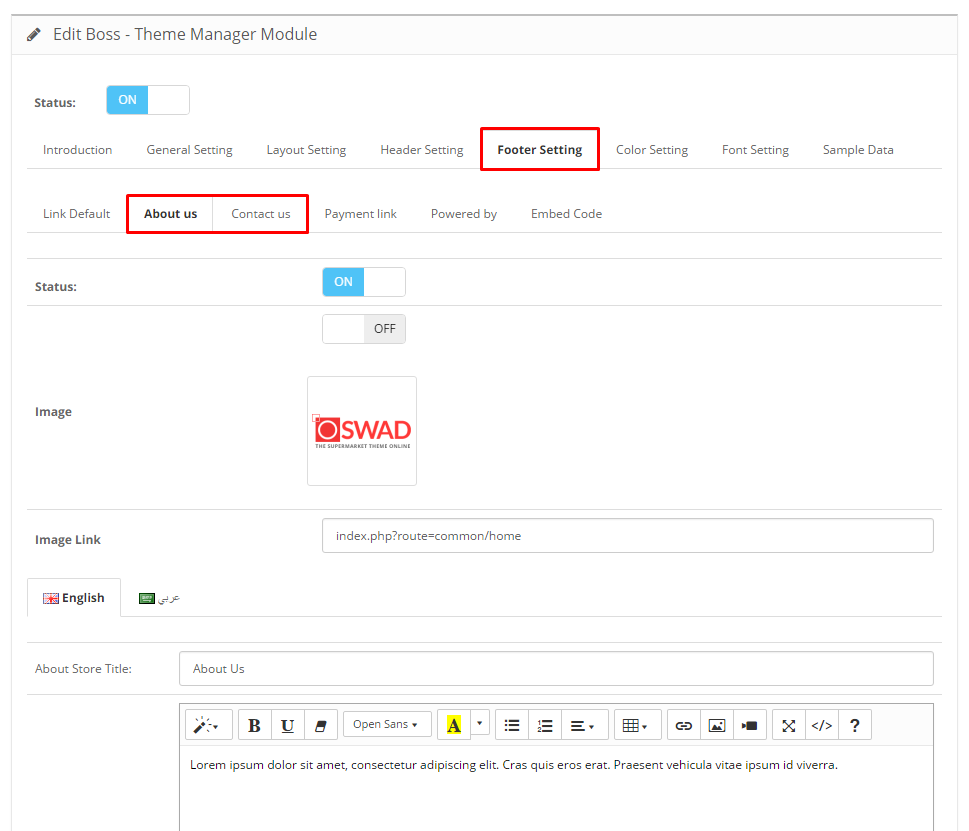
Step 3: Change the value in the text box and click Save Button in the top right corner to save your setting.
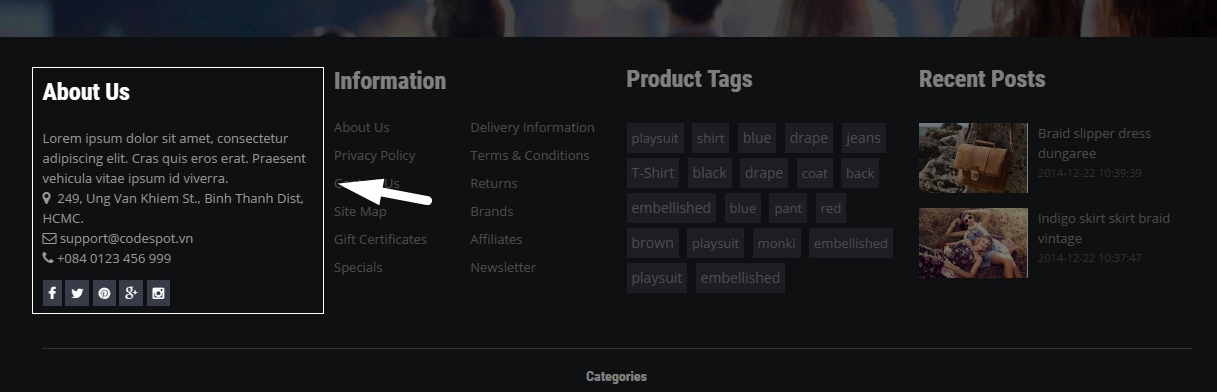
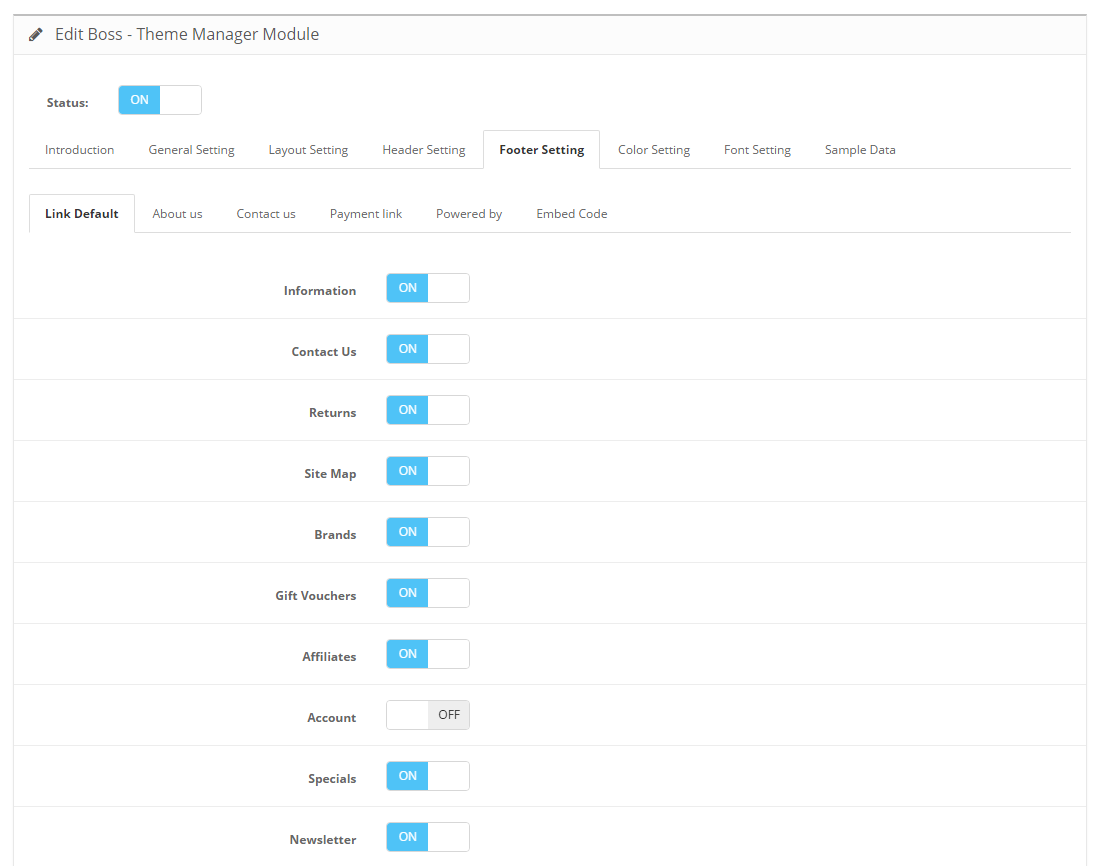
22. Theme Manager - Footer link
Frontend Appearance

Backend Setting
Step 1: Go to Admin CP > Extensions > Modules > Boss - Theme Manager > Edit.
Step 2: Click on the Footer Setting tab and then select the Link Default tab.
Step 3: Switch on or off to display or hide a link and click Save Button in the top right corner to save your setting.
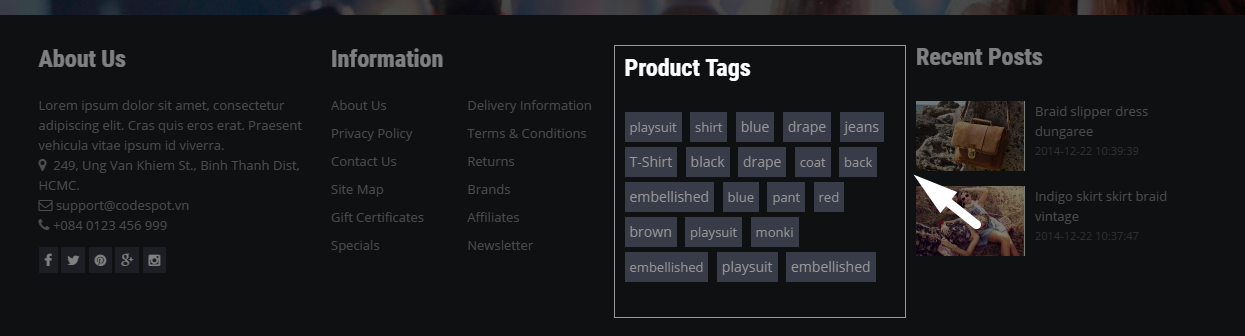
23. Tag Cloud - Footer
Frontend Appearance
Backend Setting
Step 1: Go to Admin CP > Extensions > Modules > Boss - Tag Cloud > Footer Product Tags > Edit.
Step 2: Change the setting and click Save Button in the top right corner to save your setting.
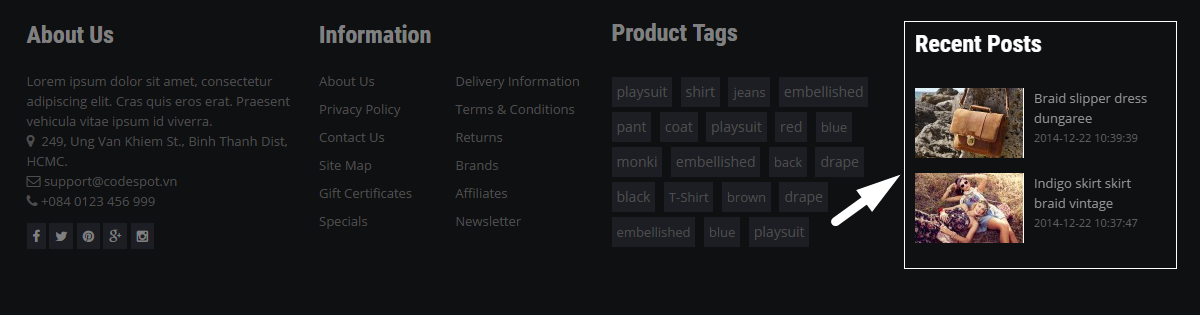
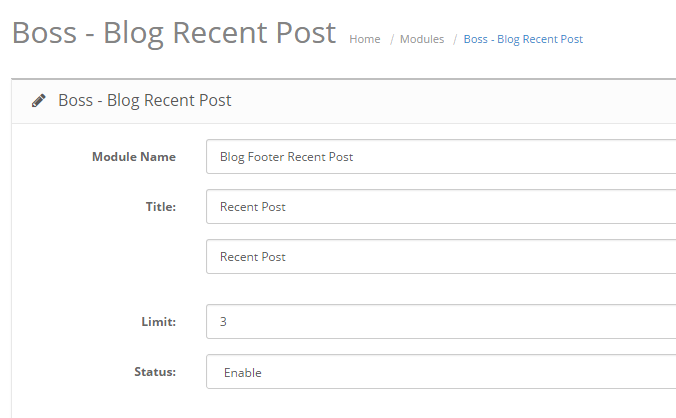
24. Blog Recent Post - Footer
Frontend Appearance
Backend Setting
Step 1: Go to Admin CP > Extensions > Modules > Boss - Blog Recent Post > Footer Recent Post > Edit.
Step 2: Change the setting and click Save Button in the top right corner to save your setting.
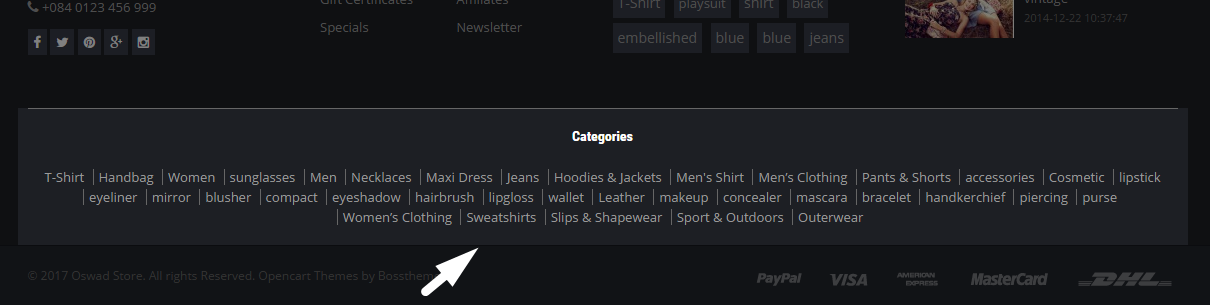
25. Theme Manager - Footer link
Frontend Appearance
Backend Setting
Step 1: Go to Admin CP > Extensions > Modules > Boss - Theme Manager > Edit.
Step 2: Click on the Footer Setting tab and then select the Link Default tab.
Step 3: Switch the Category button on or off to display or hide this function and click Save Button in the top right corner to save your setting.
26. Theme Manager - Powered by
Frontend Appearance

Backend Setting
Step 1: Go to Admin CP > Extensions > Modules > Boss - Theme Manager > Edit.
Step 2: Click on the Footer Setting tab and then select the Powered by tab.
Step 3: Change the value in the text box and click Save Button in the top right corner to save your setting.
27. Theme Manager - Payment link
Frontend Appearance

Backend Setting
Step 1: Go to Admin CP > Extensions > Modules > Boss - Theme Manager > Edit.
Step 2: Click on the Footer Setting tab and then select the Payment link tab.
Step 3: Change the setting and click Save Button in the top right corner to save your setting.
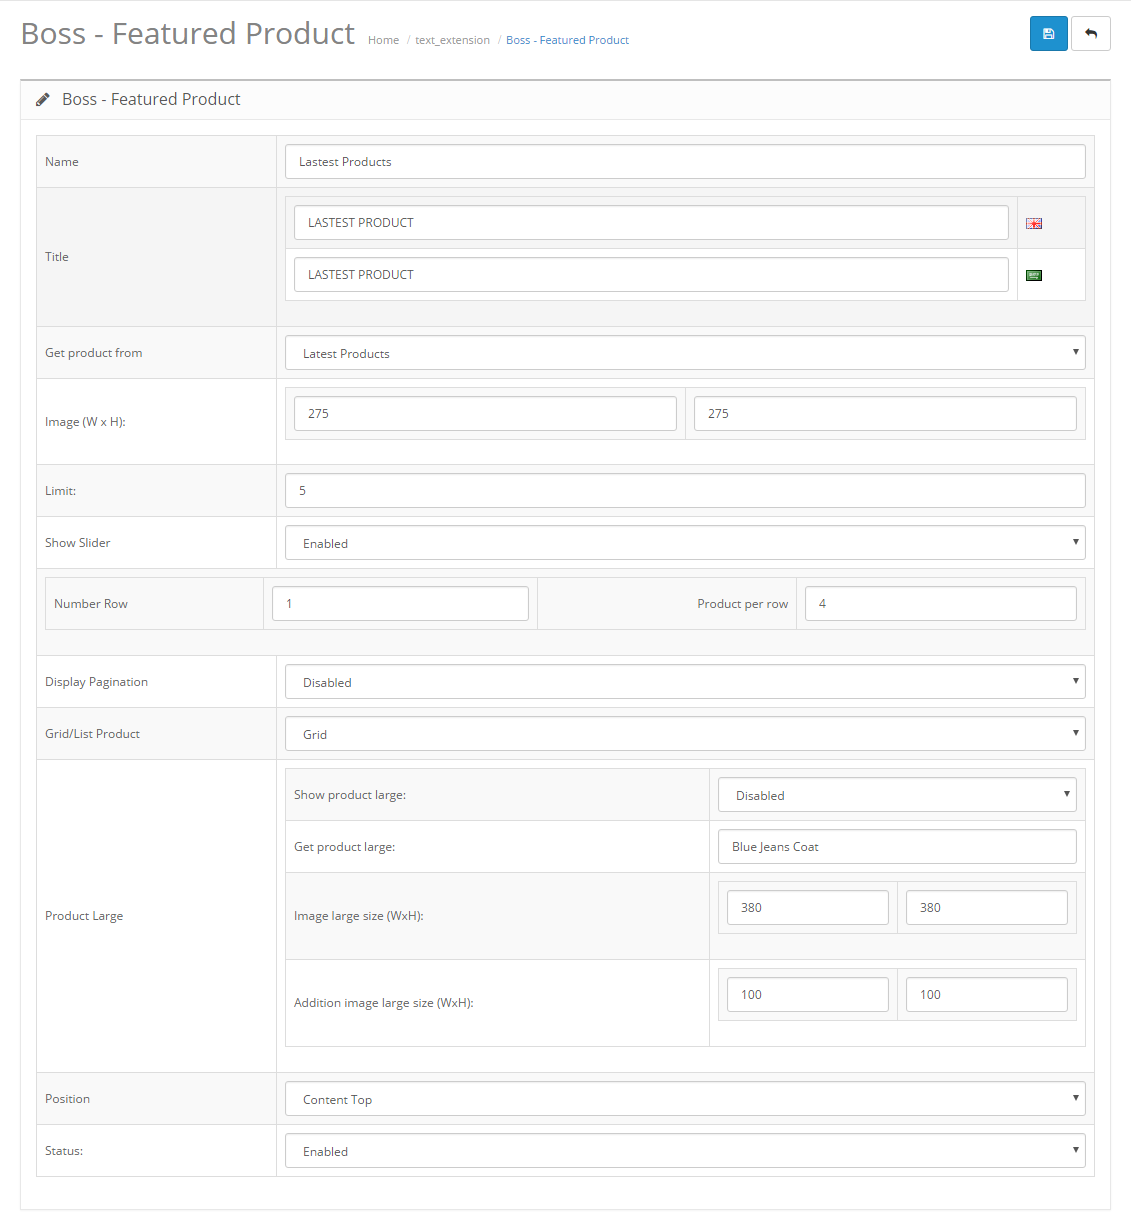
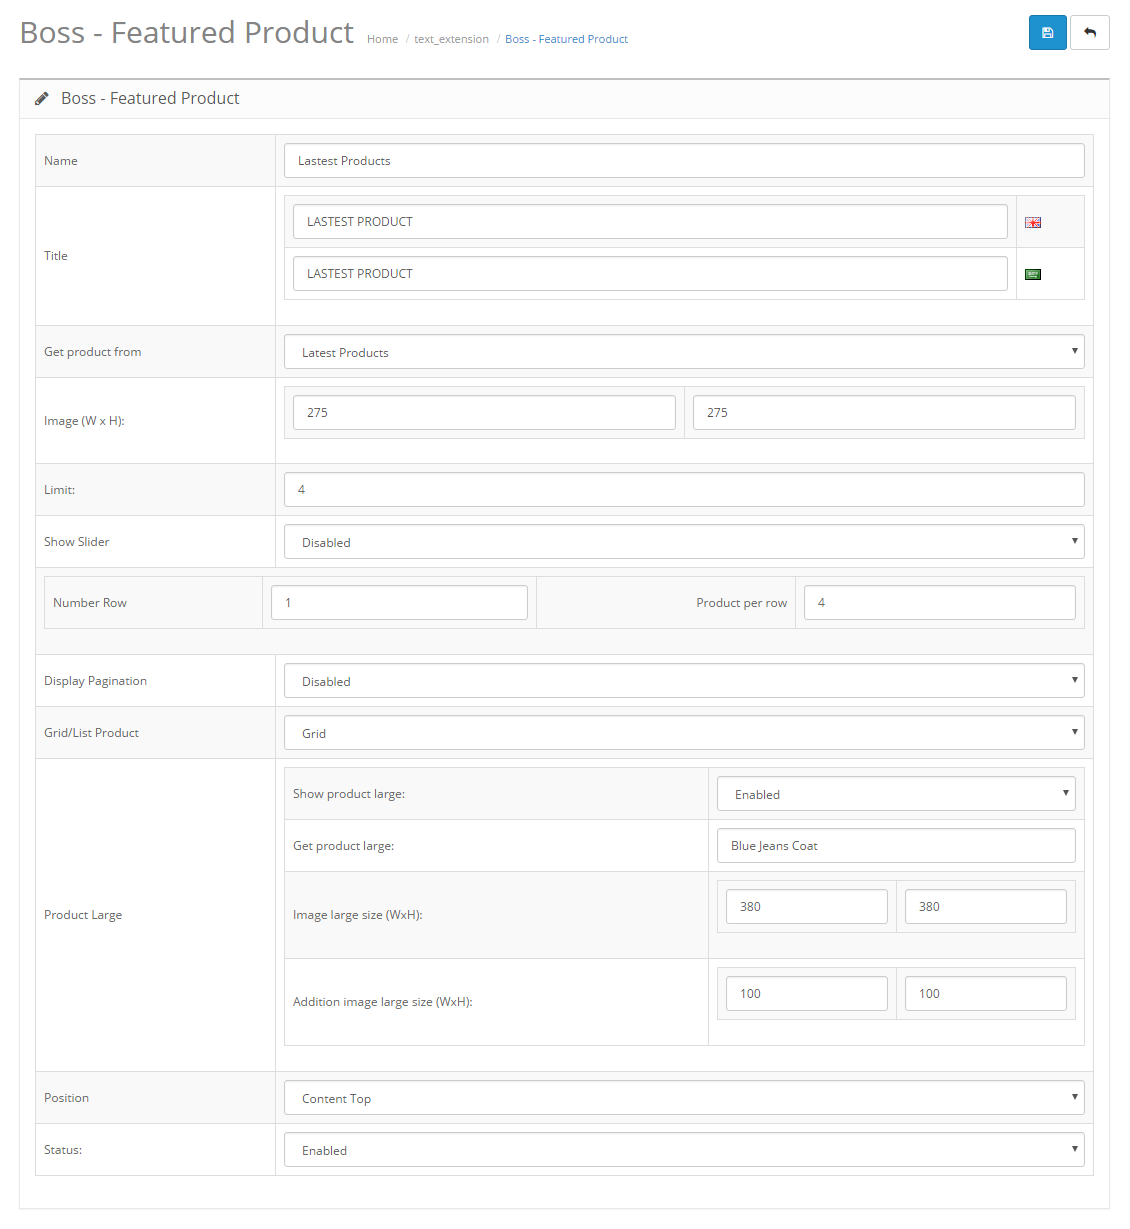
Boss - Feature Product module allows you to display products according to popular, best seller, special, latest products or choose product by name, ...
In back endGo to Extensions > Modules > Boss - Feature Product > Edit
Backend Setting
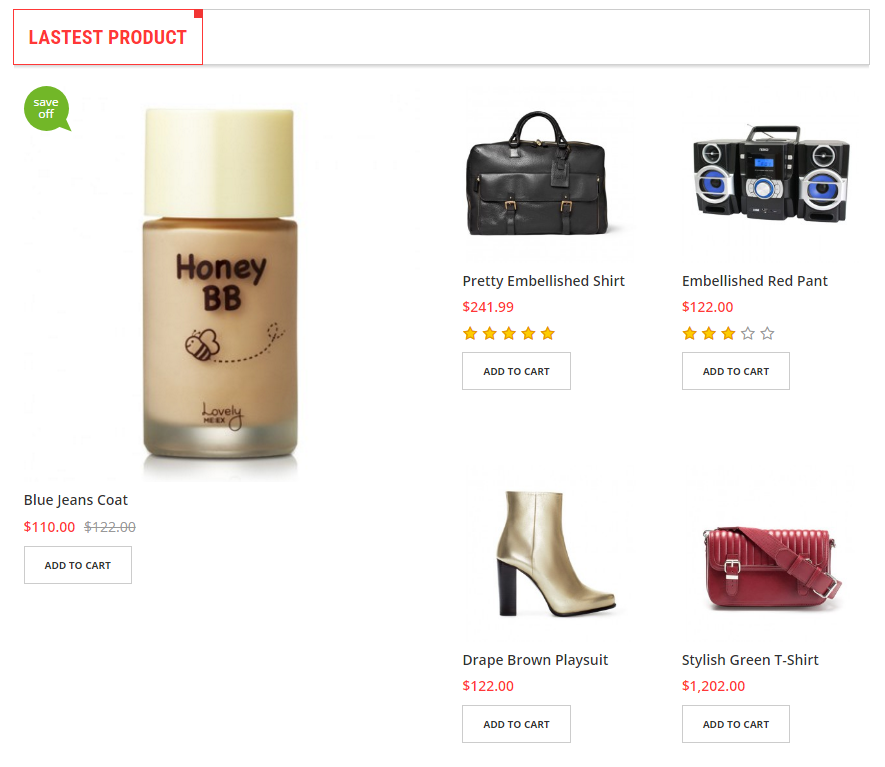
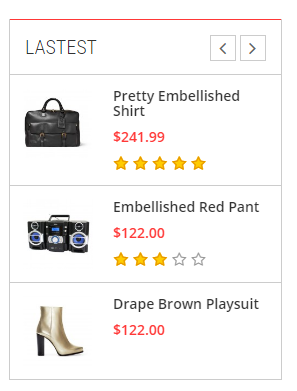
Front end

Backend Setting
Front end
Backend Setting

Front end
If you want to edit the html of feature product you can go to catalog/view/theme/{your theme}/template/extension/module/boss_feature.tpl and and then custom the html.
- In your back end, go to Extensions > Modules > Boss - Theme Manager >
Edit.
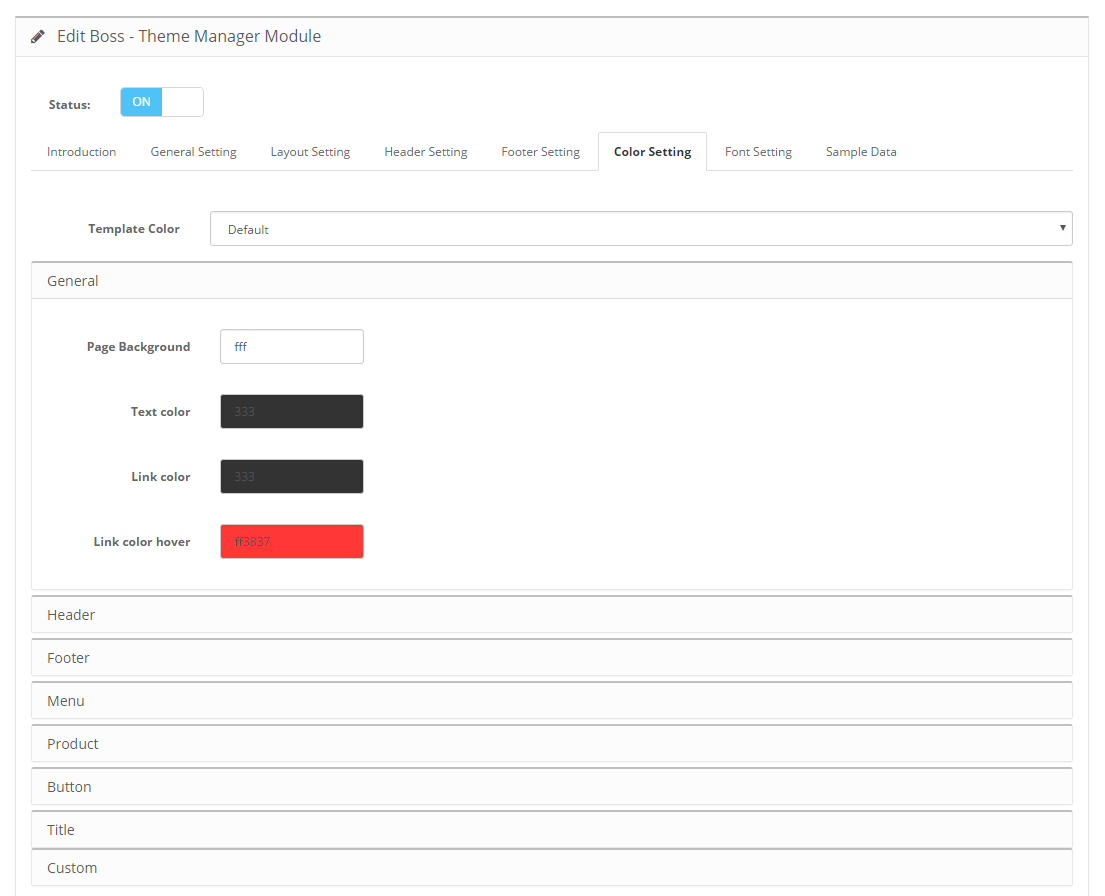
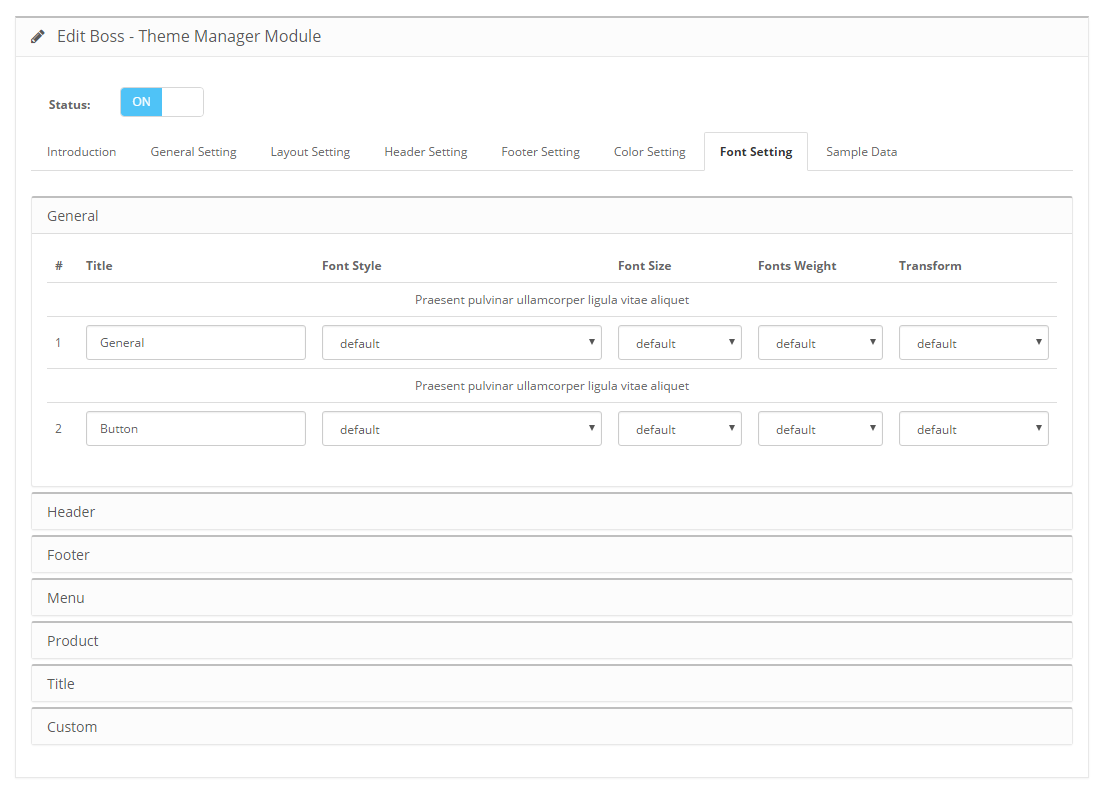
- This module helps you to customize the interface of your website easily, including column for website, color, font, layout, Option and Data Sample for important elements of website.
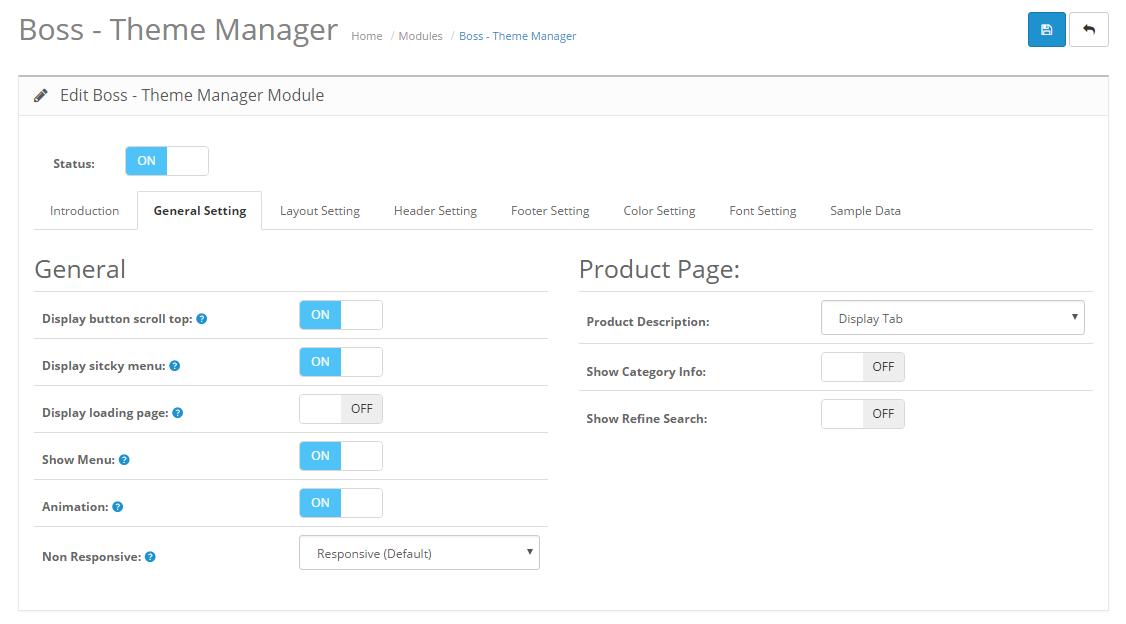
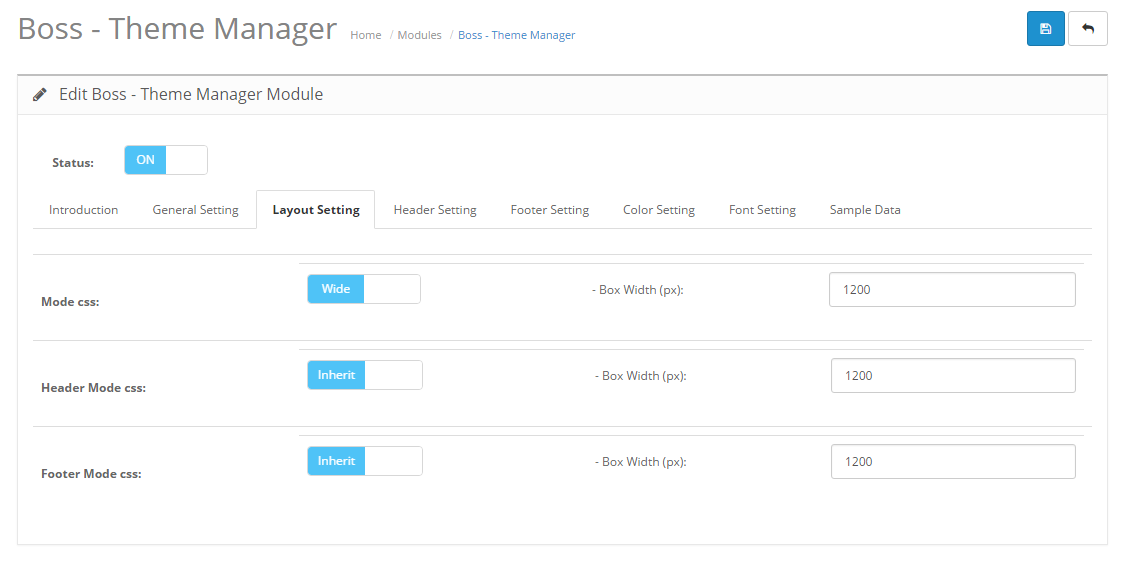
Footer Setting
Color Setting
Boss - Mega Menu module allows you to arrange many items of header menu in different columns. Customers can easily receive a lot of information and img only by hovering your header menu.
In back end, go to Extensions > Modules > Boss - Megamenu > Edit
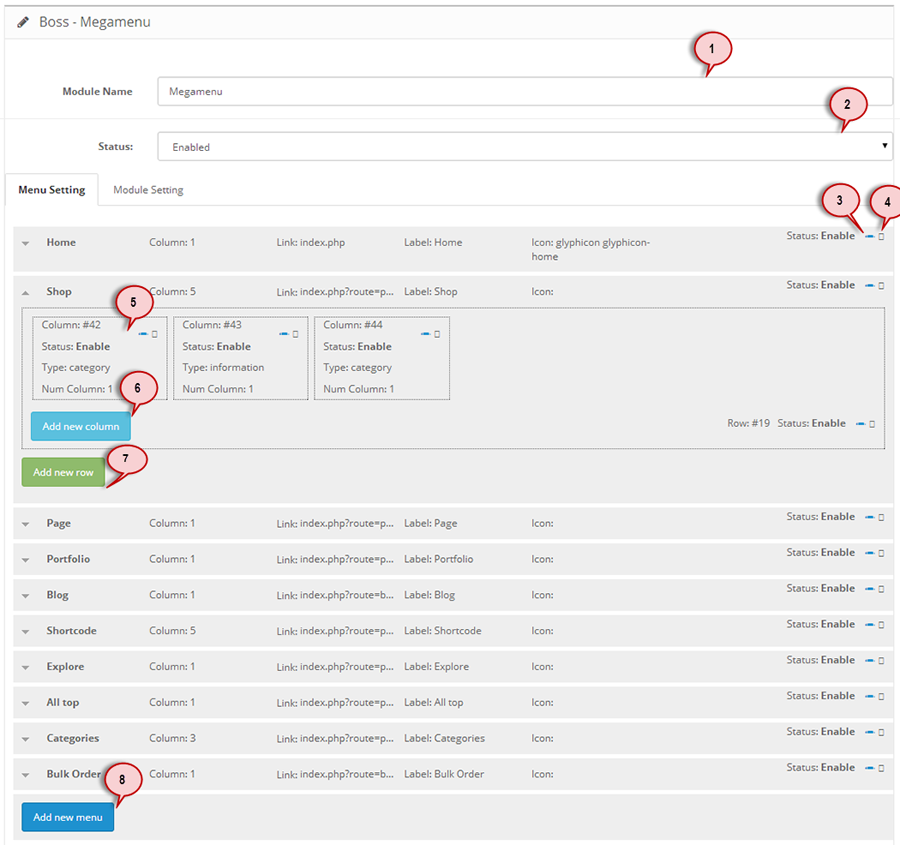
- 1Module Name: Write a name for this module
- 2Status Disable/Enable this module
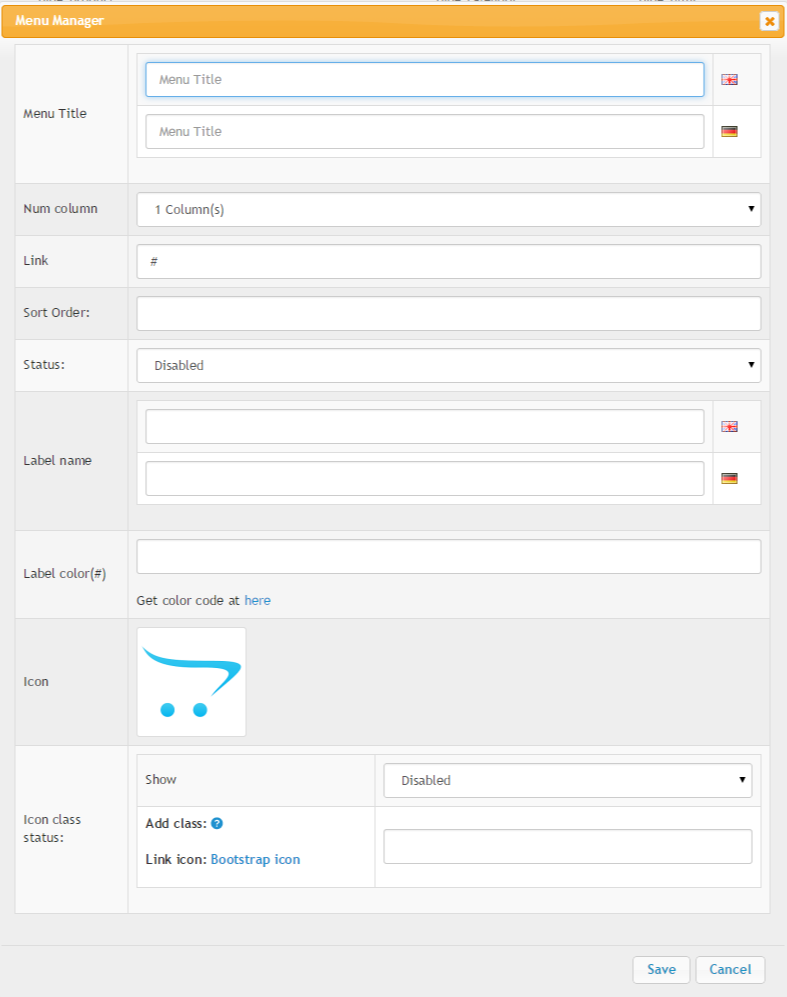
- 3Edit Edit content of menu, menu row or menu column
- 4Delete Delete menu, menu row or menu column
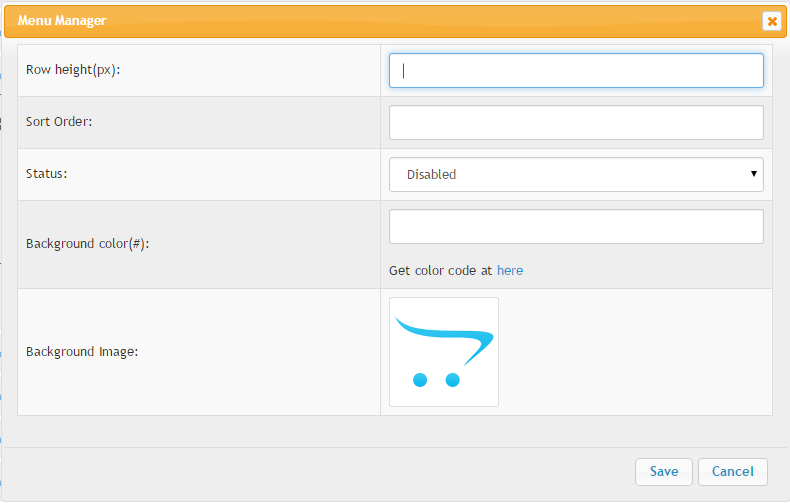
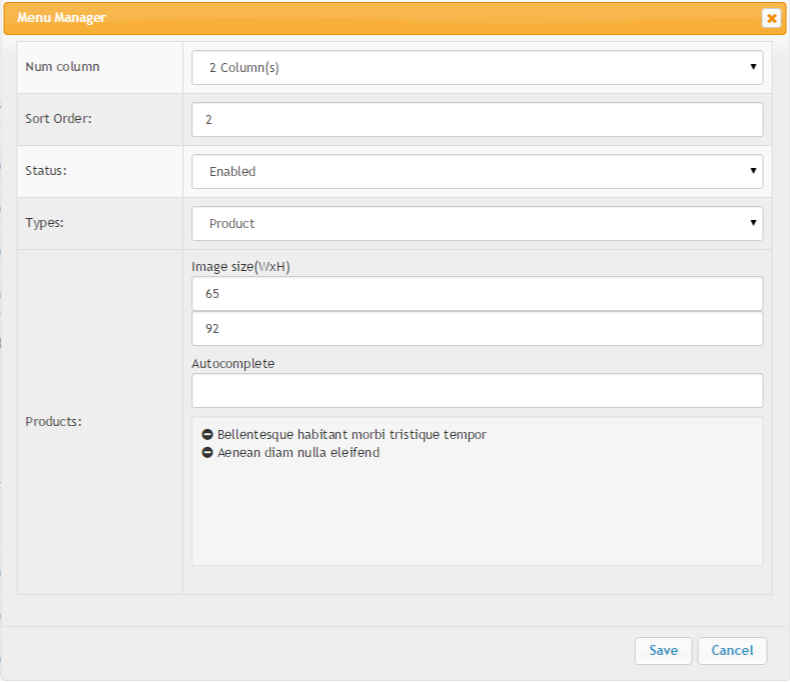
- 5Menu column A menu row has many menu columns. A menu column has many types content as: html, product, category, information, manufacturer
- 6Add menu column Add a new menu column.
- 7Add menu row Add a new menu row. Each menu row is in one menu
- 8Add menu Button add new menu. A menu includes many menu rows and a menu row has many menu columns
To create a simple menu you need 4 steps: 1. Add new menu; 2 Add new row; 3 Add new column; 4 Edit column and config "type" for it
Add menu
Add menu row
Add menu column
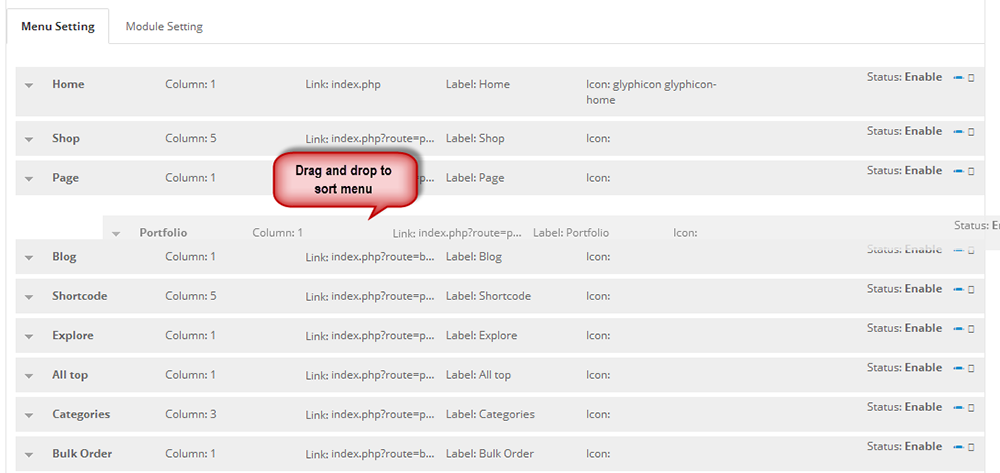
Drag and Drop to sort menu
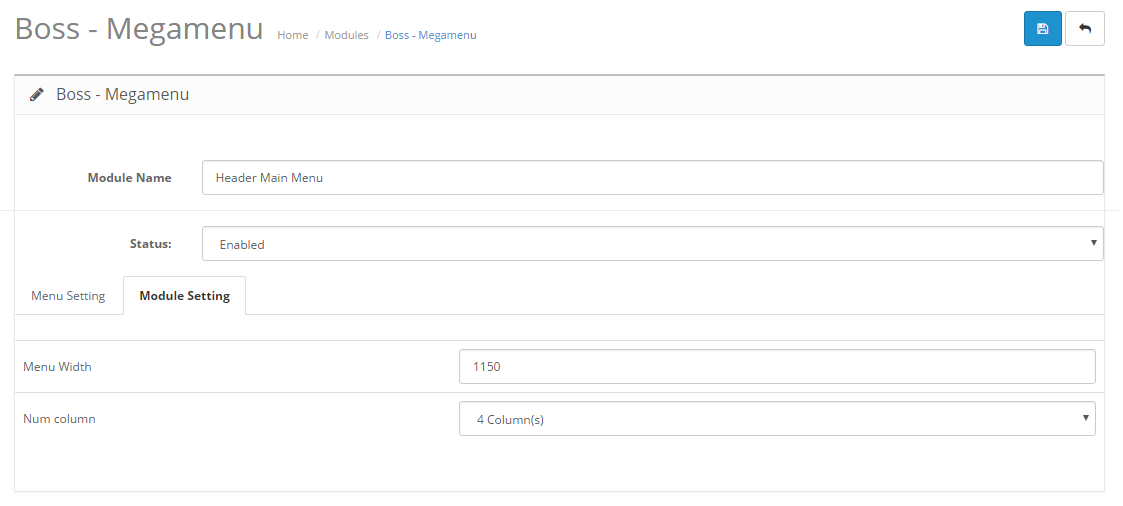
Go to Extensions > Modules > Boss Mega Menu > Edit tab Module Setting
- 1Menu Width The Width of submenu
- 2Menu Column Max Number of columns in submenu
Front end

If you want to edit the html of megamenu you can go to catalog/view/theme/{your theme}/template/extension/module/boss_newmegamenu.tpl and then custom the html.
You can see demo Here
In back end, go to Marketing > Boss - Testimonials
In back end, go to Extensions > Modules > Boss - Testimonial > Edit.

- 1Module Name: Set name for this module
- 2Status: Disable/Enable the module
- 3CTitle: The title of this module that will appear in the front end. You can leave it empty if you don't need a title.
- 4Limit: Set number testimonials show in the front-end.
- 5Characters to show: Limit the character of Message(content) show in the front-end.
- 6Random: You can random the testimonial. If it is disable, this module will get testimonilas by added date
- 7Auto Scroll: You can choose the testimonial scroll or not
- 8Show name: You can disable or enable the name of author in the front-end.
- 9Show Subject: You can disable or enable the Subject of article in the front-end.
- 10Show Message: You can disable or enable the Message(content) of article in the front-end.
- 11Show City: You can disable or enable the City of author in the front-end.
- 12Show Rating: You can disable or enable the Rating of author in the front-end.
- 13Show Date: You can disable or enable the Date of article in the front-end.
- 14Show Image: You can disable or enable the Image of author in the front-end.
- 15Link "Show All": You can disable or enable the Link "Show All" in the front-end.
- 16Link "Write testimonial": You can disable or enable the Link "Write testimonial" in the front-end.
Front end
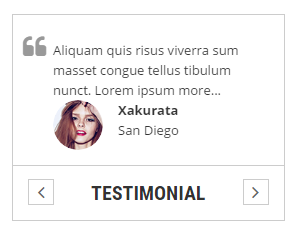
If you want to edit the html of this module you can go to catalog/view/theme/{your theme}/template/extension/module/boss_testimonial.tpl and then custom the html.
In back end, go to Extensions > Modules > Boss - Quickshop > Edit
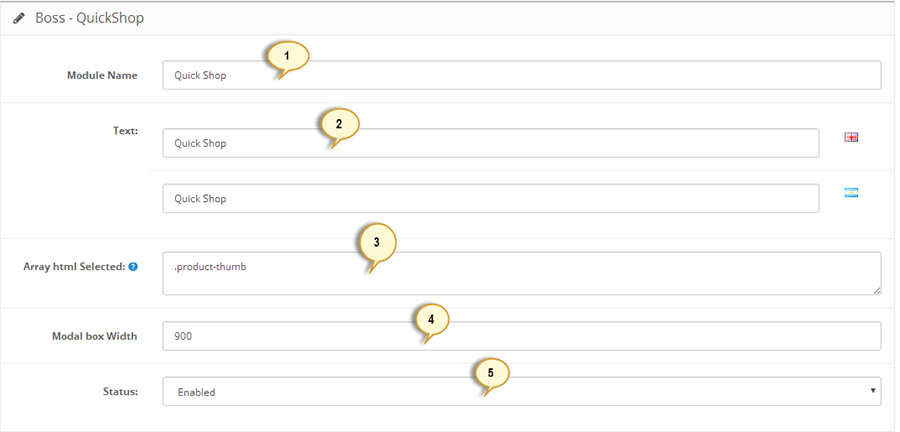
- 1Module Name: Set name for this module
- 2Text: This is the text of quick view appearing in the button of quick shop in front end. You can leave it empty if you don't need a text.
- 3Array html Selected: You have to select class of product which is showed up quickshop. See more detail at image below
- 4Fancybox Size: The size of Fancy box that show content of product in quickshop. You just only fill the width then the system auto set height for this box.
- 5Status: Disable/Enable the module
Front end

If you want to edit the html of this module you can go to catalog/view/theme/{your theme}/template/extension/module/boss_quickshop.tpl and boss_quickshop_product.tpl and then custom the html.
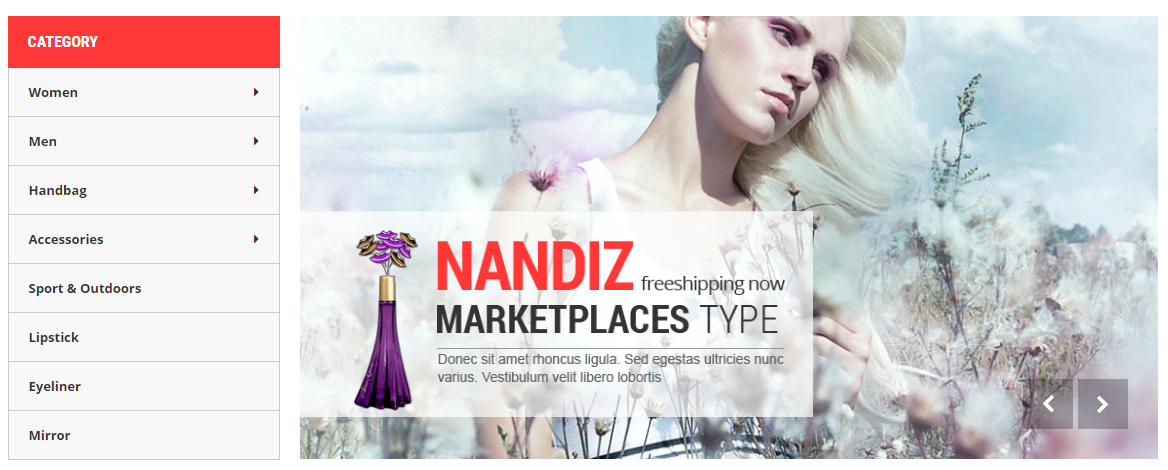
Slider Revolution is a fully developed slide in system to offer the capability to show img, videos and captions paired with simple, modern and fancy 3D transitions. On top of that, Slider Revolution is fully responsive and mobile optimized and can be displayed on any dimensions.
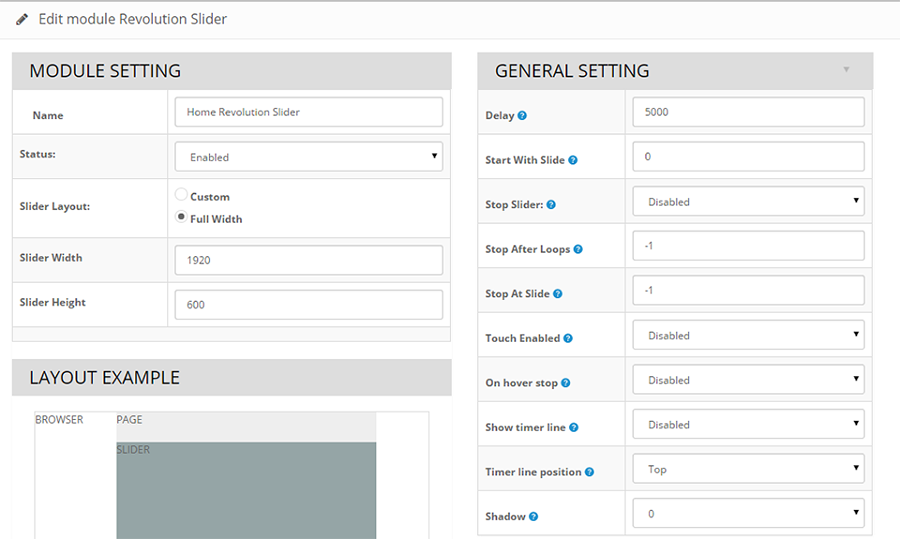
In back end, go to Extensions > Modules > Boss - Revolution Slider > Edit
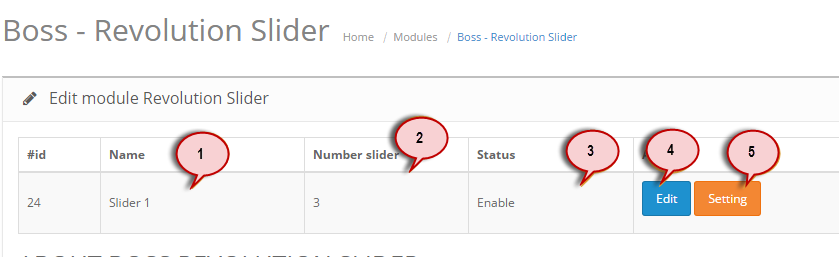
- 1Name Name of this sliders
- 2Number of Slides Total slide of this slider
- 3Status Show status of this slider (Enable or Disable)
- 4Edit Go to page edit slider. Edit each slide includes: image background, caption and other option ...
- 5Setting Go to page slider setting: Setting all option of slider: slider width, status, name...
You can config all option of each slide at here: time delay, transitions, full/box...
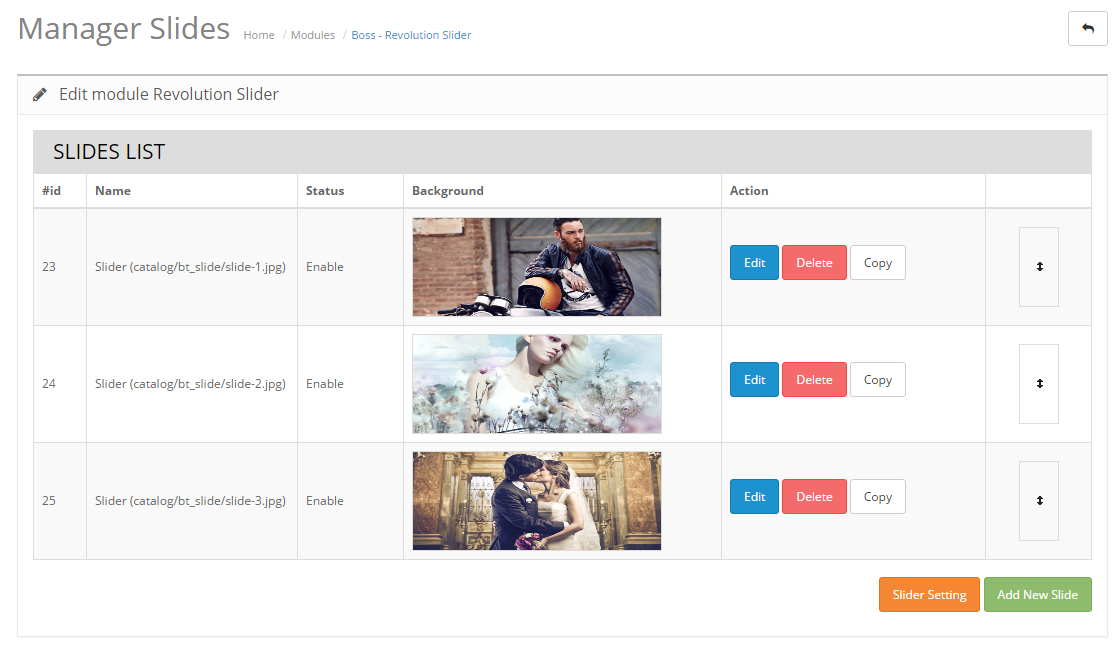
- 1Name Link of image background of each slide
- 2Status Show status of each slide (enable or disable)
- 3Action Include: copy, delete or edit each slide
- 4Drag and Drop You can drag and drop it to change position.
- 5Slider Setting Go to page setting for this slider
- 6Add new slide Add new slide for this slider
Edit and Setting each slide
Each slide has multi types of background such as: image background, color background or transparent background
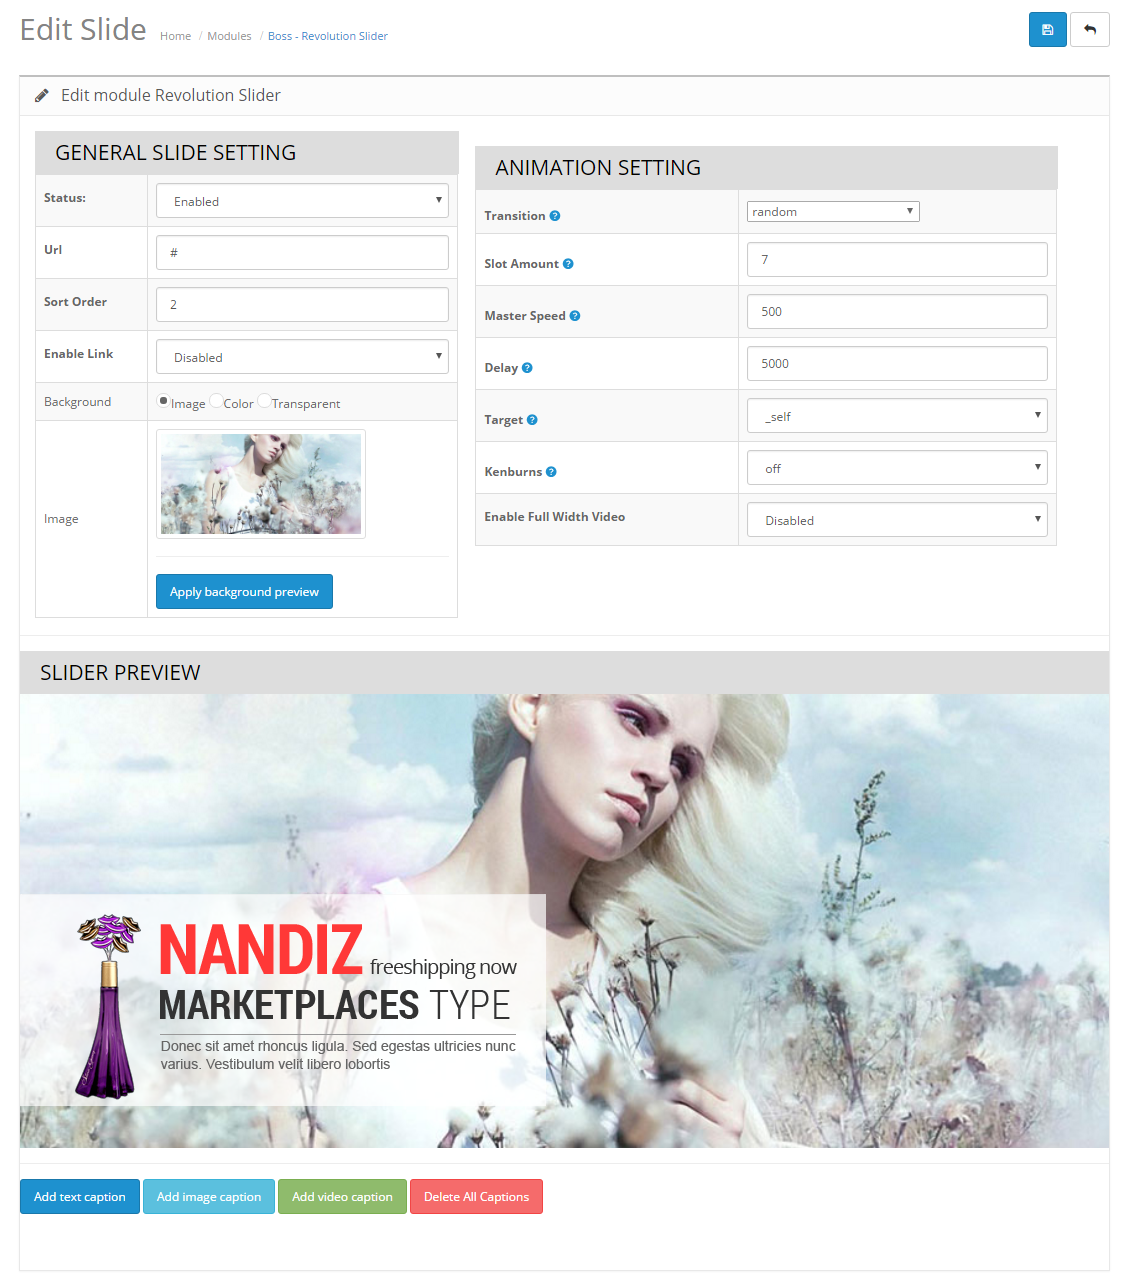
Edit and Setting caption
Each slide has multi captions. Each caption we can select multi types: text, image or video. Just click caption and edit them.
Front end
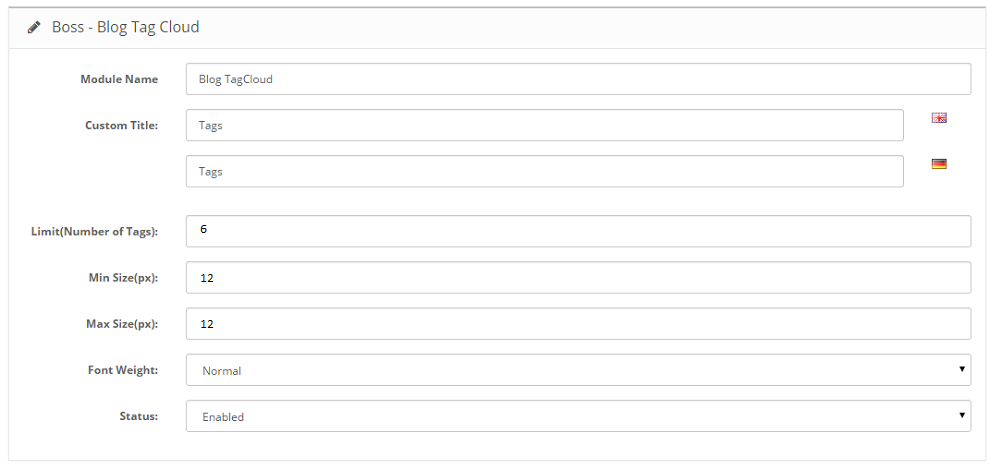
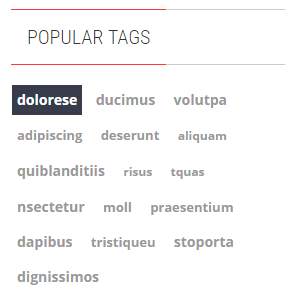
In back end, go to Extensions > Modules > Boss - Tag Cloud > Edit
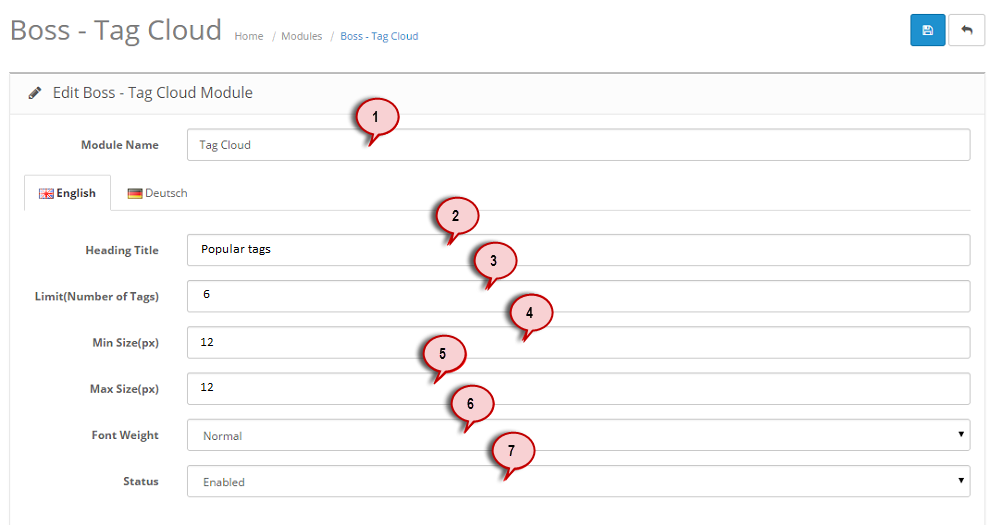
- 1Module Name: Write a name for this module
- 2Title: Name of this module will appear in the front end. You can leave it empty if you don't need a title.
- 3Limit: Limit the number of tags shown in front end.
- 4Min Size: Minimum size of the text
- 5Max Size: Maximum size of the text
- 6Font Weight: Font weight of the text
- 7Status: Disable/Enable the module
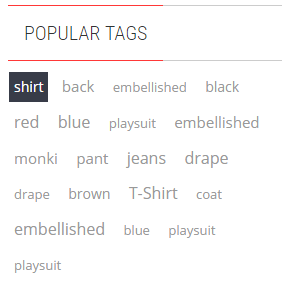
Front end
If you want to edit the html of this module you can go to catalog/view/theme/{your theme}/template/extension/module/boss_tagcloud.tpl and then custom the html.
Remember to install module Boss-Blog before dealing with 5 module (Boss - Blog Category, Boss - Blog Recent Comment, Boss - Blog Recent Post, Boss - Blog Tag Cloud, Boss- Blog Search).
In back end, go to Extensions > Modules > Boss - Blog > Edit
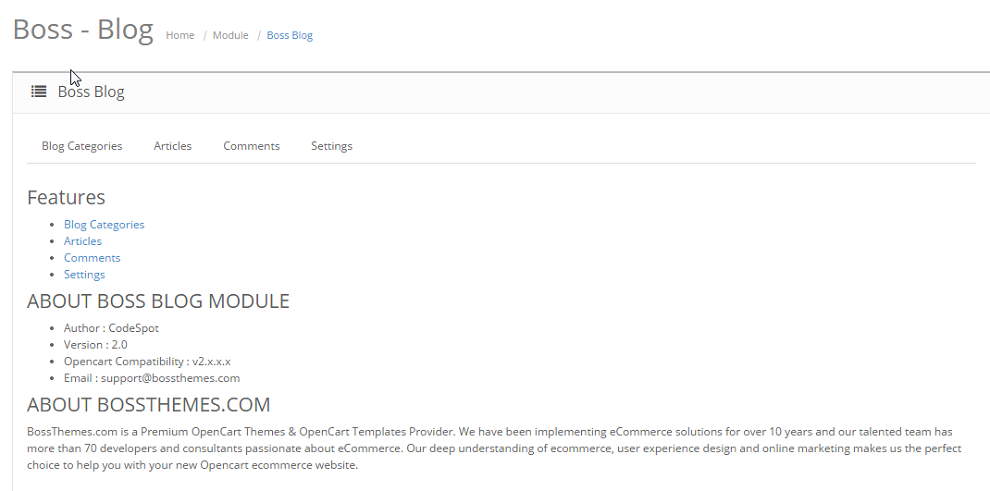
Blog Categories:
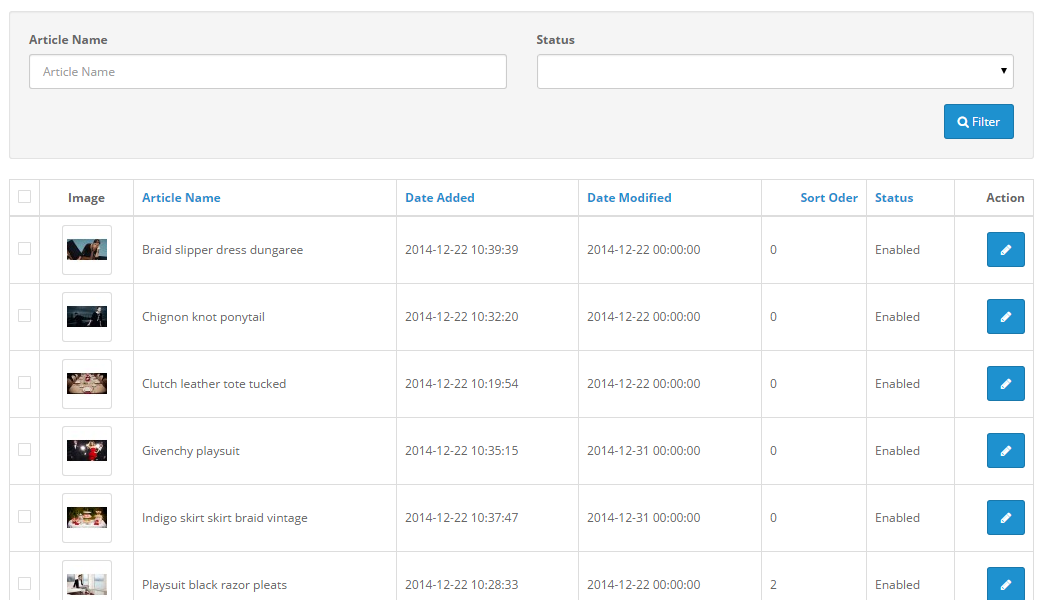
Blog Articles:
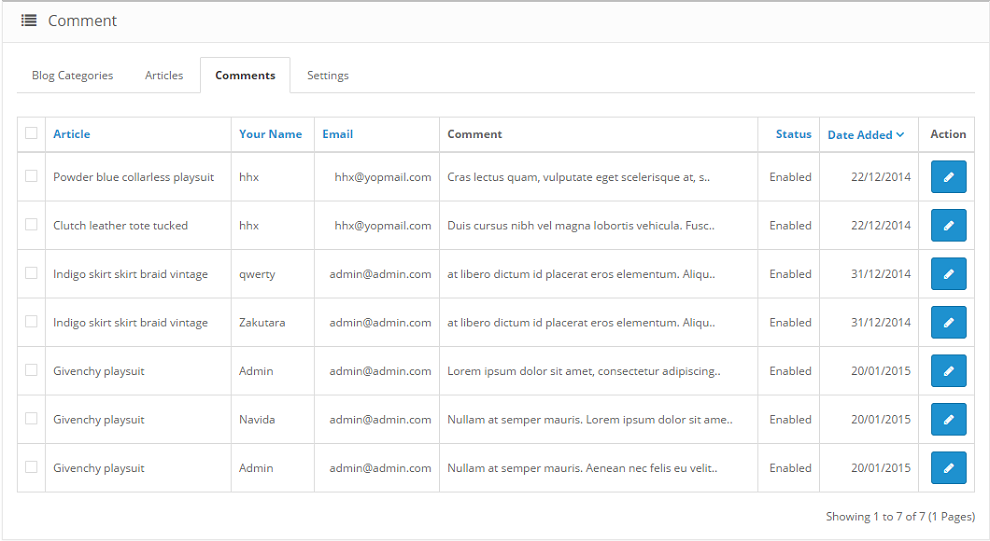
Blog Comments:
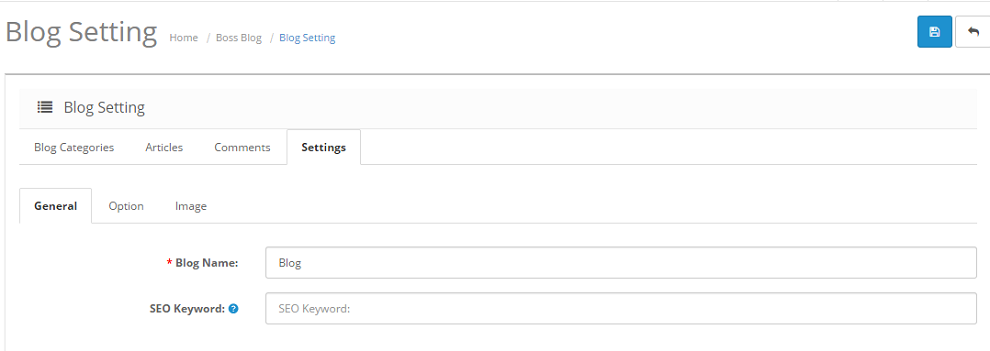
Blog Settings: General
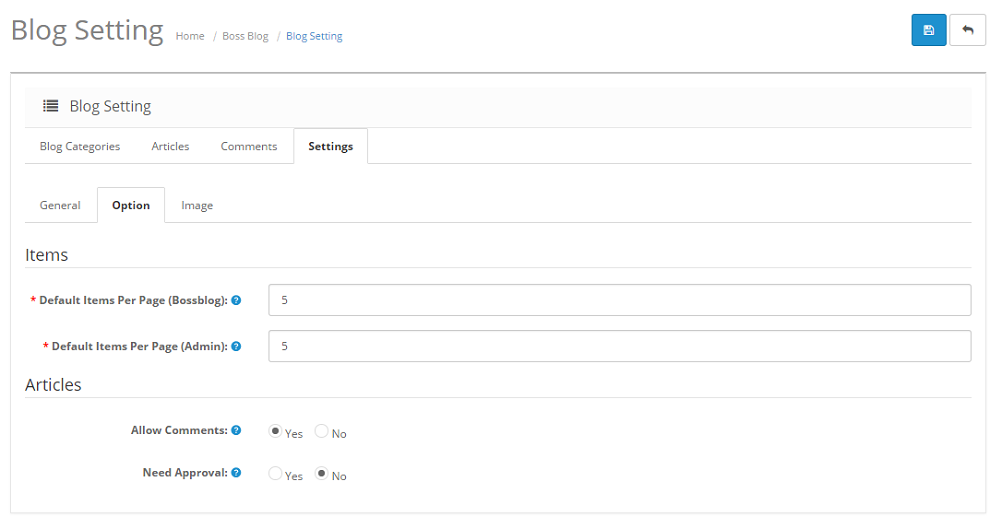
Blog Settings: Option
Blog Settings: Image

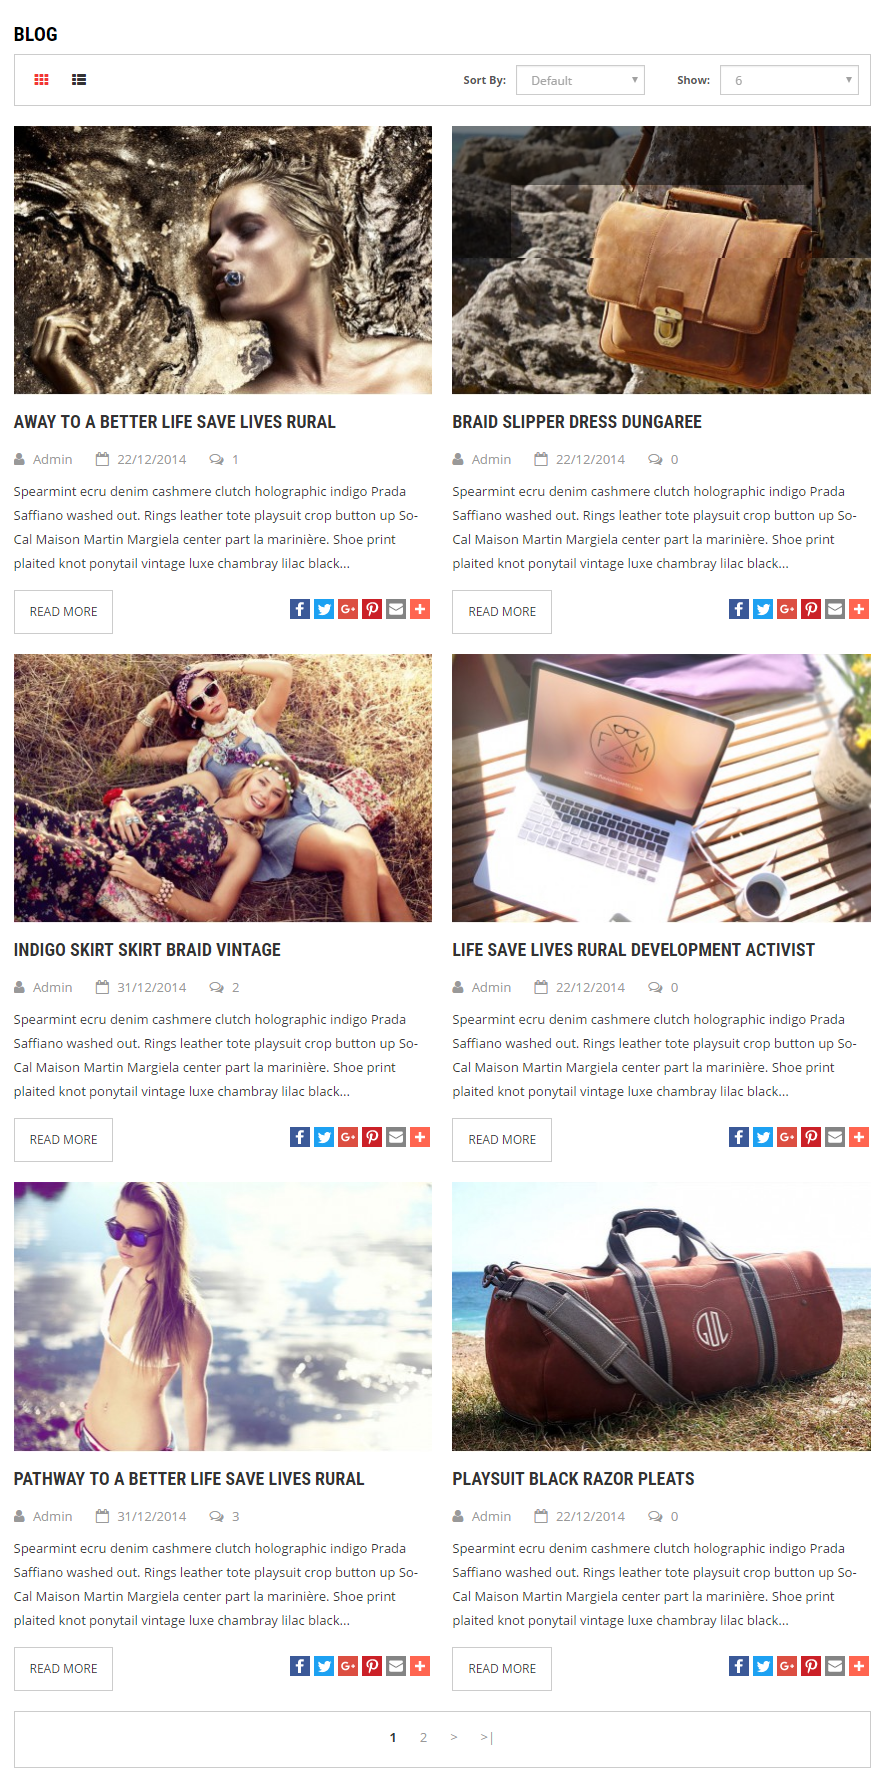
Front end
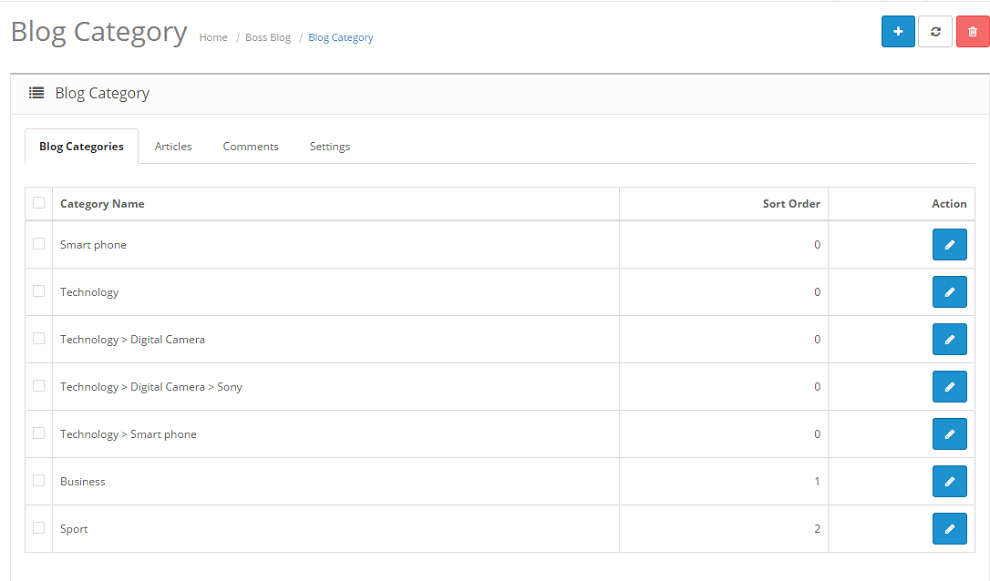
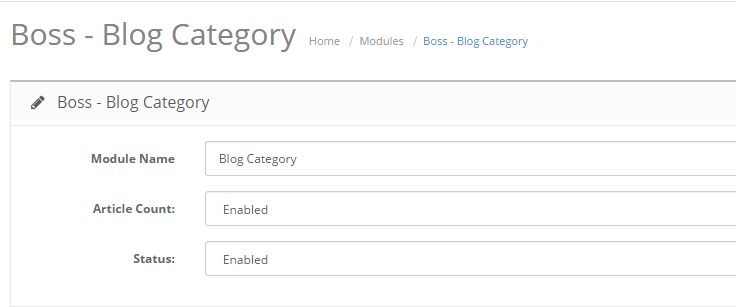
In back end, go to Extensions > Modules > Boss - Blog Category > Edit
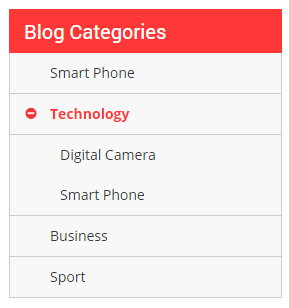
Front end
In back end, go to Extensions > Modules > Boss - Blog Tag Cloud > Edit
Front end
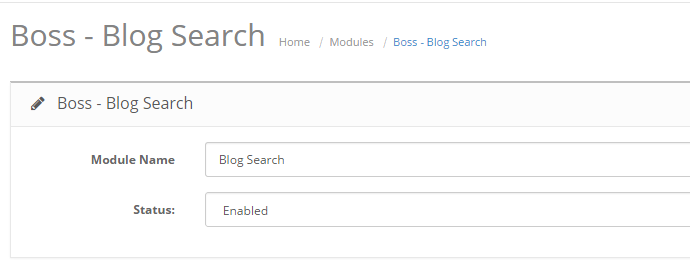
In back end, go to Extensions > Modules > Boss - Blog Search > Edit
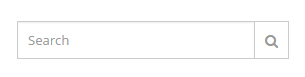
Front end
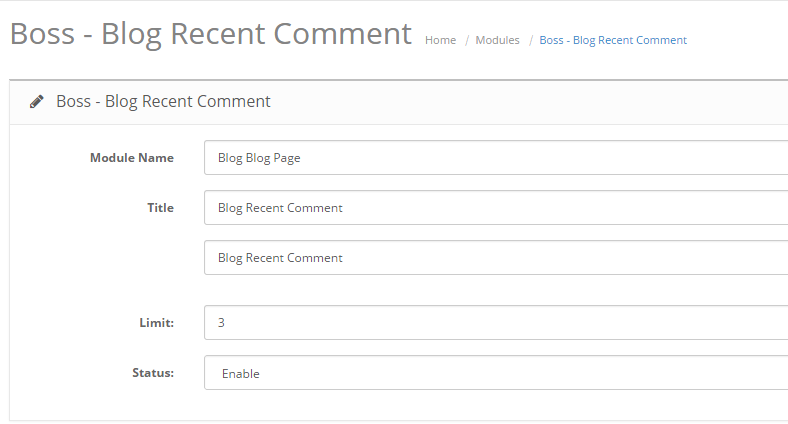
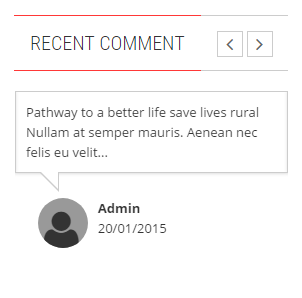
In back end, go to Extensions > Modules > Boss - Blog Recent Comment > Edit
Front end
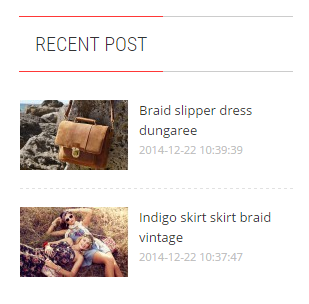
In back end, go to Extensions > Modules > Boss - Blog Recent Post > Edit
Front end
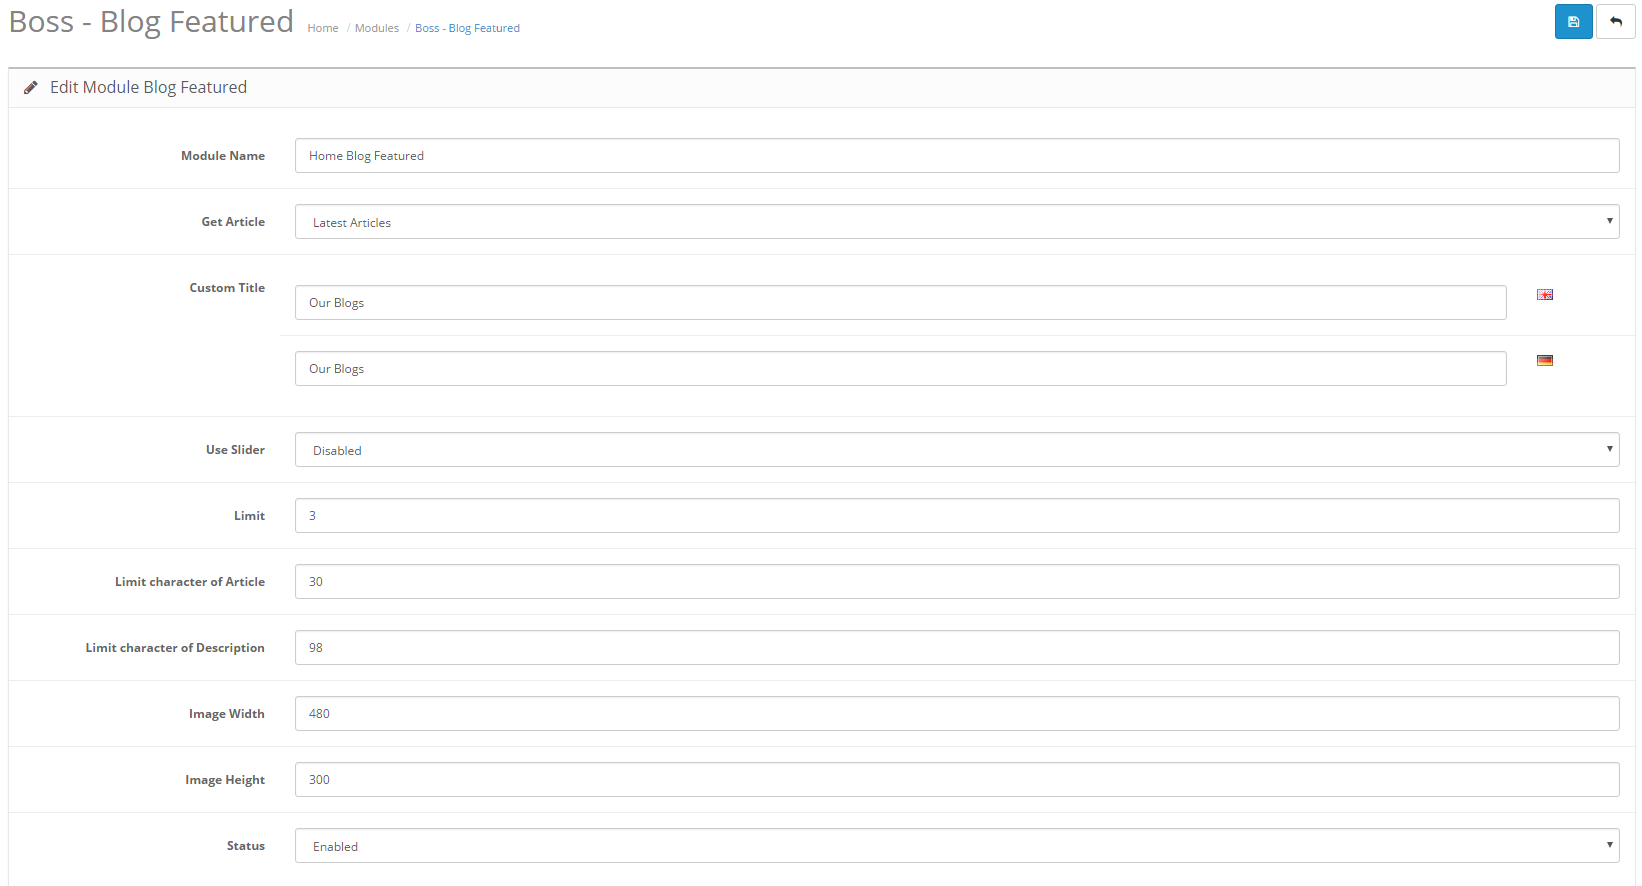
In back end, go to Extensions > Modules > Boss - Blog Featured > Edit
Front end
In back end, go to Marketing > Newsletter Subscribers
In back end, go to Extensions > Modules > News Letter > Edit
Front end
If you want to edit the html of this module you can go to catalog/view/theme/{your theme}/template/extension/module/newslettersubscribe.tpl and then custom the html.
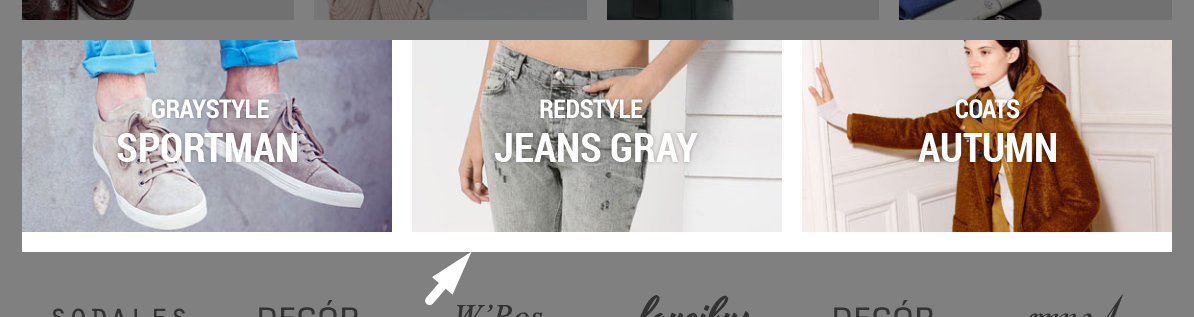
In back end, go to Extensions > Modules > Boss - Banner Grid > Edit
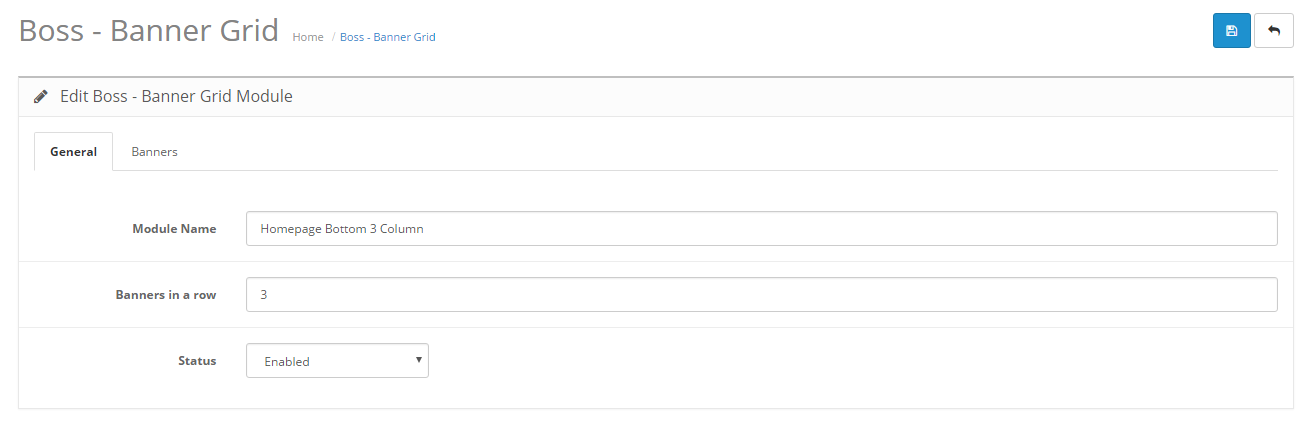

- 1Module Name: Write a name for this module
- 2Banners in a row: The number of image show in a row of this module.
- 3Status: You can disable or enable this extension
- 4Title: This is the title of a banner that will be not appear in the front end. But search engine need it, you should entry a value into the text box.
- 5Image: Select your banner to show.
- 6Link: Entry URL you want to link.
- 7Effect: Mouse hover effect.
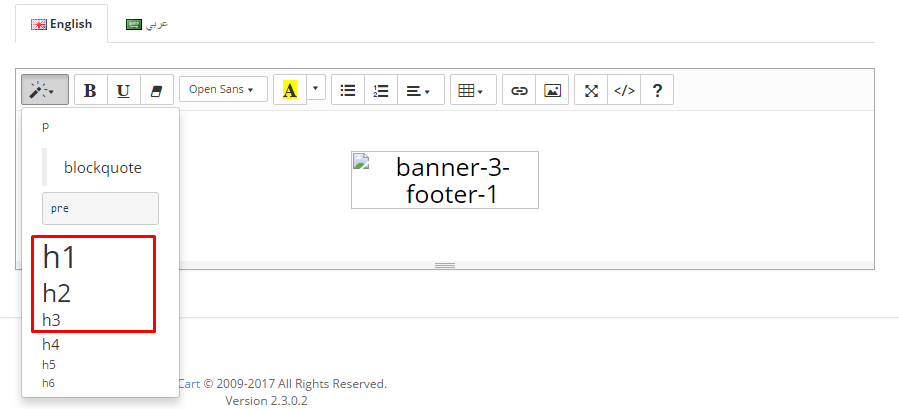
- 8Caption: You can add your custom content. For heading title you can select heading type (h1, h2, h3)
Front end

If you want to edit the html of this module you can go to catalog/view/theme/{your theme}/template/extension/module/boss_banner_grid.tpl and then custom the html.
In back end, go to Extensions > Modules > Boss - Bulk Order > Edit
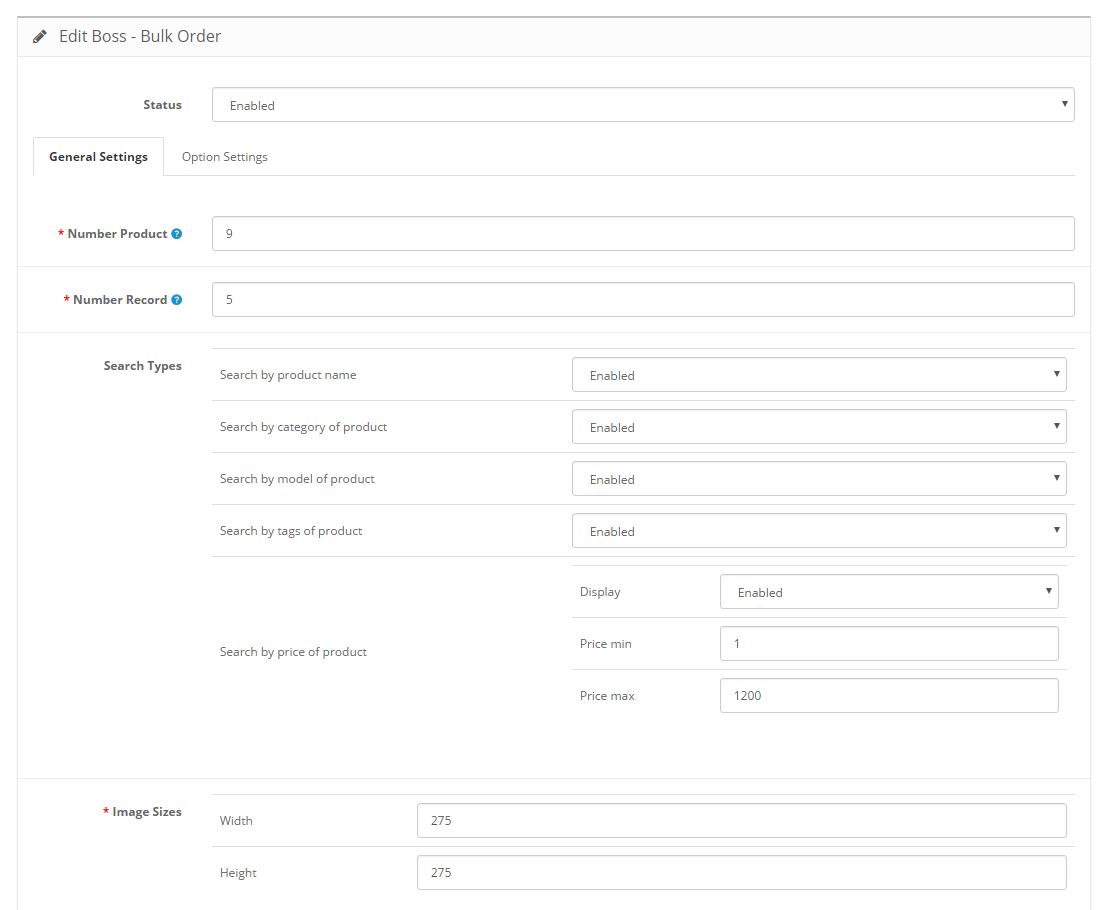
- 1Number Product: Number of products per page will appear in the front end.
- 2Number Record: Number product record when searching.
- 3Search Types: The type of value used for filters.
- 4Image Sizes: Product image size.
- 5Option Settings: The options of a product will be used for ordering.
- 6Status: You can disable or enable this extension
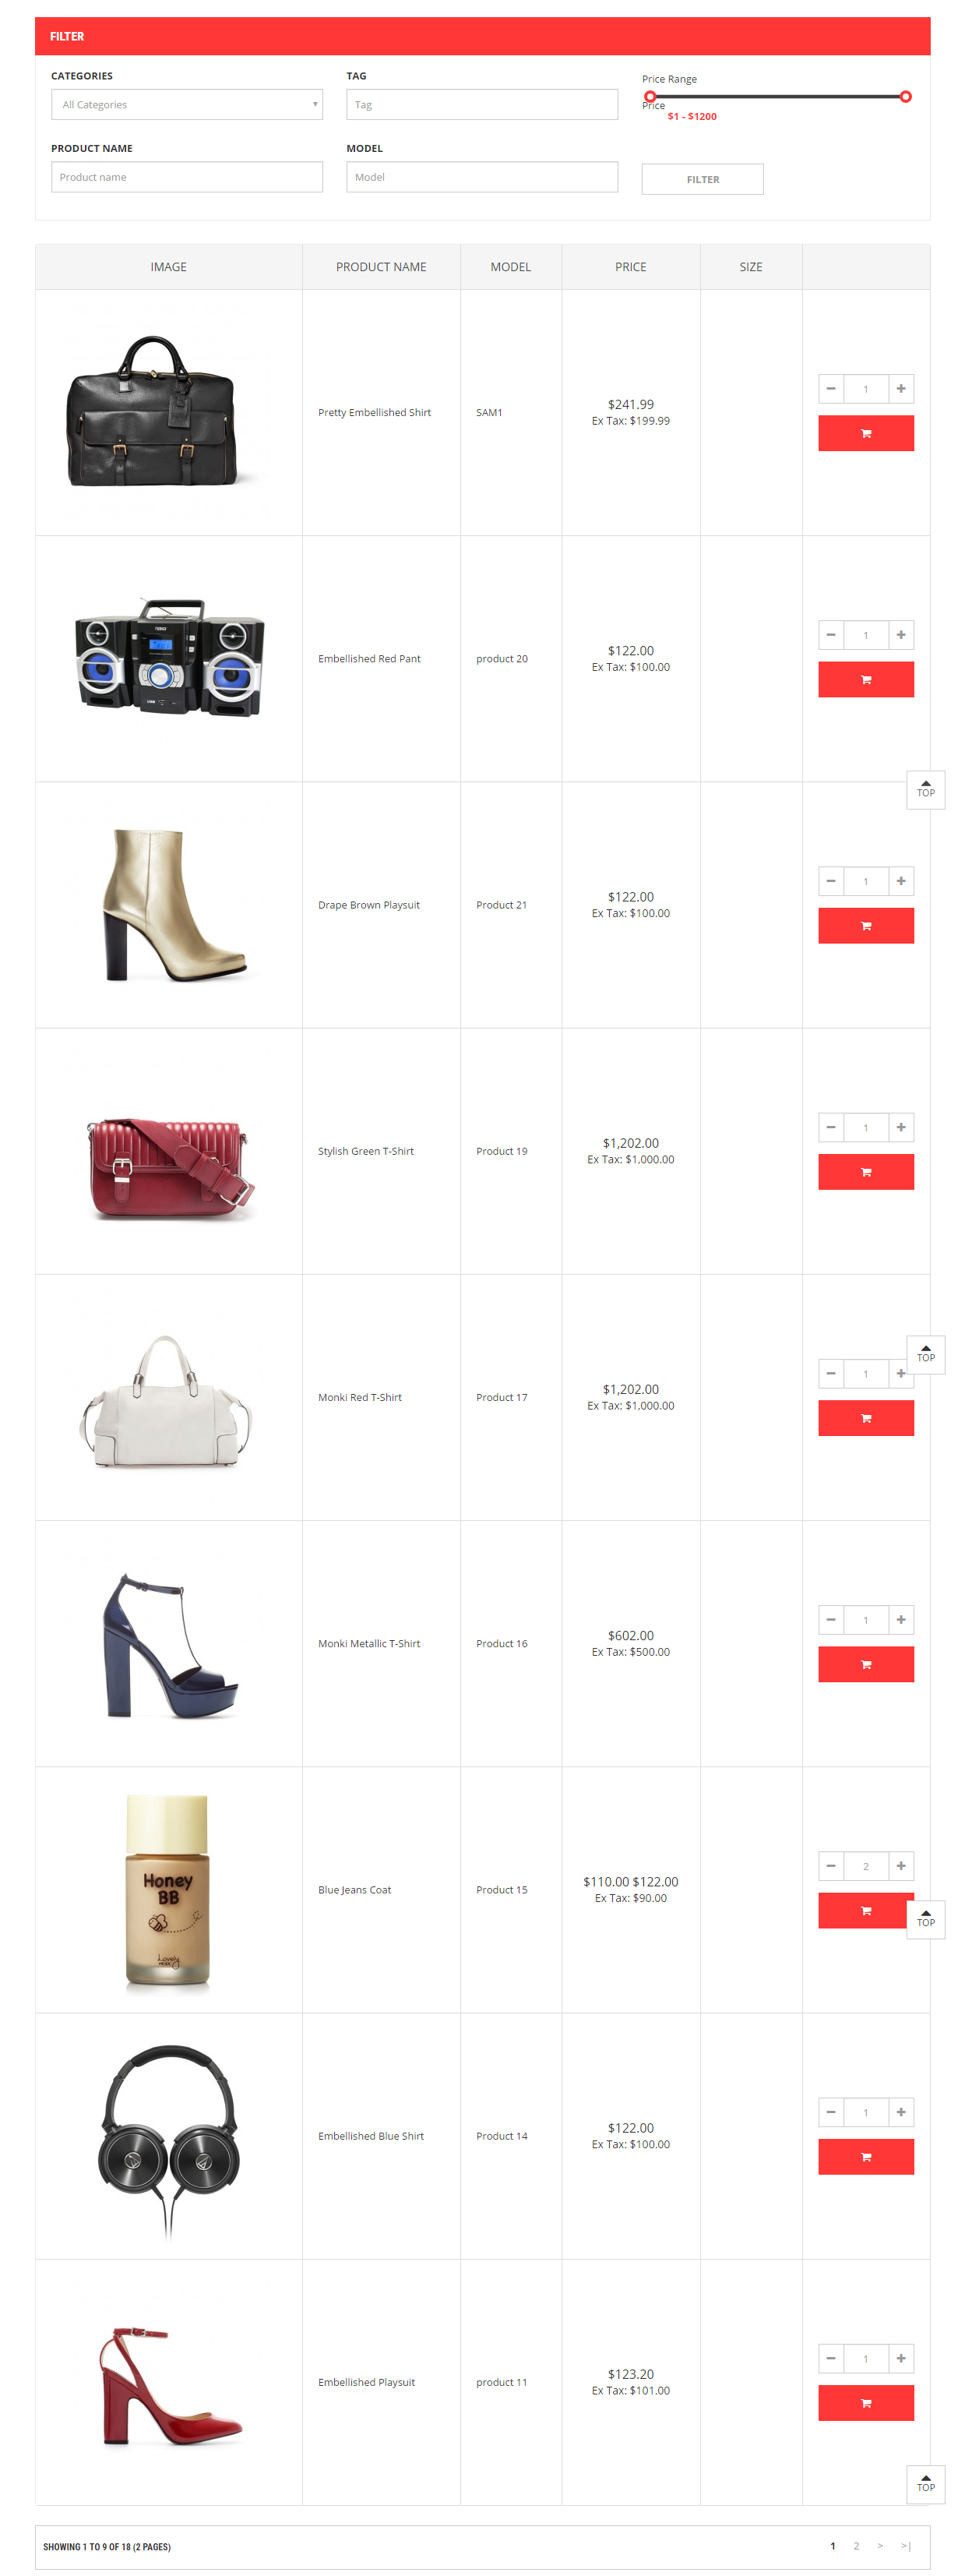
Front end
In back end, go to Extensions > Modules > Boss - Carousel > Edit
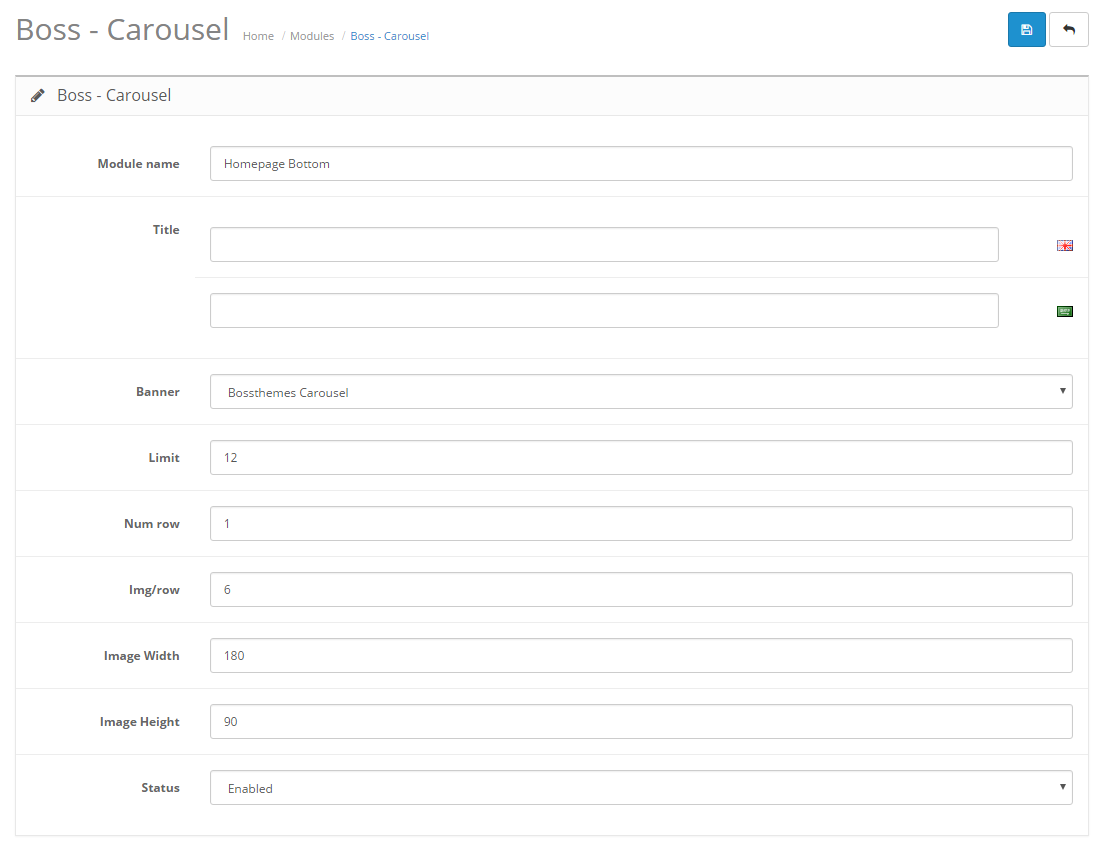
- 1Module Name: Write a name for this module
- 2Title: This is the title of this module that will appear in the front end. You can leave it empty if you don't need a title.
- 3Banner: Your banner bundle in Admin CP > Design > Banner.
- 4Limit: The maximum number of banners will be displayed.
- 5Num row: The number of row.
- 6Img/row: The number of image per row.
- 7Image Width: The width of images.
- 8Image Height: The height of images.
- 9Status: You can disable or enable this extension
Front end

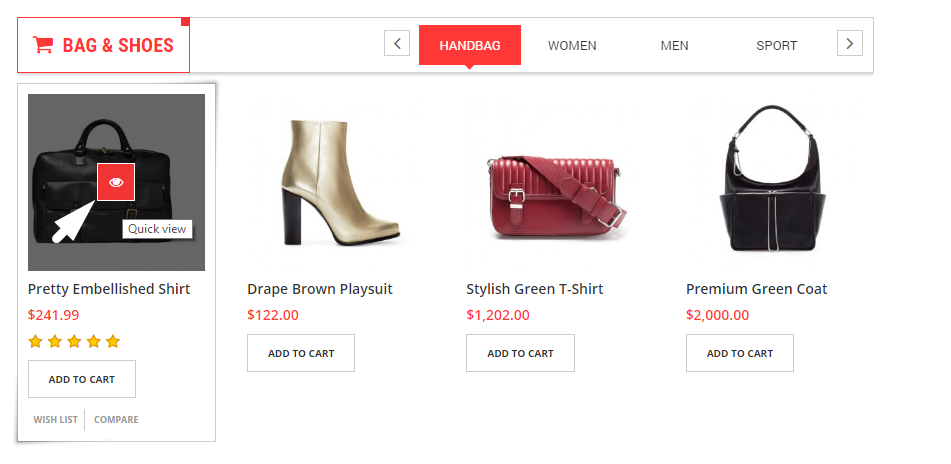
In back end, go to Extensions > Modules > Boss - Filter product > Edit
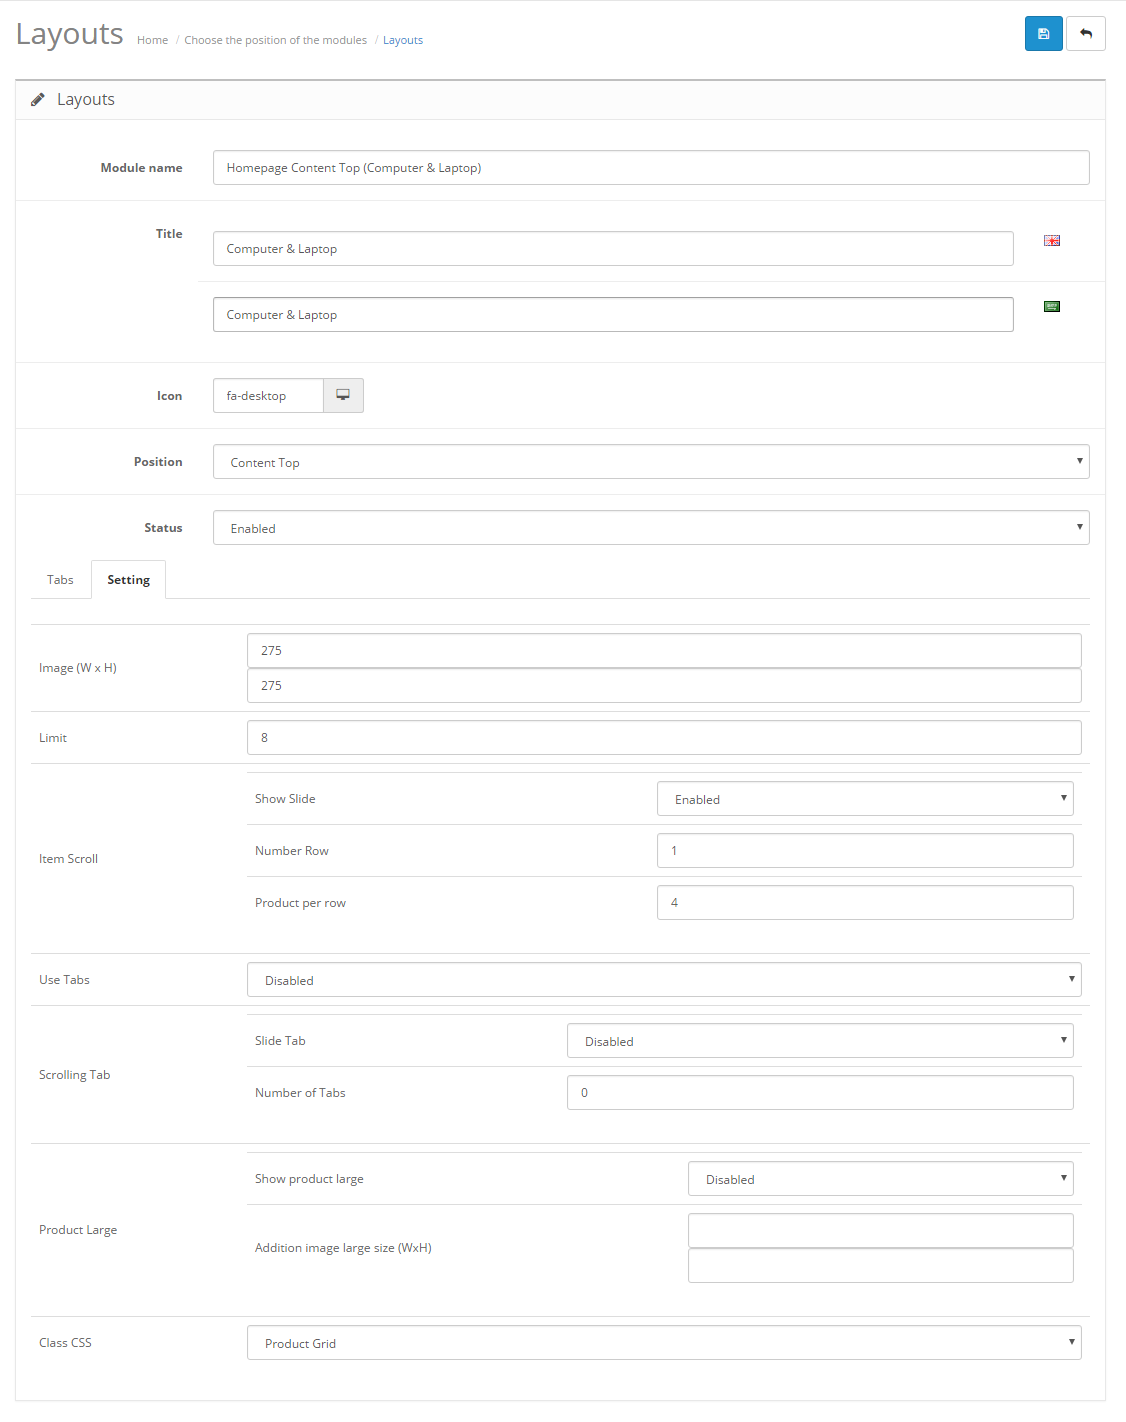
- 1Module Name: Write a name for this module
- 2Title: This is the title of this module that will appear in the front end. You can leave it empty if you don't need a title.
- 3Icon: This is the icon of this module that will appear near by the title.
- 4Image (W x H): The width and height of product images.
- 5Limit: The maximum number of products will be displayed.
- 6Item Scroll: Products slide function.
- 7Number Row: The number of row.
- 8Product per row: The number of product per row.
- 9Scrolling Tab: Tabs slide function.
- 10Product Large: Show the larger product you want your customers to pay attention to it.
- 11Class CSS: Show products by list or grid.
- 12Status: You can disable or enable this extension
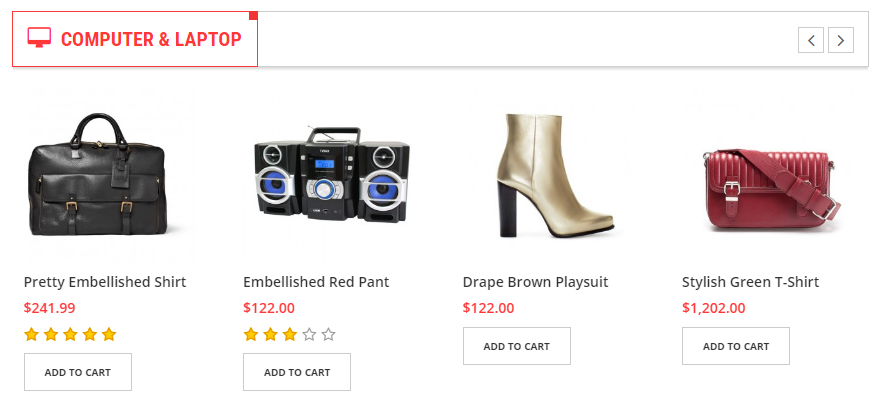
Front end
In back end, go to Extensions > Modules > Boss - Menu Category > Edit
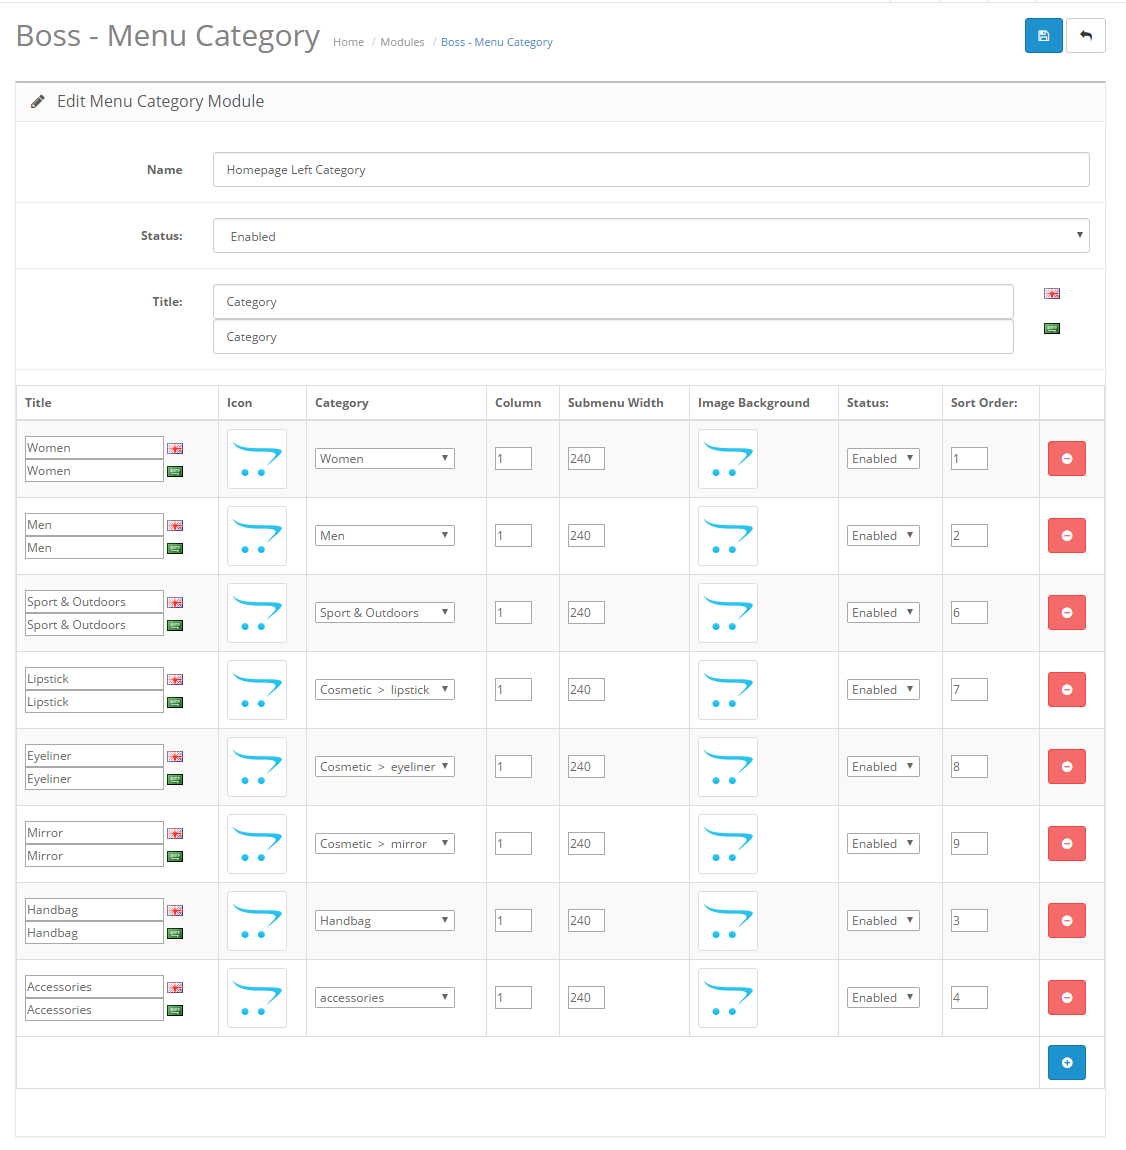
- 1Name: Write a name for this module
- 2Title: This is the title of this module that will appear in the front end. You can leave it empty if you don't need a title.
- 3Icon: This is the icon of this module that will appear near by the title.
- 4Image (W x H): The width and height of product images.
- 5Category: The category you want to display it's children categories.
- 6Column: The number of submenu column.
- 7Submenu Width: The width of submenu.
- 8Image Background: The background of submenu.
- 9Status: You can disable or enable this extension
Front end

In back end, go to Extensions > Modules > Boss - Boss - Refine Search > Edit
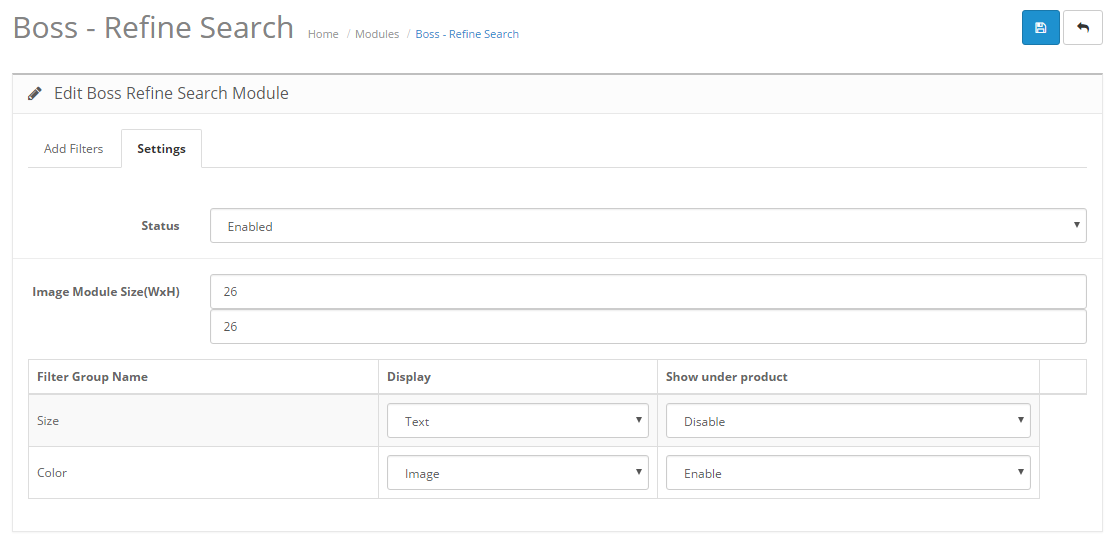
- 1Image Module Size(WxH): The width and height of filter images.
- 2Display: Display filter by text or image.
- 3Show under product: Show the value of filter in a product layout.
- 4Status: You can disable or enable this extension
Filter Groups
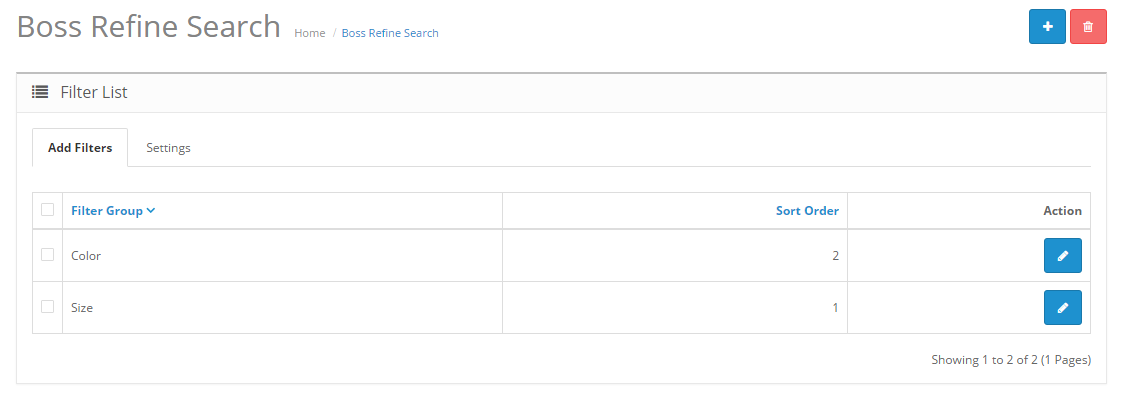
Filter Values
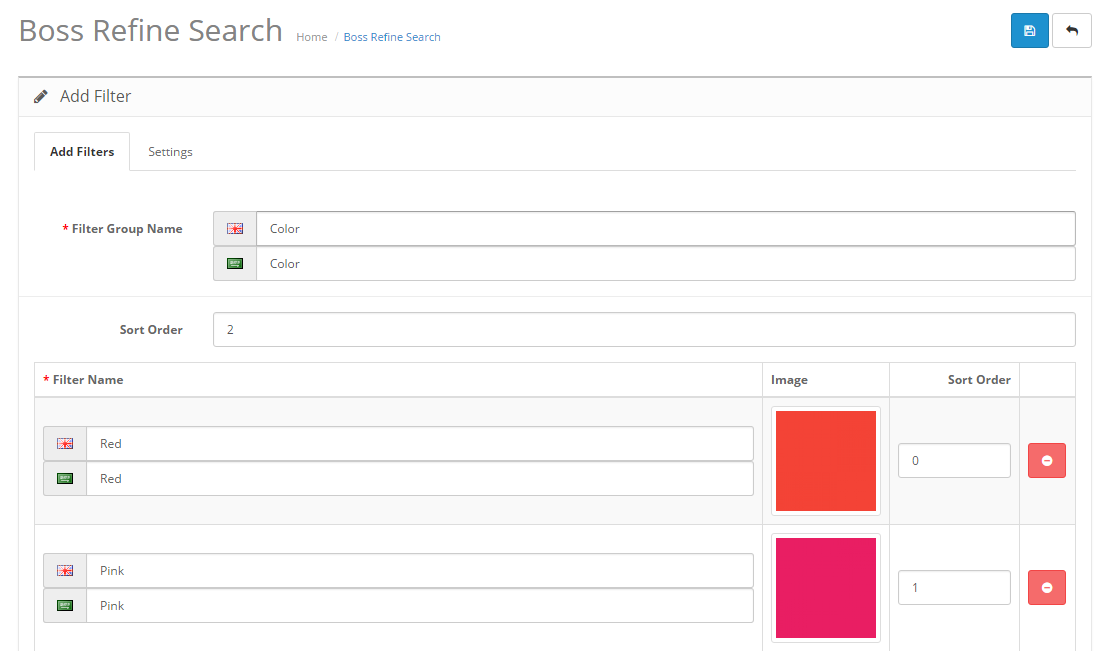
- 1Filter Group Name: The name of filter group.
- 2Filter Name: The name of filter items.
- 3Image: The image of filter items.
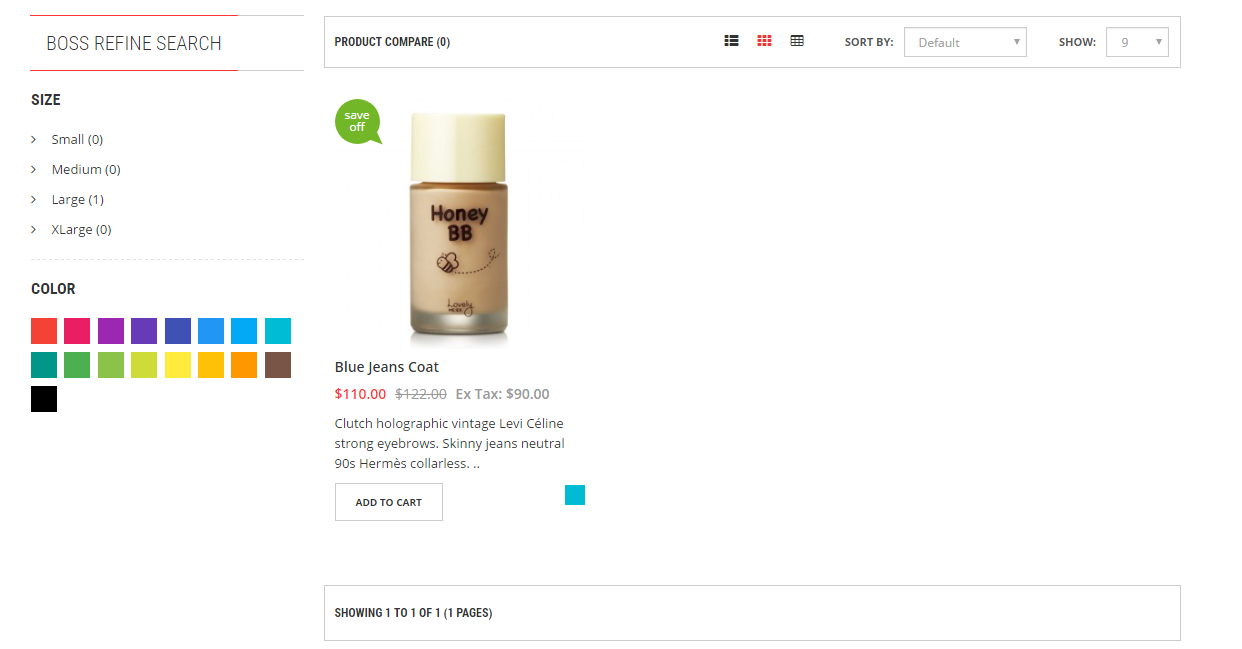
Front end
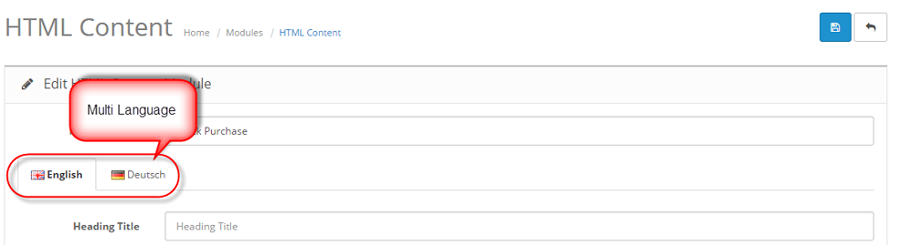
In back end, go to Extensions > Modules > HTML Content > Edit
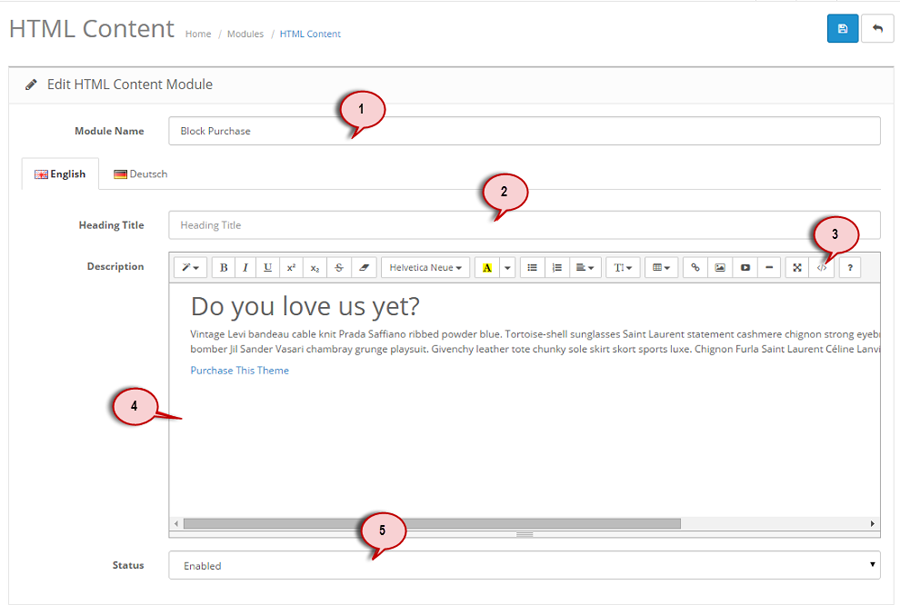
- 1Module Name: Write a name for this module
- 2Title: This is the title of this module that will appear in the front end. You can leave it empty if you don't need a title.
- 3Content: This is the HTML editor where you can add your custom content.
- 4Status: You can disable or enable this extension
- 5View Html: Click this button to view content off this block by html. you can add, edit, remove class or media (image, video...) at here.
Install Language
- You can found opencart language package here Opencart language package
- This is the link of instruction to install language of opencart. Instructions for language installation
- After installing new language please go to Boss - ... Module list -> edit -> add new language for title of this module then Save again -> reload and change language in front end.
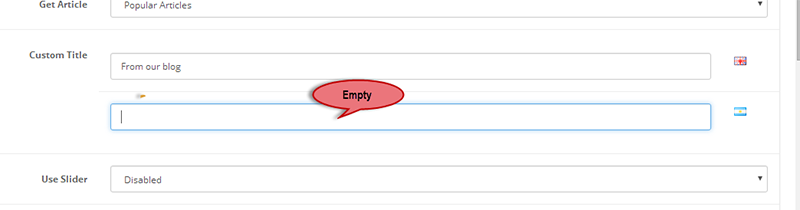
Boss - Modules for multi language
After you install new language, Please check all module and add title, description, ... for new language

You can read more about opencart Modification at Here